Renault Clio: Accelerator pedal: Removal - Refitting
VERSION WITHOUT ADAPTATION SUPPLEMENT
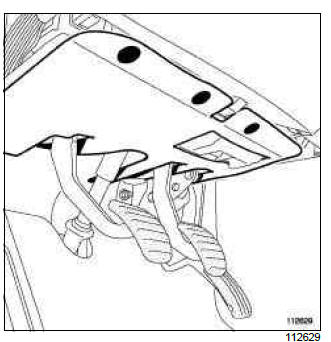
REMOVAL
I - REMOVAL PREPARATION OPERATION
- Remove:
- the retaining clips on the driver side dashboard lower trim,
- the driver side dashboard lower trim.
II - OPERATION FOR REMOVAL OF PART CONCERNED
- Disconnect the accelerator pedal potentiometer connector (1).
- Remove:
- the accelerator pedal mounting nuts (2),
- the accelerator pedal.
REFITTING
I - REFITTING OPERATION FOR PART CONCERNED
- Refit:
- the accelerator pedal,
- the accelerator pedal mounting nuts,
- Connect the accelerator pedal potentiometer connector.
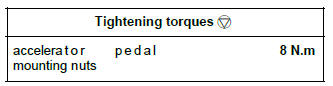
- Torque tighten the accelerator pedal mounting nuts (8 N.m).
II - FINAL OPERATION
- Refit:
- the driver's side dashboard lower trim,
- the retaining clips on the driver side dashboard lower trim,
SCHOOL VEHICLE
REMOVAL
I - REMOVAL PREPARATION OPERATION
- Disconnect the battery (see Battery: Removal - Refitting) (MR 392, 80A, Battery).
II - OPERATION FOR REMOVAL OF PART CONCERNED
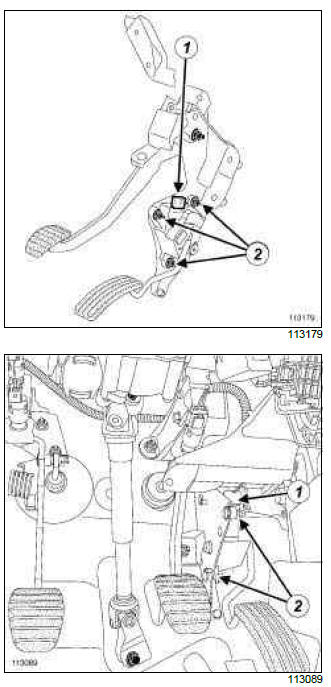
1 - student side
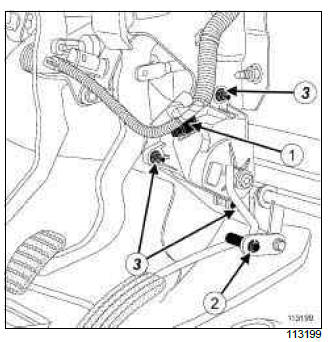
- Disconnect the accelerator pedal potentiometer connector (1).
- Remove:
- the circlip (2) from the accelerator pedal to the link bar connection control lever,
- the accelerator pedal bolts (3),
- the accelerator pedal.
2 - Instructor side
- Remove:
- the circlip (4) from the accelerator pedal to the link bar connection control lever,
- the accelerator pedal nut (5),
- the accelerator pedal shaft,
- the accelerator pedal.
REFITTING
I - REFITTING PREPARATIONS OPERATION
- Always replace the connecting circlips whenever they have been removed.
II - REFITTING OPERATION FOR PART CONCERNED
1 - student side
- Refit:
- the accelerator pedal,
- the accelerator pedal bolts (3),
- the circlip (2) from the accelerator pedal to the link bar connection control lever.
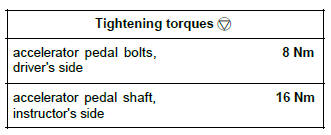
- Torque tighten the accelerator pedal bolts, driver's side (8 Nm).
- Connect the accelerator pedal potentiometer connector (1).
2 - instructor side
- Refit:
- the accelerator pedal,
- the accelerator pedal shaft,
- the accelerator pedal nut (5),
- the circlip (4) from the accelerator pedal to the link bar connection control lever.
- Torque tighten the accelerator pedal shaft, instructor's side (16 Nm).
III - FINAL OPERATION.
- Connect the battery (see Battery: Removal - Refitting) (MR 392, 80A, Battery).
Emergency brake assist: Function
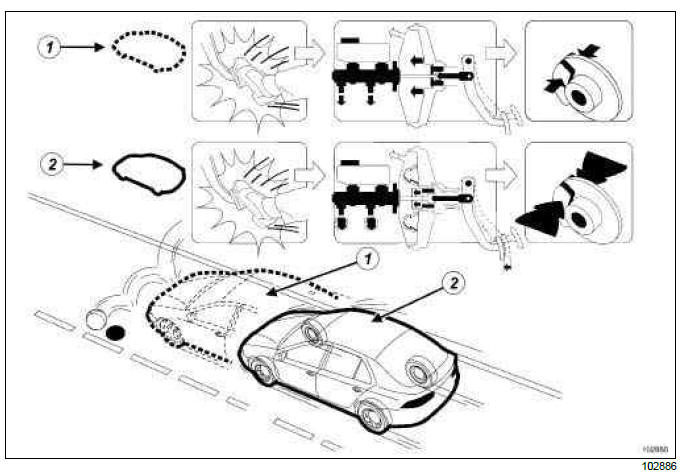
- Without emergency brake assist
- With emergency brake assist
Emergency brake assist is a system which supplements ABS.
Emergency brake assist enables the system to recognise the situation and act immediately to provide the best possible stopping distance.
Emergency braking is calculated according to how quickly the brake pedal is depressed; in this situation, braking assistance immediately reaches its maximum level of output.
The system works conditionally for current braking systems.
The emergency brake assist is a mechanical system built into the brake servo and completely independent of any electronic component.
The brake servo is fitted with a magnet which reacts by locking the control unit when the pedal is depressed sharply.
READ NEXT:
 Brake pedal: Removal - Refitting
SCHOOL VEHICLE
REMOVAL
I - REMOVAL PREPARATION OPERATION
Disconnect the battery (see Battery: Removal - Refitting)
(MR 392, 80A, Battery).
II - OPERATION FOR REMOVAL OF PART
CONCERNED
1 - student
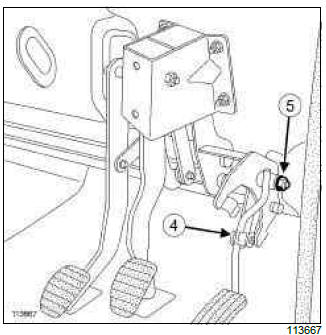
Brake pedal switch: Removal - Refitting
REMOVAL
I - REMOVAL PREPARATION OPERATION
Remove:
the retaining clips on the driver side dashboard
lower trim,
the driver side dashboard lower trim.
II - OPERATION FOR REMOVAL OF PART
CO
Brake compensator: Removal - Refitting
WITHOUT ANTI-LOCK BRAKING SYSTEM
REMOVAL
I - REMOVAL PREPARATION OPERATION
Position the vehicle on a two-post lift (see Vehicle:
Towing and lifting) (MR 392, 02A, Lifting equipment).
Fit the tool
SEE MORE:
Driving
The Renault Clio IV (2014-2019) offers a satisfying driving experience with its nimble handling and responsive performance. Its compact size and maneuverability make it well-suited for urban driving and tight parking spaces. The precise steering and suspension tuning provide a balanced and confident
Your comfort
The Renault Clio IV (2014-2019) is designed with your comfort in mind. It features a well-crafted interior with quality materials and thoughtful ergonomics. The seats offer excellent support and adjustability, providing a comfortable driving experience. The cabin is designed to minimize noise and vi
