Renault Clio: Air resonator: Removal - Refitting
K4M - F4R
REMOVAL
I - REMOVAL PREPARATION OPERATION
- Position the vehicle on a two-post lift (see Vehicle: Towing and lifting) (02A, Lifting equipment).
- Remove:
- the battery (see Battery: Removal - Refitting) (80A, Battery),
- the engine cover,
- the battery tray (see Battery tray: Removal - Refitting) (80A, Battery).
K4M, and 862
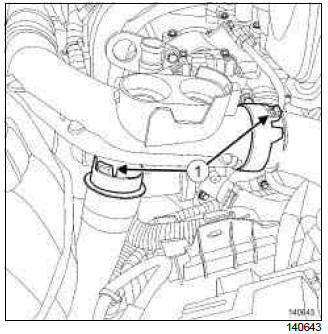
- Unclip the air inlet pipe from the air filter unit (1).
- Move aside the air filter unit air inlet pipe.
II - OPERATION FOR REMOVAL OF PART CONCERNED
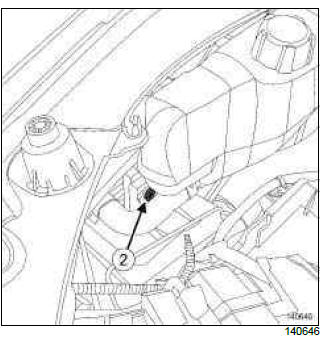
- Remove:
- the air resonator upper mounting (2),
- the air resonator.
REFITTING
I - REFITTING OPERATION FOR PART CONCERNED
- Refit:
- the air resonator,
- the air resonator upper mounting.
II - FINAL OPERATION
K4M, and 862
- Refit the air filter unit air inlet pipe.
- Refit:
- the battery tray (see Battery tray: Removal - Refitting) (80A, Battery),
- the air inlet duct,
- the engine cover,
- the battery (see Battery: Removal - Refitting) (80A, Battery).
M4R

Note: The vehicle has three air resonators.
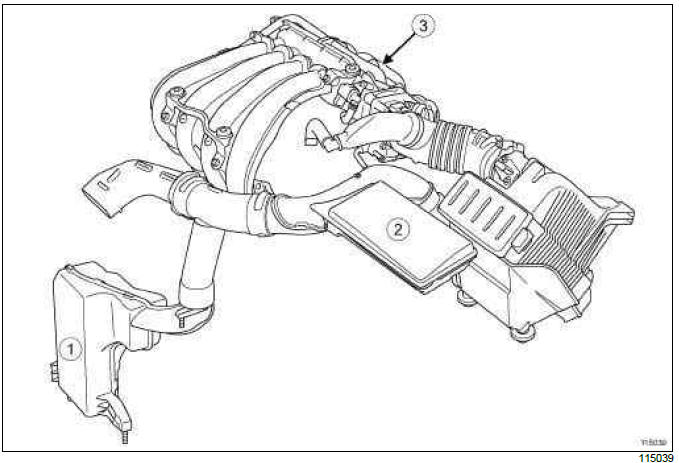
- Air resonator on front end panel
- Air resonator on battery
- Air resonator on inlet manifold
REMOVING THE AIR RESONATOR ON THE FRONT END PANEL
I - REMOVAL PREPARATION OPERATION
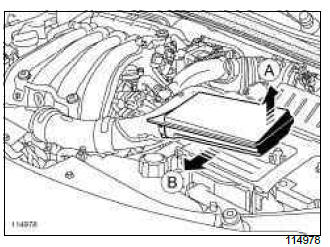
- Lift the air resonator (A) to remove it from the battery cover.
- Pull the air resonator towards the front of the vehicle (B) to remove it.
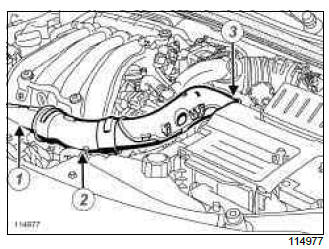
- Detach the air intake sleeve:
- from the front end panel at (1),
- from the air resonator on the front end panel at (2),
- from the air filter unit at (3).
- Remove the air intake sleeve.
- Remove the front bumper (see ) (MR 393, 55A, Exterior protection).
- Remove the frontal impact cross member (see ) (MR 393, 41A, Front lower structure).
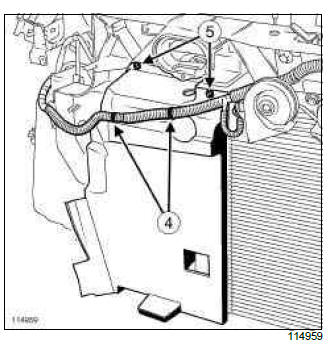
- Unclip the wiring harness at (4).
- Remove:
- plastic rivets (5),
- the air deflector.
II - REMOVAL OF PART CONCERNED
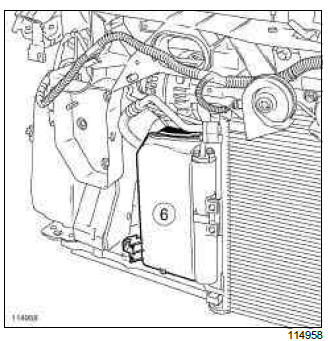
- Lift the air resonator on the front end panel (6) to remove it from the mountings.
- Remove the air resonator on the front end panel.
REFITTING THE AIR RESONATOR ON THE FRONT END PANEL
I - REFITTING PREPARATIONS OPERATION
- Check that there are three air resonator mountings on the front end panel.
II - REFITTING PART CONCERNED
- Refit the air resonator on the front end panel.
III - FINAL OPERATION.
- Refit the air deflector.
- Refit the frontal impact cross member (see ) (MR 393, 41A, Front lower structure).
- Refit the front bumper (see ) (MR 393, 55A, Exterior protection).
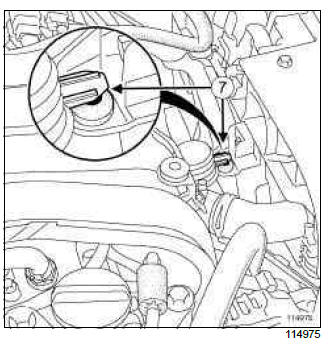
- Before refitting the air intake sleeve, check that the air resonator's upper mounting in the front end panel is correctly clipped at (7).
- Refit the air intake sleeve.
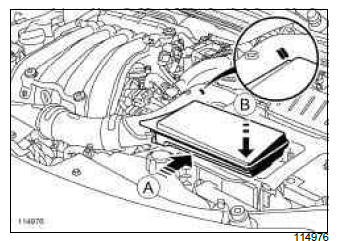
- Push the air resonator towards the rear of the vehicle (A) until the air resonator's rear face is located between the two marks on the air intake sleeve.
- Push the air resonator (B) to fit it onto the battery cover.
REMOVING THE AIR RESONATOR ON THE INLET MANIFOLD
I - REMOVAL PREPARATION OPERATION
- Remove the inlet manifold (see 12A, Fuel mixture, Inlet distributor: Removal - Refitting, 12A- 45).
II - REMOVAL OF PART CONCERNED
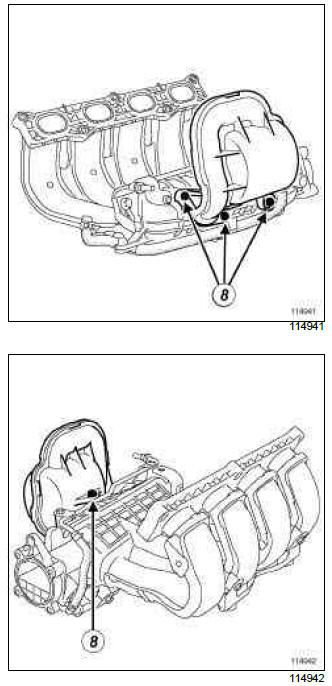
- Remove the mounting bolts (8) from the air resonator on the intake distributor.
REFITTING THE AIR RESONATOR ON THE INLET MANIFOLD
I - REFITTING PREPARATIONS OPERATION
- The O-ring of the air resonator on the inlet manifold must always be replaced.
II - REFITTING PART CONCERNED
- Torque tighten the air resonator mounting bolt on the intake distributor (11 Nm).
III - FINAL OPERATION.
- Refit the intake distributor (see 12A, Fuel mixture, Inlet distributor: Removal - Refitting, 12A- 45).
READ NEXT:
 Air filter: Removal - Refitting
D4F, and 740 or 742 or 764
REMOVAL
I - REMOVAL PREPARATION OPERATION
Remove the air filter unit (see 12A, Fuel mixture,
Air filter unit: Removal - Refitting, 12A-17).
II - OPERATION FOR REMOVAL OF
 Air filter unit: Removal - Refitting
D4F, and 740 or 742 or 764
REMOVAL
I - REMOVAL PREPARATION OPERATION
Apply pressure to (1).
Pull at (2).
Remove the air breather sleeve (3) from the front
end panel.
Undo the clip (4) mounti
 Air flowmeter: Removal - Refitting
K9K
REMOVAL
I - REMOVAL PREPARATION OPERATION
Disconnect the battery (see Battery: Removal - Refitting).
Loosen the clip (1) between the air duct and the air
flowmeter.
Disconnect the air flow
SEE MORE:
 Trim And Upholstery
Clio IV (2014-2019) offers a range of trim levels and upholstery options to suit individual preferences and style. The trim levels may vary, offering different levels of features and equipment. The upholstery options include a variety of fabrics and materials, providing comfort and durability. Depen
 K9K, and JH3 or JR5 or TL4
REMOVAL
I - REMOVAL PREPARATION OPERATION
Position the vehicle on a two-post lift (see Vehicle:
Towing and lifting) (02A, Lifting equipment).
Remove the front engine cover.
K9K, and 772
Discharge the pressure in the fuel supply circuit of
the exhaust fuel injector (see 19B, Exhaust, Exhaust
© 2016-2026 Copyright Renault Clio Owners Club

