Renault Clio: Brake servo non-return valve: Removal - Refitting
LEFT-HAND DRIVE
REMOVAL
I - REMOVAL PREPARATION OPERATION
K4J or K4M or K9K
- Remove the engine cover.
II - OPERATION FOR REMOVAL OF PART CONCERNED
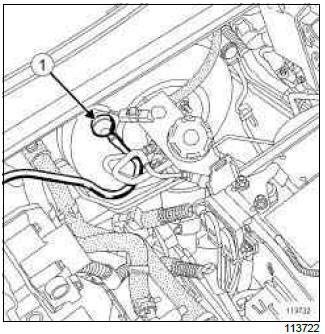
- Disconnect the non-return valve (1) at the servo.
- Pull and turn the non-return valve to release it from the rubber sealing washer.
K9K
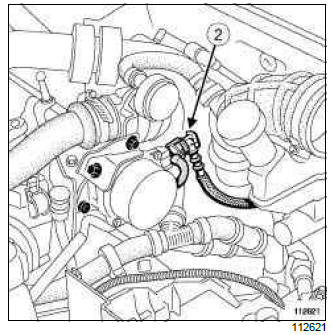
- Disconnect the non-return valve (2) at the vacuum pump.
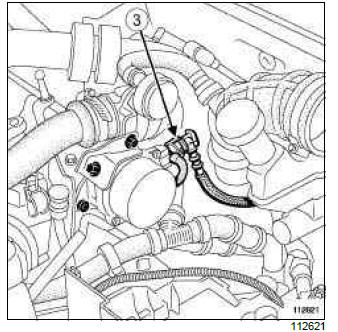
K4J or K4M
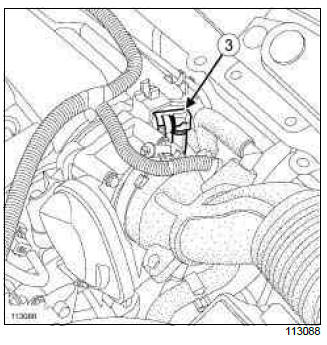
Note: Do not damage the vacuum tube on the plenum chamber. If it is damaged, the plenum chamber will have to be replaced.
- Disconnect the non-return valve (3) at the plenum chamber.
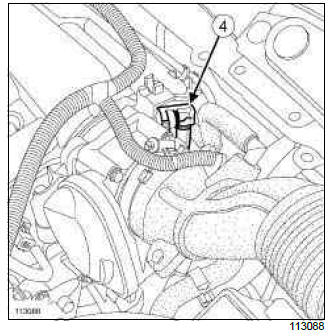
D4F
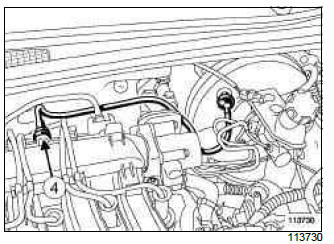
Note: Do not damage the vacuum tube on the plenum chamber. If it is damaged, the plenum chamber will have to be replaced.
- Disconnect the non-return valve (4) at the inlet manifold.
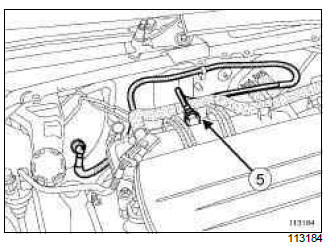
F4R
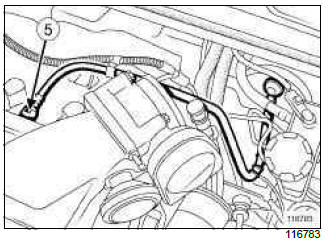
Note: Do not damage the vacuum tube on the plenum chamber. If it is damaged, the plenum chamber will have to be replaced.
- Disconnect the non-return valve (5) at the plenum chamber.
- Remove the non-return valve.
REFITTING
I - REFITTING PREPARATIONS OPERATION
- Check the condition of the sealing washer and the non-return valve.
- Replace any faulty parts.
II - REFITTING OPERATION FOR PART CONCERNED
- Refit the non-return valve.
K9K
- Connect the non-return valve at the vacuum pump,
D4F or F4R or K4J or K4M
- Connect the non-return valve at the inlet manifold.
- Connect the non-return valve on the servo,
III - FINAL OPERATION.
K4J or K4M or K9K
- Refit the engine cover.
RIGHT-HAND DRIVE
REMOVAL
I - REMOVAL PREPARATION OPERATION
K4J or K4M or K9K
- Remove the engine cover.
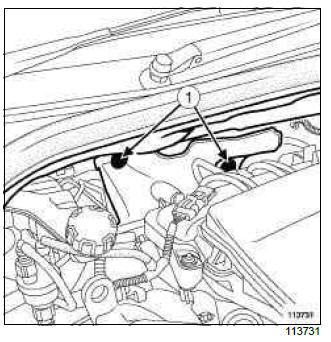
- Remove the soundproofing retaining clips (1).
- lift away the upper section of the soundproofing.
II - OPERATION FOR REMOVAL OF PART CONCERNED
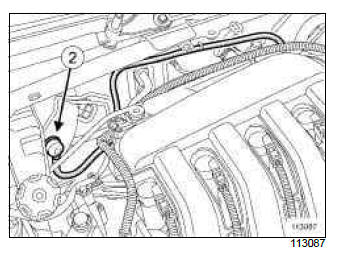
- Disconnect the non-return valve (2) at the servo,
- Pull and turn the non-return valve to release it from the rubber sealing washer.
K9K
- Disconnect the non-return valve (3) at the vacuum pump,
K4J or K4M
Note: Do not damage the vacuum tube on the plenum chamber. If it is damaged, the plenum chamber will have to be replaced.
- Disconnect the non-return valve (4) at the plenum chamber.
D4F
Note: Do not damage the vacuum tube on the plenum chamber. If it is damaged, the plenum chamber will have to be replaced.
- Disconnect the non-return valve (5) at the inlet manifold.
- Remove the non-return valve.
REFITTING
I - REFITTING PREPARATION OPERATION
- Check the condition of the rubber sealing washer and the non-return valve.
- Replace any faulty parts.
II - REFITTING OPERATION FOR PART CONCERNED
- Refit the non-return valve.
K9K
- Connect the non-return valve at the vacuum pump,
D4F or K4J or K4M
- Connect the non-return valve at the inlet manifold.
- Connect the non-return valve at the servo,
III - FINAL OPERATION
- Refit the upper section of the soundproofing.
- Refit the soundproofing retaining clips
K4J or K4M or K9K
- Refit the engine cover.
READ NEXT:
 K4J or K4M or K9K or M4R, and Left-hand Drive
REMOVAL
I - REMOVAL PREPARATION OPERATION
Position the vehicle on a two-post lift (see Vehicle:
Towing and lifting) (MR 392, 02A, Lifting equipment).
Remove:
the battery (see Battery: Remova
K9K, and Right-hand Drive
REMOVAL
I - REMOVAL PREPARATION OPERATION
Position the vehicle on a two-post lift (see Vehicle:
Towing and lifting) (MR 392, 02A, Lifting equipment).
Disconnect the battery (see Battery: Removal
SEE MORE:
Driving
The Renault Clio IV (2014-2019) offers a satisfying driving experience with its nimble handling and responsive performance. Its compact size and maneuverability make it well-suited for urban driving and tight parking spaces. The precise steering and suspension tuning provide a balanced and confident
Your comfort
The Renault Clio IV (2014-2019) is designed with your comfort in mind. It features a well-crafted interior with quality materials and thoughtful ergonomics. The seats offer excellent support and adjustability, providing a comfortable driving experience. The cabin is designed to minimize noise and vi
