Renault Clio: Coolant temperature sensor: Removal - Refitting
REMOVAL
I - REMOVAL PREPARATION OPERATION
- Disconnect the battery (see Battery: Removal - Refitting) (80A, Battery).
- Remove:
- the engine cover,
- the air intake sleeve.
II - OPERATION FOR REMOVAL OF PART CONCERNED
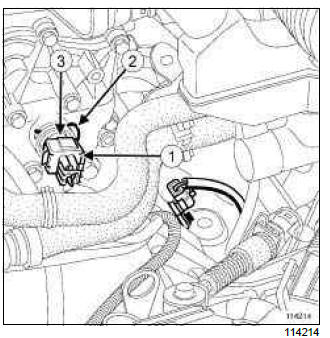
- Disconnect the coolant temperature sensor connector (1).
- Unclip the retaining clip (2) on the coolant temperature sensor.
- Remove the coolant temperature sensor (3).
REFITTING
I - REFITTING PREPARATION OPERATION
- Always replace the coolant temperature sensor O-ring.
II - REFITTING OPERATION FOR PART CONCERNED
- Refit the coolant temperature sensor.
- Secure the coolant temperature sensor with the retaining clip.
- Connect the coolant temperature sensor connector.
III - FINAL OPERATION
- Fill the cooling system (see 19A, Cooling, Cooling system: Draining - Refilling, 19A-16) (MR 392, 19A, Cooling).
- Connect the battery (see Battery: Removal - Refitting) (MR 392, 80A, Battery).
- Bleed the cooling system (see 19A, Cooling, Cooling system: Draining - Refilling, 19A-16) (MR 392, 19A, Cooling).
- Refit:
- the air intake sleeve,
- the engine cover.
K9K
REMOVAL
I - REMOVAL PREPARATION OPERATION
- Position the vehicle on a two-post lift (see Vehicle: Towing and lifting) (MR 392, 02A, Lifting equipment).
- Remove:
- the battery (see Battery: Removal - Refitting) (MR 392, 80A, Battery),
- the engine cover.
- Remove:
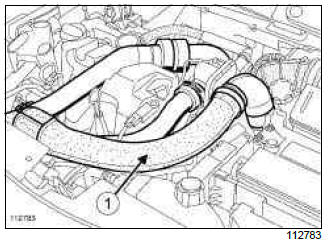
- the air filter inlet air pipe (1),
- the battery tray (see Battery tray: Removal - Refitting) (MR 392, 80A, Battery),
- the air filter unit (see 12A, Fuel mixture, Air filter unit: Removal - Refitting, 12A-17),
- the engine undertray.
- Drain the cooling system (see 19A, Cooling, Cooling system: Draining - Refilling, 19A-16) (MR 392, 19A, Cooling).
- Clean the cooling system (see 19A, Cooling, Cooling system: Draining - Refilling, 19A-16) (MR 392, 19A, Cooling).
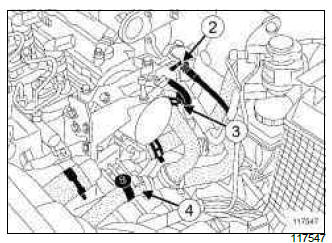
- Disconnect the vacuum pipe (2) from the vacuum pump.
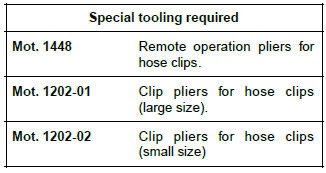
- Remove the clip (3) from the coolant hose using the (Mot. 1448) or (Mot. 1202-01) or (Mot. 1202-02).
- Disconnect the coolant hose.
- Unclip the coolant hose (4).
II - OPERATION FOR REMOVAL OF PART CONCERNED
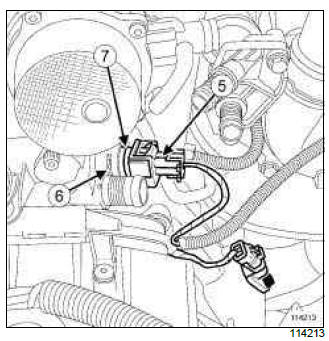
- Disconnect the coolant temperature sensor connector (5).
- Remove:
- the coolant temperature sensor retaining clip (6),
- the coolant temperature sensor (7),
- the coolant temperature sensor O-ring.
REFITTING
I - REFITTING PREPARATION OPERATION
- The coolant temperature sensor O-ring must always be replaced.
- Connect the coolant temperature sensor connector.
II - REFITTING OPERATION FOR PART CONCERNED
- Refit:
- the coolant temperature sensor,
- the coolant temperature sensor retaining clip.
III - FINAL OPERATION
- Connect the coolant hose.
- Fit the coolant hose clip using the (Mot. 1448) or (Mot. 1202-01) or (Mot. 1202-02).
- Clip the coolant hose.
- Connect the vacuum pipe to the vacuum pump.
- Refit:
- the engine undertray,
- the air filter unit (see 12A, Fuel mixture, Air filter unit: Removal - Refitting, 12A-17),
- the battery tray (see Battery tray: Removal - Refitting) (MR 392, 80A, Battery),
- the air filter inlet air pipe,
- the battery (see Battery: Removal - Refitting) (MR 392, 80A, Battery),
- Perform the following operations:
- fill the engine cooling system (see 19A, Cooling, Cooling system: Draining - Refilling, 19A- 16) (MR 392, 19A, Cooling),
- bleed the cooling system (see 19A, Cooling, Cooling system: Draining - Refilling, 19A-16) (MR 392, 19A, Cooling).
- Refit the engine cover.
D4F, and 740 or 742 or 764
REMOVAL
I - REMOVAL PREPARATION OPERATION
- Disconnect the battery (see Battery: Removal - Refitting).
- Remove the air filter unit (see 12A, Fuel mixture, Air filter unit: Removal - Refitting, 12A-17) (80A, Battery).
II - OPERATION FOR REMOVAL OF PART CONCERNED
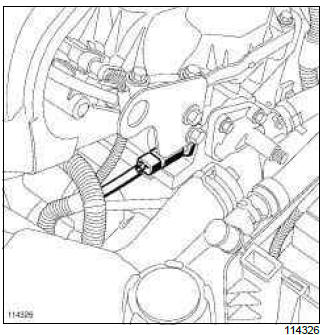
- Disconnect the coolant temperature sensor connector.
- Remove the coolant temperature sensor.
REFITTING
I - REFITTING PREPARATION OPERATION
- Always replace the coolant temperature sensor O-ring.
II - REFITTING OPERATION FOR PART CONCERNED
- Refit:
- the coolant temperature sensor O-ring,
- the coolant temperature sensor.
- Connect the coolant temperature sensor connector.
III - FINAL OPERATION
- Refit the air filter unit (see 12A, Fuel mixture, Air filter unit: Removal - Refitting, 12A-17).
- Fill the cooling system (see 19A, Cooling, Cooling system: Draining - Refilling, 19A-16) (MR 392, 19A, Cooling).
- Connect the battery (see Battery: Removal - Refitting) (80A, Battery).
- Bleed the cooling system (see 19A, Cooling, Cooling system: Draining - Refilling, 19A-16) (MR 392, 19A, Cooling).
F4R

REMOVAL
I - REMOVAL PREPARATION OPERATION
- Position the vehicle on a two-post lift (see Vehicle: Towing and lifting) (MR 392, 02A, Lifting equipment).
- Disconnect the battery (see Battery: Removal - Refitting) (MR 392, 80A, Battery).
- Remove the engine undertray.
- Perform the following operations:
- drain the cooling system (see 19A, Cooling, Cooling system: Draining - Refilling, 19A-16),
- flush out the cooling system (see 19A, Cooling, Cooling system: Draining - Refilling, 19A- 16).
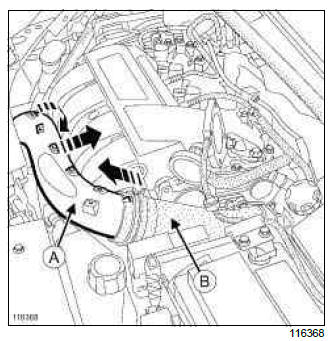
- Remove the air inlet duct (A) :
- unclip it from the front end panel,
- turn it and disconnect it.
- Disconnect the duct (B) :
- air resonator side,
- air filter unit side.
- Remove:
- the battery (see Battery: Removal - Refitting) (MR 392, 80A, Battery),
- the battery tray (see Battery tray: Removal - Refitting) (MR 392, 80A, Battery).
- Unclip the breather pipe from the gearbox.
II - OPERATION FOR REMOVAL OF PART CONCERNED
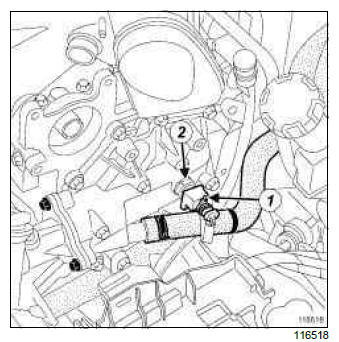
- Disconnect the coolant temperature sensor connector (1).
- Remove the coolant temperature sensor (2).
REFITTING
I - REFITTING OPERATION FOR PART CONCERNED
- Refit the coolant temperature sensor fitted with a new seal.
- Tighten to torque the coolant temperature sensor (33 N.m).
- Connect the coolant temperature sensor connector.
II - FINAL OPERATION
- Clip the breather pipe to the gearbox.
- Connect the duct (B) :
- to air filter unit,
- to the air resonator.
- Refit:
- the air inlet duct (A),
- the battery tray (see Battery tray: Removal - Refitting) (MR 392, 80A, Battery),
- the battery (see Battery: Removal - Refitting) (MR 392, 80A, Battery).
- Connect the battery ( (see Battery: Removal - Refitting) (MR 392, 80A, Battery).
- Perform the following operations:
- fill the cooling system (see 19A, Cooling, Cooling system: Draining - Refilling, 19A-16) (MR 392, 19A, Cooling),
- bleed the cooling system (see 19A, Cooling, Cooling system: Draining - Refilling, 19A-16) (MR 392, 19A, Cooling).
- Check that there are no leaks.
- Refit the engine undertray.
D4F, and 784 or 786

REMOVAL
I - REMOVAL PREPARATION OPERATION
- Position the vehicle on a two-post lift (see Vehicle: Towing and lifting) (MR 392, 02A, Lifting equipment).
- Disconnect the battery (see Battery: Removal - Refitting) (MR 392, 80A, Battery).
- Remove:
- the engine undertray,
- the engine cover,
- the throttle valve (see 12A, Fuel mixture, Throttle valve: Removal - Refitting, 12A-33).
- Drain the cooling system (see 19A, Cooling, Cooling system: Draining - Refilling, 19A-16) (MR 392, 19A, Cooling).
II - OPERATION FOR REMOVAL OF PART CONCERNED
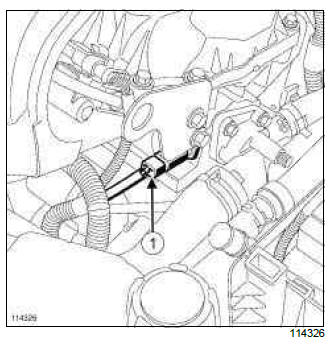
- Disconnect the coolant temperature sensor connector (1).
- Remove the coolant temperature sensor.
- Remove:
- the coolant temperature sensor,
- the coolant temperature sensor O-ring.
REFITTING
I - REFITTING PREPARATION OPERATION
- Always replace the coolant temperature sensor O-ring.
II - REFITTING OPERATION FOR PART CONCERNED
- Refit:
- the coolant temperature sensor O-ring,
- the coolant temperature sensor.
- Torque tighten the coolant temperature sensor (23 N.m).
- Connect the coolant temperature sensor connector.
III - FINAL OPERATION
- Refit:
- the throttle valve (see 12A, Fuel mixture, Throttle valve: Removal - Refitting, 12A-33),
- the engine cover.
- Connect the battery (see ) (MR 392, 80A, Battery).
- Fill and bleed the cooling system (see 19A, Cooling, Cooling system: Draining - Refilling, 19A-16) (MR 392, 19A, Cooling).
- Refit the engine undertray.

