Renault Clio: Engine cooling fan assembly: Removal - Refitting
K9K
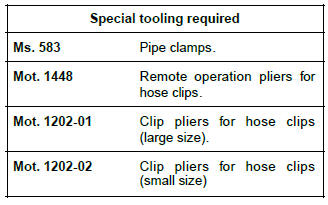
REMOVAL
I - REMOVAL PREPARATION OPERATION
- Position the vehicle on a two-post lift (see Vehicle: Towing and lifting) (MR 392, 02A, Lifting equipment).
- Remove:
- the engine cover,
- the battery (see Battery: Removal - Refitting) (MR 392, 80A, Battery).
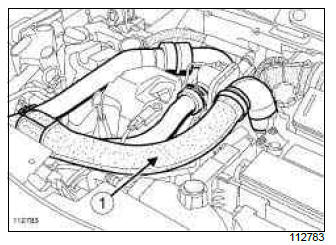
- Remove:
- the air filter inlet air pipe (1),
- the battery tray (see Battery tray: Removal - Refitting) (MR 392, 80A, Battery),
- the front section of the front wheel arch liners (see Front wheel arch liner: Removal - Refitting) (MR 393, 55A, Exterior protection),
- the front bumper (see Front bumper: Removal - Refitting) (MR 393, 55A, Exterior protection).
- Fit a hose clamp (Ms. 583) to the expansion bottle top hose.
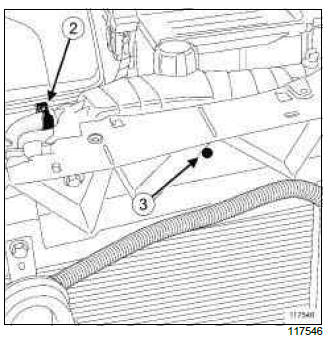
- Open the clip (2) on the expansion bottle top hose using the (Mot. 1448) or (Mot. 1202-01) or (Mot. 1202-02).
- Disconnect the expansion bottle top hose.
- Remove the clip (3) from the expansion bottle.
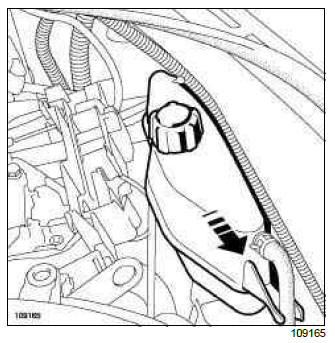
- Remove the expansion bottle, following the direction of the arrow.
- Unclip the wiring harness of the turbocharger solenoid valve on the fan assembly.
- Remove the engine undertray.
- Disconnect the motor-driven fan assembly connectors.
- Unclip the fan assembly wiring harness.
- Unclip the coolant bottom hose.
II - OPERATION FOR REMOVAL OF PART CONCERNED
- Remove the blower unit.
REFITTING
I - REFITTING OPERATION FOR PART CONCERNED
- Refit the blower unit.
II - FINAL OPERATION.
- Clip the coolant bottom hose.
- Clip the fan assembly wiring harness.
- Connect the fan assembly connectors.
- Refit the engine undertray.
- Clip the wiring harness of the turbocharger solenoid valve on the fan assembly.
- Position the expansion bottle.
- Refit the clip to the expansion bottle.
- Connect the expansion bottle top hose.
- Fit the expansion bottle top hose clip using the (Mot.1448) or (Mot. 1202-01) or (Mot. 1202-02).
- Remove the hose clamp (Ms. 583) on the expansion bottle top hose.
- Refit:
- the front bumper (see Front bumper: Removal - Refitting) (MR 393, 55A, Exterior protection),
- the front section of the front wheel arch liners (see Front wheel arch liner: Removal - Refitting) (MR 393, 55A, Exterior protection),
- the battery tray (see Battery tray: Removal - Refitting) (MR 392, 80A, Battery),
- the air filter inlet air pipe,
- the battery (see Battery: Removal - Refitting) (MR 392, 80A, Battery),
- the engine cover.
D4F, and 740 or 742 or 764
REMOVAL
I - REMOVAL PREPARATION OPERATION
- Position the vehicle on a two-post lift (see Vehicle: Towing and lifting) (MR 392, 02A, Lifting equipment).
- Disconnect the battery (see Battery: Removal - Refitting) (MR 392, 80A, Battery).
- Remove the engine undertray.
STANDARD HEATING
- Disconnect the motor-driven fan assembly connectors.
- Unclip the fan assembly wiring.
- Remove the electrical earth from the gearbox.
AIR CONDITIONING
- Remove the front bumper (see Front bumper: Removal - Refitting) (MR 393, 55A, Exterior protection).
- Disconnect:
- the pressure switch connector,
- the fan assembly connectors.
- Unclip the fan assembly wiring.
- Remove the electrical earth from the gearbox.
- Attach the cooling radiator assembly.
- Remove the radiator mounting cross member (see Radiator mounting cross member: Removal - Refitting) (MR 393, 41A, Front lower structure).
- Separate the fan assembly from the cooling radiator.
II - OPERATION FOR REMOVAL OF PART CONCERNED
- Remove the blower unit.
REFITTING
I - REFITTING OPERATION FOR PART CONCERNED
- Refit the fan assembly.
II - FINAL OPERATION.
STANDARD HEATING
- Refit the electrical earth to the gearbox.
- Clip the fan assembly wiring.
- Connect the motor-driven fan assembly connectors.
AIR CONDITIONING
- Refit the radiator mounting cross member (see Radiator mounting cross member: Removal - Refitting) (MR 393, 41A, Front lower structure).
- Detach the cooling radiator assembly.
- Refit the electrical earth to the gearbox.
- Clip the fan assembly wiring.
- Connect:
- the engine cooling fan assembly connectors,
- the pressostat connector.
- Refit the front bumper (see Front bumper: Removal - Refitting) (MR 393, 55A, Exterior protection).
- Refit the engine undertray.
- Connect the battery (see Battery: Removal - Refitting).
F4R or K4J or K4M

IMPORTANT
The circuits are designed to be pressurised, so be careful at high temperatures (risk of serious burns).
Do not remove the cap from the expansion bottle while the engine is hot. Take care when carrying out a repair under the bonnet, as the radiator fan(s) may start to operate without warning.
Do not open the bleed screw(s) with the engine running.
REMOVAL
I - REMOVAL PREPARATION OPERATION
- Position the vehicle on a two-post lift (see Vehicle: Towing and lifting) (MR 392, 02A, Lifting equipment).
- Remove:
- the battery (see Battery: Removal - Refitting) (MR 392, 80A, Battery),
- the air inlet duct,
- the battery tray (see Battery tray: Removal - Refitting) (MR 392, 80A, Battery).
- Fit a hose clamp to the expansion bottle degassing hose.
- Remove
- the expansion bottle degassing hose clip using the (Mot. 1448),
- the expansion bottle degassing hose.
- Remove the expansion bottle.
- Unclip the air resonator upper clip.
- Attach the cooling radiator assembly to the front end panel.
- Remove:
- the air resonator,
- the left and right-hand wheel arch liners (see MR 393 Bodywork, 55A, Exterior protection, Front wheel arch liners: Removal - Refitting),
- the front bumper (see Front bumper: Removal - Refitting) (MR 393, 55A, Exterior protection),
- the radiator mounting cross member (see Radiator mounting cross member: Removal - Refitting) (MR 393, 41A, Front lower structure).
- Disconnect the motor-driven fan assembly connectors.
- Unclip the wiring harness on the motor-driven fan assembly.
- Remove the electrical earth from the gearbox.
- Remove the bottom hose on the motor-driven fan assembly.
II - OPERATION FOR REMOVAL OF PART CONCERNED
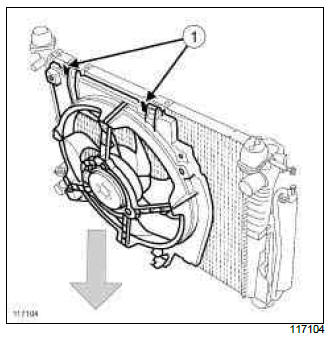
- Move the brackets (1) apart.
- Lower the motor-driven fan assembly in the direction of the arrow.
REFITTING
I - REFITTING OPERATION FOR PART CONCERNED
- Position the motor-driven fan assembly.
- Clip the retaining brackets.
II - FINAL OPERATION.
- Refit the bottom hose onto the motor-driven fan assembly.
- Refit the electrical earth to the gearbox.
- Clip the wiring harness onto the motor-driven fan assembly.
- Connect the motor-driven fan assembly connectors.
- Refit:
- the radiator mounting cross member (see Radiator mounting cross member: Removal - Refitting) (MR 393, 41A, Front lower structure),
- the front bumper (see Front bumper: Removal - Refitting) (MR 393, 55A, Exterior protection),
- the front wheel arch liners (see Front wheel arch liner: Removal - Refitting) (MR 393, 55A, Exterior protection),
- the air resonator.
- Detach the cooling radiator assembly from the front end panel.
- Clip the air resonator upper clip.
- Refit:
- the expansion bottle,
- the expansion bottle degassing hose,
- the expansion bottle degassing hose clip using the (Mot. 1448).
- Remove the hose clamp from the expansion bottle degassing hose.
- Refit:
- the battery tray (see Battery tray: Removal - Refitting) (MR 392, 80A, Battery),
- the air inlet duct,
- the battery (see Battery: Removal - Refitting) (MR 392, 80A, Battery).
- Check that the engine cooling fan is operating correctly.
M4R
REMOVAL
I - REMOVAL PREPARATION OPERATION
- Position the vehicle on a two-post lift (see Vehicle: Towing and lifting) (MR 392, 02A, Lifting equipment).
- Disconnect the battery (see Battery: Removal - Refitting) (MR 392, 80A, Battery).
- Remove:
- the engine undertray,
- the front bumper (see Front bumper: Removal - Refitting) (MR 393, 55A, Exterior protection),
- the frontal impact cross member (see Front impact cross member: Removal - Refitting) (MR 393, 41A, Front lower structure),
- the front end panel air resonator (see 12A, Fuel mixture, Air resonator: Removal - Refitting, 12A-10).
- Disconnect:
- the pressostat connector,
- the fan assembly connectors.
- Unclip the wiring harness from the fan assembly.
- Attach the cooling radiator assembly.
- Remove the radiator mounting cross member (see Radiator mounting cross member: Removal - Refitting) (MR 393, 41A, Front lower structure).
- Separate the fan assembly from the cooling radiator.
II - OPERATION FOR REMOVAL OF PART CONCERNED
- Remove the blower unit.
REFITTING
I - REFITTING OPERATION FOR PART CONCERNED
- Refit the blower unit.
II - FINAL OPERATION.
- Refit the radiator mounting cross member (see Radiator mounting cross member: Removal - Refitting) (MR 393, 41A, Front lower structure).
- Detach the cooling radiator assembly.
- Refit the electrical earth to the gearbox.
- Clip the fan assembly wiring.
- Connect:
- the engine cooling fan assembly connectors,
- the pressostat connector.
- Refit:
- the front end panel air resonator (see 12A, Fuel mixture, Air resonator: Removal - Refitting, 12A-10),
- the frontal impact cross member (see Front impact cross member: Removal - Refitting) (MR 393, 41A, Front lower structure),
- the front bumper (see Front bumper: Removal - Refitting) (MR 393, 55A, Exterior protection),
- the engine undertray.
- Refit the engine undertray.
- Connect the battery (see Battery: Removal - Refitting) (MR 392, 80A, Battery).
D4F, and 784 or 786

REMOVAL
I - REMOVAL PREPARATION OPERATION
- Position the vehicle on a two-post lift (see Vehicle: Towing and lifting) (MR 392, 02A, Lifting equipment).
- Disconnect the battery (see ) (MR 392, 80A, Battery).
- Remove:
- the engine undertray,
- the front bumper (see Front bumper: Removal - Refitting) (MR 393, 55A, Exterior protection).
- Disconnect:
- the pressostat connector,
- the fan assembly connectors.
- Unpick the blower unit harness.
- Remove the earth cable from the gearbox.
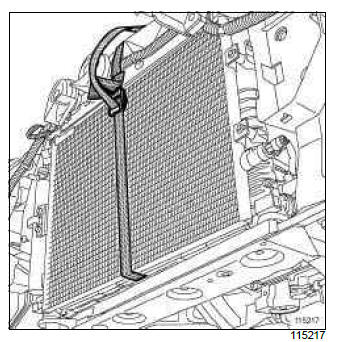
- Attach the cooling radiator assembly using a safety strap(s).
- Remove the radiator mounting cross member (see Radiator mounting cross member: Removal - Refitting) (MR 393, 41A, Front lower structure).
II - OPERATION FOR REMOVAL OF PART CONCERNED
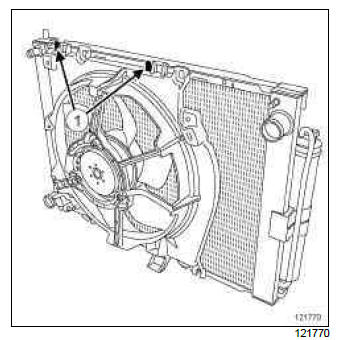
- Remove the tabs (1).
- Remove the motor-driven fan assembly from underneath.
REFITTING
I - REFITTING OPERATION FOR PART CONCERNED
- Refit the blower unit.
- Clip the tabs into place.
II - FINAL OPERATION.
- Refit the radiator mounting cross member (see Radiator mounting cross member: Removal - Refitting) (MR 393, 41A, Front lower structure).
- Remove the safety strap(s).
- Refit the earth cable on the gearbox.
- Clip the blower unit wiring harness.
- Connect:
- the pressostat connector,
- the fan assembly connectors.
- Refit:
- the front bumper (see Front bumper: Removal - Refitting) (MR 393, 55A, Exterior protection),
- the engine undertray.
- Connect the battery (see ) (MR 392, 80A, Battery).

