Renault Clio: Crankshaft position sensor: Removal - Refitting
K9K, and 764 or 766 or 768
REMOVAL
I - REMOVAL PREPARATION OPERATION
- Position the vehicle on a two-post lift (see Vehicle: Towing and lifting).
- Disconnect the battery (see Battery: Removal - Refitting).
- Remove the engine undertray.
II - OPERATION FOR REMOVAL OF PART CONCERNED

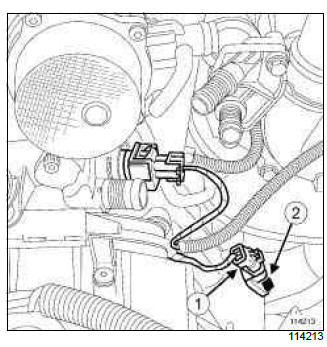
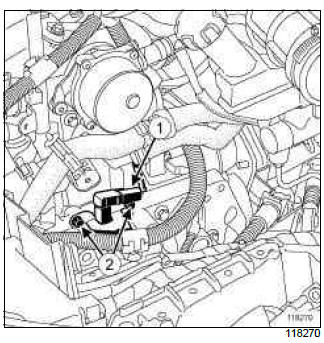
- Disconnect the connector (1) from the engine speed and position sensor.
- Remove the engine speed and position sensor (2).
REFITTING
I - REFITTING OPERATION FOR PART CONCERNED
- Refit the engine speed and position sensor.
- Connect the engine speed and position sensor connector.
II - FINAL OPERATION
- Refit the engine undertray.
- Connect the battery (see Battery: Removal - Refitting).
K9K, and 750 or 752
REMOVAL
I - REMOVAL PREPARATION OPERATION
- Remove the air filter unit air inlet pipe.
II - OPERATION FOR REMOVAL OF PART CONCERNED

- Disconnect the connector (1) from the engine speed and position sensor.
- Remove:
- the engine speed and position sensor bolts (2),
- the engine speed and position sensor.
REFITTING
I - REFITTING OPERATION FOR PART CONCERNED
- Refit:
- the speed and position sensor,
- the engine speed and position sensor bolts.
- Connect the engine speed and position sensor connector.
II - FINAL OPERATION
- Refit the air filter unit air inlet pipe.
READ NEXT:
 Pre-postheating unit: Removal - Refitting
K9K
REMOVAL
I - REMOVAL PREPARATION OPERATION
Remove:
the battery (see Battery: Removal - Refitting),
the battery tray (see Battery tray: Removal - Refitting)
(MR 392, 80A, Battery).
II
 Heater plugs: Removal - Refitting
K9K, and 764 or 772
REMOVAL
I - REMOVAL PREPARATION OPERATION
Remove the air filter box inlet air pipe (1).
Remove the turbocharger outlet air pipe retaining pins (2).
Remove:
the turbochar
SEE MORE:
 Rear Upper Structure
Rear wing panel: General description
Note:
The information contained in the following
describes the general repair procedure for all vehicles
having the same design for this part.
Before reading the following general information,
make sure that there are no special notes associated
with the vehicle
 Anti-lock braking system
(ABS)
Under heavy braking, the ABS prevents
the wheels from locking, allowing the
stopping distance to be managed and
keeping control of the vehicle.
Under these circumstances, the vehicle
can be steered to avoid an obstacle
whilst braking. In addition, this system
can increase stopping distances
© 2016-2026 Copyright Renault Clio Owners Club

