Renault Clio: Crankshaft seal, gearbox end: Removal - Refitting
K9K

REMOVAL
I - REMOVAL PREPARATION OPERATION
- Position the vehicle on a two-post lift (see Vehicle: Towing and lifting) (MR 392, 02A, Lifting equipment).
- Remove:
- the gearbox (see Manual gearbox: Removal - Refitting) (MR 392, 21A, Manual gearbox),
- the clutch pressure plate (see Pressure plate - Disc: Removal - Refitting) (MR 392, 20A, Clutch),
- the flywheel (see 10A, Engine and cylinder block assembly, Flywheel: Removal - Refitting, 10A-237) (MR 392, 20A, Clutch).
II - OPERATION FOR REMOVAL OF PART CONCERNED
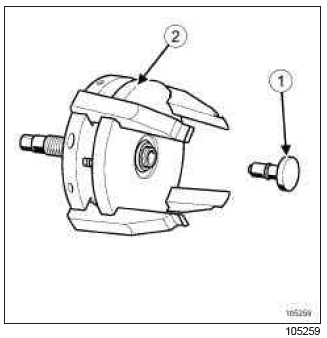
- Fit the end piece (1) of the (Mot. 1579) (2).
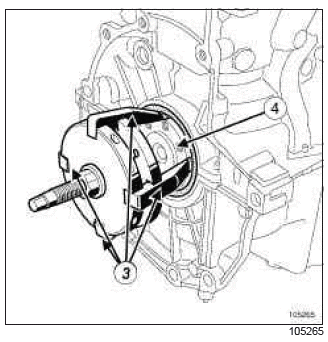
- Position the jaws (3) of the (Mot. 1579) on the crankshaft (4).
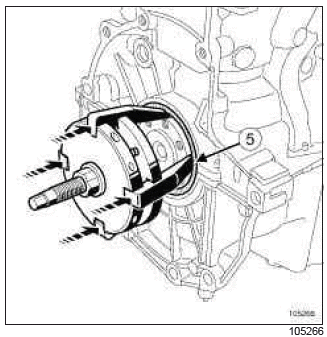
- Push the tool until contact is made between the ends (5) of the jaws and the crankshaft seal.
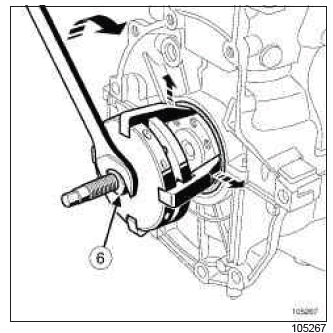
- Move the jaws away by tightening the bolt (6) using an open-jawed spanner.
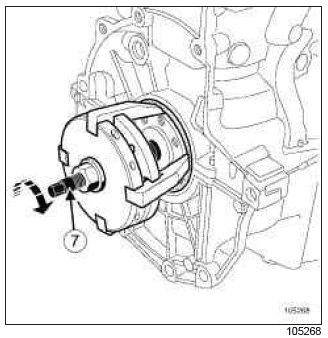
- Screw down the threaded rod of the (7) (Mot. 1579).
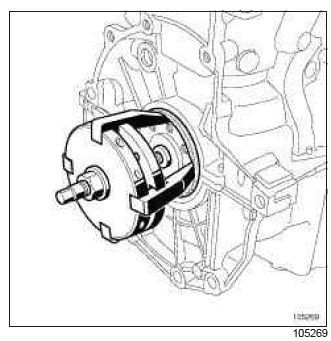
- Remove the crankshaft seal using the (Mot. 1579).
REFITTING
I - REFITTING OPERATION FOR PART CONCERNED
- Refit the crankshaft seal on the gearbox side (see ) (Technical Note 6006A, 10A, Engine and peripherals).
II - FINAL OPERATION.
- Refit:
- the flywheel (see 10A, Engine and cylinder block assembly, Flywheel: Removal - Refitting, 10A-237) (MR 392, 20A, Clutch),
- the clutch pressure plate (see Pressure plate - Disc: Removal - Refitting) (MR 392, 20A, Clutch),
- the gearbox (see Manual gearbox: Removal - Refitting) (MR 392, 21A, Manual gearbox).
K4M

REMOVAL
I - REMOVAL PREPARATION OPERATION
- Position the vehicle on a two-post lift (see Vehicle: Towing and lifting) (02A, Lifting equipment).
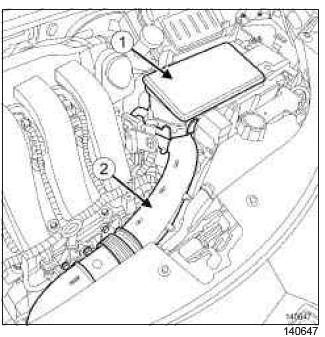
- Remove:
- the air resonator (1),
- the air filter unit air inlet pipe (2),
- the engine undertray bolts,
- the engine undertray,
- the battery (see ) (80A, Battery),
- the battery tray (see Battery tray: Removal - Refitting) (80A, Battery),
- the air filter unit (see 12A, Fuel mixture, Air filter unit: Removal - Refitting, 12A-17),
- the windscreen wiper arms (see Windscreen wiper arm: Removal - Refitting) (85A, Wiping - Washing),
- the scuttle panel grille (see Scuttle panel grille: Removal - Refitting) (56A, Exterior equipment),
- the scoop under the scuttle panel grille (see Scoop under the scuttle panel grille: Removal - Refitting) (56A, Exterior equipment),
- the front wheels (see Wheel: Removal - Refitting) (35A, Wheels and tyres),
- the front wheel arch liners (see Front wheel arch liner: Removal - Refitting) (55A, Exterior protection),
- the front bumper (see Front bumper: Removal - Refitting) (55A, Exterior protection),
- the radiator mounting cross member (see Radiator mounting cross member: Removal - Refitting) (41A, Front lower structure),
- the starter (see 16A, Starting - Charging, Starter: Removal - Refitting, 16A-23),
- the lower engine tie-bar (see 19D, Engine mounting, Lower engine tie-bar: Removal - Refitting, 19D-13),
- the left-hand suspended engine mounting (see 19D, Engine mounting, Left-hand suspended engine mounting: Removal - Refitting, 19D-34).
- Drain the gearbox (see Manual gearbox oils: Draining - Filling) (21A, Manual gearbox).
- Remove:
- the front left-hand wheel driveshaft (see Front left-hand driveshaft: Removal - Refitting) (29A, Driveshafts),
- the front right-hand wheel driveshaft (see Front right-hand driveshaft: Removal - Refitting) (29A, Driveshafts),
- the gearbox (see Manual gearbox: Removal - Refitting) (21A, Manual gearbox),
- the " pressure plate - disc " assembly (see Pressure plate - Disc: Removal - Refitting) (20A, Clutch),
- the flywheel (see 10A, Engine and cylinder block assembly, Flywheel: Removal - Refitting, 10A-237).
II - OPERATION FOR REMOVAL OF PART CONCERNED
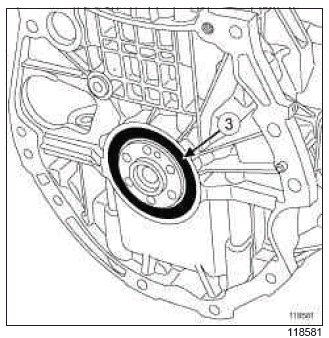
- Remove the crankshaft seal (3) using a screwdriver.
Note: Take care not to damage the crankshaft mating face.
REFITTING
I - REFITTING PREPARATION OPERATION
- parts always to be replaced: Crankshaft seal on gearbox end.
- Use SURFACE CLEANER (see ) (04B, Consumables
- Products) to clean and degrease:
- the crankshaft seal mating face,
- the seal housing on the cylinder block.
WARNING
To ensure proper sealing, the gasket surfaces must be clean, dry and not greasy (avoid any finger marks).
II - REFITTING OPERATION FOR PART CONCERNED
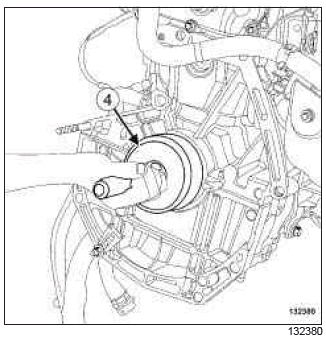
- Refit a new crankshaft seal using the (Mot. 1129-01) (4).
III - FINAL OPERATION
- Refit:
- the flywheel (see 10A, Engine and cylinder block assembly, Flywheel: Removal - Refitting, 10A-237),
- the " pressure plate - disc " assembly (see Pressure plate - Disc: Removal - Refitting) (20A, Clutch),
- the gearbox (see Manual gearbox: Removal - Refitting) (21A, Manual gearbox),
- the front right-hand wheel driveshaft (see Front right-hand driveshaft: Removal - Refitting) (29A, Driveshafts),
- the front left-hand wheel driveshaft (see Front left-hand driveshaft: Removal - Refitting) (29A, Driveshafts).
- Fill the gearbox (see Manual gearbox oils: Draining - Filling) (21A, Manual gearbox).
- Refit:
- the left-hand suspended engine mounting (see 19D, Engine mounting, Left-hand suspended engine mounting: Removal - Refitting, 19D-34),
- the lower engine tie-bar (see 19D, Engine mounting, Lower engine tie-bar: Removal - Refitting, 19D-13).
- the starter (see 16A, Starting - Charging, Starter: Removal - Refitting, 16A-23),
- the radiator mounting cross member (see Radiator mounting cross member: Removal - Refitting) (41A, Front lower structure),
- the front bumper (see Front bumper: Removal - Refitting) (55A, Exterior protection),
- the front wheel arch liners (see Front wheel arch liner: Removal - Refitting) (55A, Exterior protection),
- the front wheels (see Wheel: Removal - Refitting) (35A, Wheels and tyres),
- the scoop under the scuttle panel grille (see Scoop under the scuttle panel grille: Removal - Refitting) (56A, Exterior equipment),
- the scuttle panel grille (see Scuttle panel grille: Removal - Refitting) (56A, Exterior equipment),
- the windscreen wiper arms (see Windscreen wiper arm: Removal - Refitting) (85A, Wiping - Washing),
- the air filter unit (see 12A, Fuel mixture, Air filter unit: Removal - Refitting),
- the battery tray (see Battery tray: Removal - Refitting) (80A, Battery),
- the battery (see ) (80A, Battery),
- the engine undertray,
- the air filter unit air inlet pipe,
- the air resonator.
READ NEXT:
 Engine oil: Draining - Refilling
D4F or K4J or K4M or K9K
I - RECOMMENDATIONS FOR REPAIR
Direction of fitting of the drain plug seal.
K4J or K4M or K9K
For an aluminium engine oil sump
There is no direction of fitting for a s
 Oil filter: Removal - Refitting
K9K
WARNING
Always check the oil level using the dipstick.
Do not exceed the maximum level on the dipstick
(could destroy the engine).
Correct the engine oil level if necessary before
delivering th
 Oil-coolant heat exchanger: Removal - Refitting
K9K, and 764 or 766 or 768
REMOVAL
I - REMOVAL PREPARATION OPERATION
Position the vehicle on a two-post lift (see Vehicle:
Towing and lifting) (02A, Lifting equipment).
Remove:
the engine prote
SEE MORE:
 Flywheel: Removal - Refitting
D4F or F4R or K4J or K4M or K9K
REMOVAL
I - REMOVAL PREPARATION OPERATION
Position the vehicle on a two-post lift (see Vehicle:
Towing and lifting) (02A, Lifting equipment).
Disconnect the battery (see ) (80A, Battery).
Remove:
the gearbox (see Manual gearbox: Removal - Refitting)
(21A, Ma
 Condenser: Removal - Refitting
AIR CONDITIONING or CLIMATE CONTROL
Note:
Before removal, use DIALOGYS to check how the
condenser is fitted and arranged.
There are 2 possibilities:
the condenser and cooling radiator cannot be separated,
the condenser and cooling radiator can be separated.
IMPORTANT
To avoid all risk of damag
© 2016-2026 Copyright Renault Clio Owners Club

