Renault Clio: Expansion chamber: Removal - Refitting
Renault Clio III (2005-2013) Service Manual / Engine And Peripherals / Exhaust / Expansion chamber: Removal - Refitting
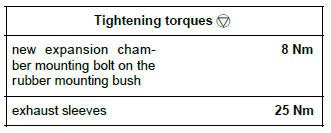
REMOVAL
I - REMOVAL PREPARATION OPERATION
- Position the vehicle on a two-post lift (see Vehicle: Towing and lifting) (MR 392, 02, Lifting equipment).
- Remove the engine undertray.
- Cut the exhaust pipe (see ) and (see 19B, Exhaust, Exhaust: Precautions for the repair, 19B- 19).
II - OPERATION FOR REMOVAL OF PART CONCERNED
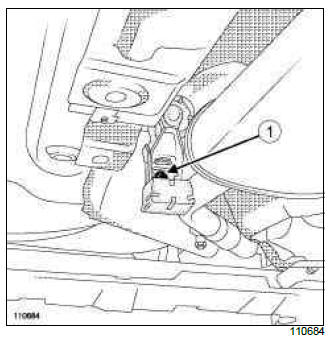
- Remove:
- the bolt (1) mounting the expansion chamber to the exhaust rubber mounting bush,
- the expansion chamber.
Note: If the rubber mounting bushes are damaged, mark the position of the support on the body, then replace the " support - rubber mounting bush " assembly.
REFITTING
I - REFITTING OPERATION FOR PART CONCERNED
- Fit:
- the expansion chamber,
- the sleeves,
- the rubber mounting bush damper.
- Torque tighten:
- the new expansion chamber mounting bolt on the rubber mounting bush (8 Nm),
- the exhaust sleeves (25 Nm) while lifting the exhaust pipe to ensure correct alignment (see 19B, Exhaust, Exhaust: Precautions for the repair, 19B-19).
II - FINAL OPERATION.
- Check:
- that all the exhaust pipe heat shields are in place and properly attached,
- that there is no contact with the underbody.
WARNING
Make sure:
- that the sleeve " nut-bolt tightening " assembly is vertical, with the nut facing downwards, to prevent any risk of underbody contact,
- that you position the new component in a way that the cutting area marks are aligned,
- that the two marks are flush with the two ends of the sleeve,
- that an old sleeve is not reused.
- that the bolts securing the rubber mounting bushes to the exhaust pipe have been replaced with new ones.
READ NEXT:
 Intermediate pipe: Removal - Refitting
REMOVAL
I - REMOVAL PREPARATION OPERATION
Position the vehicle on a two-post lift (see Vehicle:
Towing and lifting) (MR 392, 02A, Lifting equipment).
II - OPERATION FOR REMOVAL OF PART
CONCERNED
Silencer: Removal - Refitting
D4F or K4J or K4M or K9K or M4R
REMOVAL
I - REMOVAL PREPARATION OPERATION
Position the vehicle on a two-post lift (see Vehicle:
Towing and lifting) (MR 392, 02A, Lifting equipment).
Cut the exhau
SEE MORE:
Driving
The Renault Clio IV (2014-2019) offers a satisfying driving experience with its nimble handling and responsive performance. Its compact size and maneuverability make it well-suited for urban driving and tight parking spaces. The precise steering and suspension tuning provide a balanced and confident
Your comfort
The Renault Clio IV (2014-2019) is designed with your comfort in mind. It features a well-crafted interior with quality materials and thoughtful ergonomics. The seats offer excellent support and adjustability, providing a comfortable driving experience. The cabin is designed to minimize noise and vi
© 2016-2026 Copyright Renault Clio Owners Club - 0.0052
