Renault Clio: Front brake disc: Removal - Refitting
EQUIPMENT LEVEL EAC or EQUIPMENT LEVEL SPORT

Brake discs cannot be reground. If there is excessive scoring or wear, they will need to be replaced (see 30A, General information, Brake: Specifications, 30A-9).
IMPORTANT
To avoid all risk of damage to the systems, apply the safety and cleanliness instructions and operation recommendations before carrying out any repair:
- (see 30A, General information, Brake circuit: Precautions for the repair, 30A-2),
- (see Vehicle: Precautions for the repair) (01D, Mechanical introduction).
REMOVAL
I - REMOVAL PREPARATION OPERATION
- Position the vehicle on a two-post lift (see Vehicle: Towing and lifting) (02A, Lifting equipment).
- Remove:
- the front wheels (see 35A, Wheels and tyres, Wheel: Removal - Refitting, 35A-1),
- the front brake pads (see 31A, Front axle components, Front brake pads: Removal - Refitting, 31A-1).
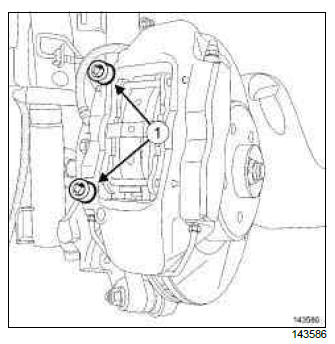
- Remove the bolts (1) from the front brake callipers.
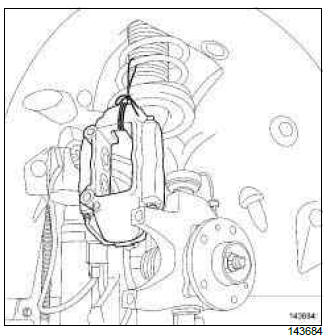
- Suspend the brake callipers from the suspension springs.
II - OPERATION FOR REMOVAL OF PART CONCERNED
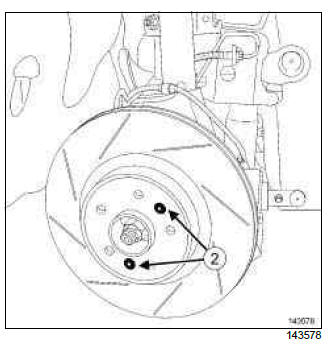
- Remove:
- the brake disc bolts (2),
- the brake discs.
REFITTING
I - REFITTING PREPARATION OPERATION
- Clean the brake discs using a parts washer.
- Dry the surface of the discs.
- Clean the mating faces of the disc on the hub using a wire brush and BRAKE CLEANER (see Vehicle: Parts and consumables for the repair) (04B, Consumables - Products).
- parts always to be replaced: Front brake disc bolt (13,03,03,11).
II - REFITTING OPERATION FOR PART CONCERNED
- Refit the brake discs with new bolts.
III - FINAL OPERATION
- Refit:
- the brake callipers,
- the brake calliper bolts.
- Torque tighten the bolts of the front brake callipers (see 30A, General information, Brake circuit: Tightening torque, 30A-6).
- Refit:
- the front brake pads (see 31A, Front axle components, Front brake pads: Removal - Refitting, 31A-1),
- the front wheels (see 35A, Wheels and tyres, Wheel: Removal - Refitting, 35A-1).
WARNING
To avoid any accident, bring the pistons, brake pads and brake discs into contact by depressing the brake pad several times.
- Advise the customer to run-in the brake pads (no harsh braking).
EQUIPMENT LEVEL E3 LEISURE or EQUIPMENT LEVEL EA1 or EQUIPMENT LEVEL EA2 or EQUIPMENT LEVEL EA3 or EQUIPMENT LEVEL EA4 or EQUIPMENT LEVEL EA5 or EQUIPMENT LEVEL EAG

Brake discs cannot be reground. If there is excessive scoring or wear, they will need to be replaced (see 30A, General information, Brake: Specifications, 30A-9).
IMPORTANT
To avoid all risk of damage to the systems, apply the safety and cleanliness instructions and operation recommendations before carrying out any repair:
- (see 30A, General information, Brake circuit: Precautions for the repair, 30A-2) (30A, General information),
- (see Vehicle: Precautions for the repair) (01D, Mechanical introduction).
REMOVAL
I - REMOVAL PREPARATION OPERATION
- Position the vehicle on a two-post lift (see Vehicle: Towing and lifting) (02A, Lifting equipment).
- Set the wheels straight ahead.
- Remove the front wheel (see 35A, Wheels and tyres, Wheel: Removal - Refitting, 35A-1).
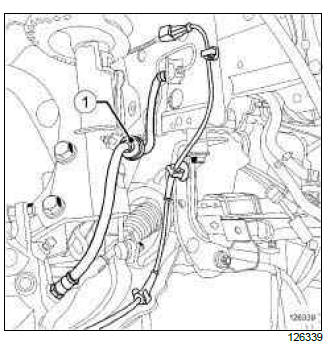
- Mark the position of the cap (1) on the base of the shock absorber using a indelible pencil.
- Unclip the cap (1) from the base of the shock absorber.
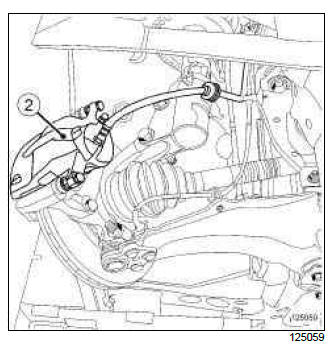
- Remove the brake pads (see 31A, Front axle components, Front brake pads: Removal - Refitting, 31A-1)
- Remove the "brake calliper mounting - brake calliper" assembly (2) (see 31A, Front axle components, Front brake calliper mounting: Removal - Refitting, 31A-12).
- Hang the "brake calliper mounting - brake calliper" assembly (2) on the suspension spring.
II - OPERATION FOR REMOVAL OF PART CONCERNED
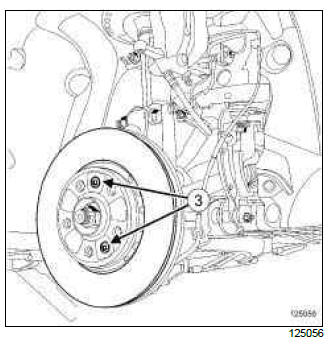
- Remove:
- the brake disc bolt or bolts (3),
- the brake disc.
REFITTING
I - REFITTING PREPARATION OPERATION
- Clean the brake discs using a parts washer.
- Dry the surface of the discs.
- Clean the mating faces of the disc on the hub using a wire brush and BRAKE CLEANER (see Vehicle: Parts and consumables for the repair) (04B, Consumables - Products).
- parts always to be replaced: Front brake disc bolt (13,03,03,11)
II - REFITTING OPERATION FOR PART CONCERNED
- Refit the brake disc with new bolts.
- Torque tighten the new disc mounting bolts (see 30A, General information, Brake circuit: Tightening torque, 30A-6)
III - FINAL OPERATION
- Refit the "brake calliper mounting - brake calliper" assembly (see 31A, Front axle components, Front brake calliper mounting: Removal - Refitting, 31A-12).
- Refit the brake pads (see 31A, Front axle components, Front brake pads: Removal - Refitting, 31A-1)
- Set the wheels straight ahead.
- Clip the cap on the base of the shock absorber while aligning the marks made with a indelible pencil.
WARNING
In order not to damage the brake hose:
- do not tension the hose,
- do not twist the hose,
- check that there is no contact with the surrounding components.
- Refit the front wheel (see 35A, Wheels and tyres, Wheel: Removal - Refitting, 35A-1).
IMPORTANT
To avoid any accident, bring the pistons, brake pads and brake discs into contact by depressing the brake pad several times.
- Advise the customer to run-in the brake pads (no harsh braking).
Front brake disc: Description
I - PREPARATION OPERATION FOR CHECK
Position the vehicle on a two-post lift (see Vehicle: Towing and lifting) (02A, Lifting equipment).
Remove the wheel (see 35A, Wheels and tyres, Wheel: Removal - Refitting, 35A-1).
II - CHECKING OPERATION FOR PART CONCERNED
Note: Use a Palmer type tool to check the thickness of the disc.
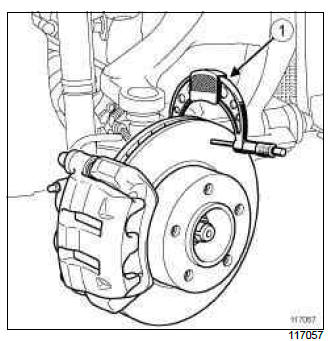
Position the Palmer tool (1) to measure the disc thickness.
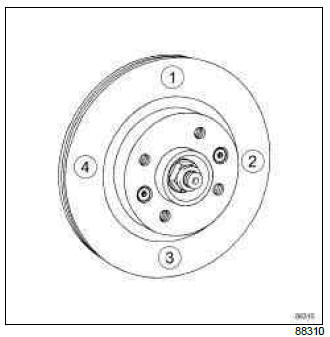
Measure the thickness of the disc at 4 points in order (90

