Renault Clio: Front end panel: General description
Note: The information contained in the following describes the general repair procedure for all vehicles having the same design for this part.
Before reading the following general information, make sure that there are no special notes associated with the vehicle. These special notes are specified if necessary in other parts of the sub-section dealing with the component.
DESIGN OF THE STRUCTURAL COMPONENT

A special feature of this part is that it is made out of composite materials; it cannot be repaired and is bolted onto the vehicle.
This part is attached to the ends of the front side member and cannot be adjusted.
Front end panel: Removal - Refitting
REMOVAL
I - REMOVAL PREPARATION OPERATION
- Remove:
- the front wheel arch liner, front section (see Front wheel arch liner: Removal - Refitting),
- the front bumper (see Front bumper: Removal - Refitting),
- the front headlights,
- the front impact cross member (see 41A, Front lower structure, Front impact cross member: Removal - Refitting, 41A-2).
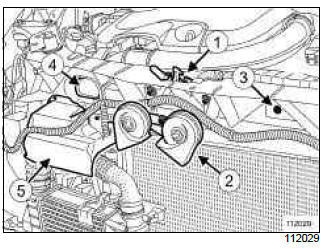
- Remove:
- the bonnet catch (1) (see Bonnet lock: Removal - Refitting),
- the buzzer (2) (see Audible warning: Removal - Refitting),
- the clip (3) from the expansion bottle.
- Extract the expansion bottle from the front end panel.
- Unclip the wiring harness from the front end panel.
- Remove (depending on equipment level):
- the air inlet nozzle (4),
- the intercooler cover (5).
II - OPERATION FOR REMOVAL OF PART CONCERNED
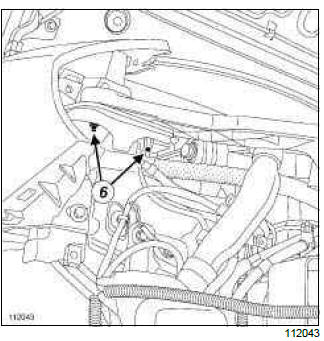
Note: To maintain the adjustment of the front end panel, hold the indexing bolts (6) in position with a 5 mm spanner while loosening the nuts.
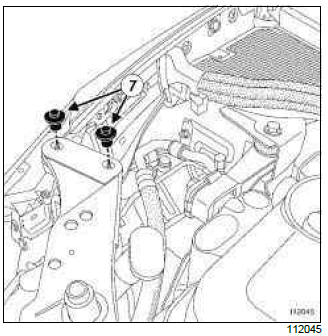
- Remove:
- the mounting nuts (7),
- the front end panel.
REFITTING
I - REFITTING OPERATION FOR PART CONCERNED
- Refit:
- the front end panel,
- the mounting nuts (7).
- Torque tighten the nuts (7) of the front panel mounting (21 Nm).
II - FINAL OPERATION.
- Refit (depending on equipment level):
- the intercooler cover (5),
- the air inlet nozzle (4).
- Insert the expansion bottle into the front end panel.
- Refit:
- the clip (3) to the expansion bottle,
- the wiring harness,
- the buzzer (2) (see Audible warning: Removal - Refitting),
- the bonnet catch (1) (see Bonnet lock: Removal - Refitting),
- the front impact cross member (see 41A, Front lower structure, Front impact cross member: Removal - Refitting, 41A-2),
- the front headlights,
- the front bumper (see Front bumper: Removal - Refitting),
- the front wheel arch liner, front section (see Front wheel arch liner: Removal - Refitting).
READ NEXT:
 Scuttle side panel: General description
Note:
The information contained in the following
describes the general repair procedure for all vehicles
having the same design for this part.
Before reading the following general information,
make s
Front wheel arch: General description
IMPORTANT
Use a repair bench to ensure the positioning of the
points and the geometry of the axle assemblies.
Note:
The information contained in the following
describes the general repair procedure fo
Dashboard cross member: Removal - Refitting
Note:
In the event of a front impact with triggering of airbags,
check the area of connection between both
diameters of the beam. If there is any damage visible
to the naked eye, this part must be re
SEE MORE:
Driving
The Renault Clio IV (2014-2019) offers a satisfying driving experience with its nimble handling and responsive performance. Its compact size and maneuverability make it well-suited for urban driving and tight parking spaces. The precise steering and suspension tuning provide a balanced and confident
Your comfort
The Renault Clio IV (2014-2019) is designed with your comfort in mind. It features a well-crafted interior with quality materials and thoughtful ergonomics. The seats offer excellent support and adjustability, providing a comfortable driving experience. The cabin is designed to minimize noise and vi
