Renault Clio: Front footwell air distribution duct: Removal - Refitting
LEFT-HAND DRIVE
REMOVAL
I - REMOVAL PREPARATION OPERATION
1 - Driver's side
- Remove the centre console (see Centre console: Removal - Refitting) (MR 393, 57A, Interior equipment).
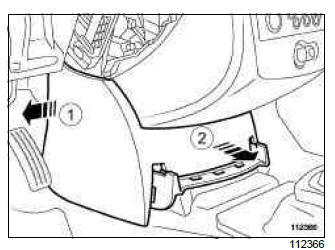
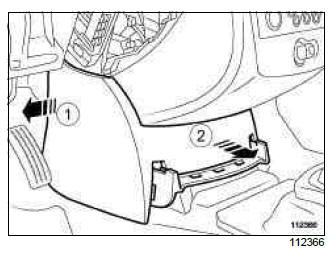
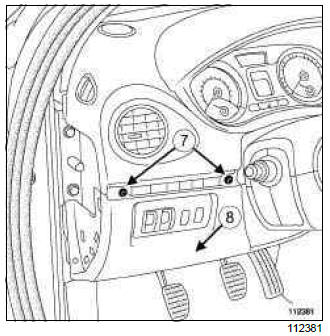
- Unclip the dashboard lower trim at (1) and (2).
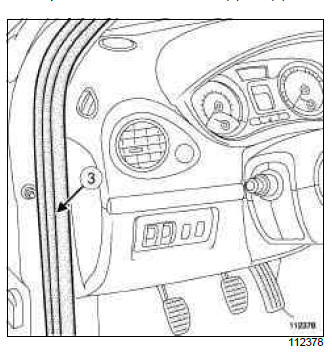
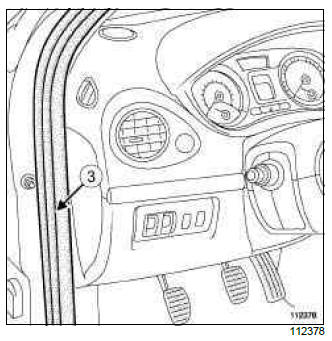
- Partially remove the door seal. (3)
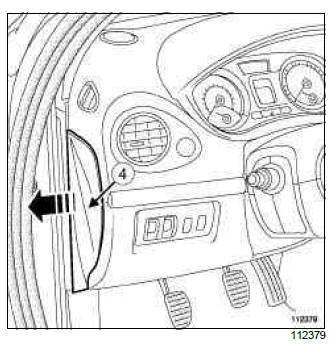
- Remove the side panel (4).
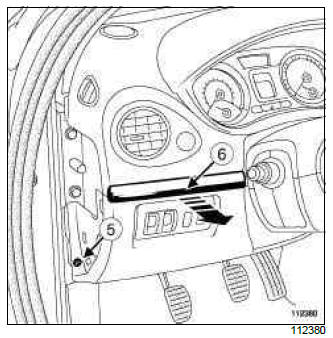
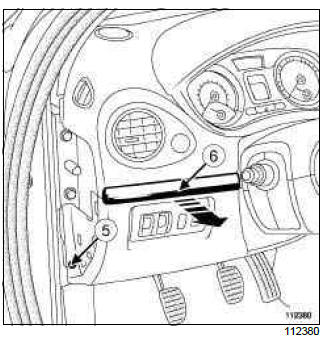
- Remove the bolt (5) from the dashboard lower trim on the driver's side.
- Unclip the trim (6).
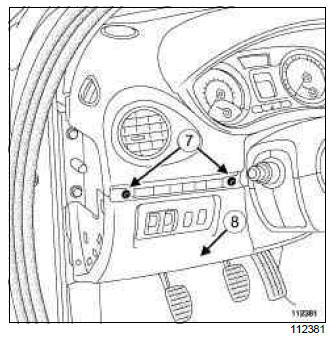
- Remove the bolts (7) from the dashboard lower trim on the driver's side.
- Remove the dashboard lower trim (8) on the driver's side.
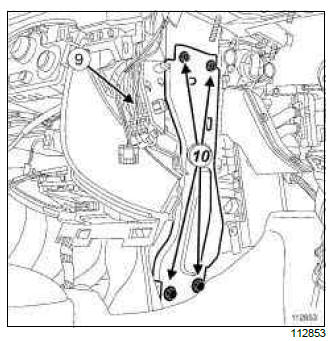
- Disconnect the connectors (depending on equipment level).
- Unclip:
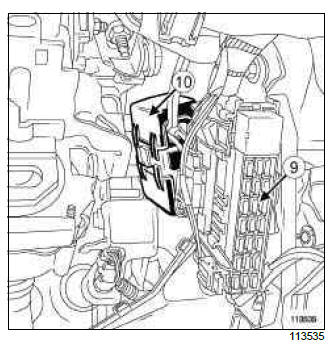
- the fuse and relay box (9),
- the heating resistor relays (10).
- Lift the carpet to access the stiffener bolts.
- Remove:
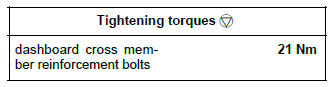
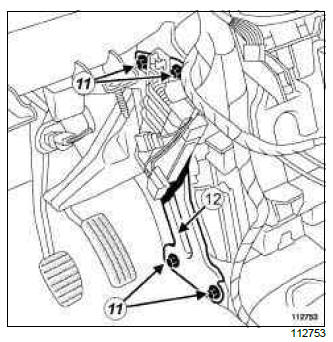
- the dashboard cross member reinforcement bolts (11),
- the dashboard cross member reinforcement (12).
2 - Passenger side
- Remove the glovebox (see Glovebox: Removal - Refitting) (MR 393, 57A, Interior equipment).
II - OPERATION FOR REMOVAL OF PART CONCERNED
1 - Driver's side
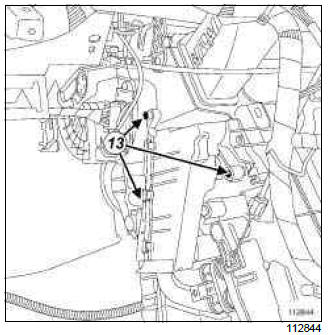
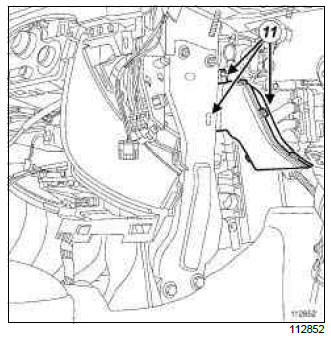
- Remove:
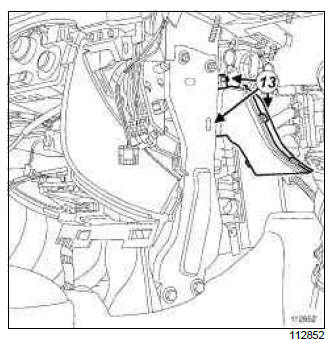
- the bolts (13) from the front footwell air distribution duct on the driver's side,
- the driver's side front footwell air distribution duct.
2 - Passenger side
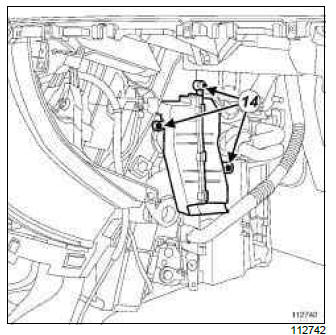
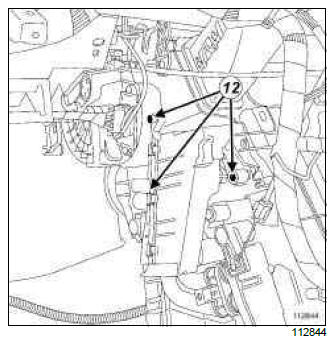
- Remove:
- the bolts (14) from the front footwell air distribution duct on the passenger side,
- the passenger side front footwell air distribution duct.
REFITTING
I - REFITTING OPERATION FOR PART CONCERNED
1 - Driver's side
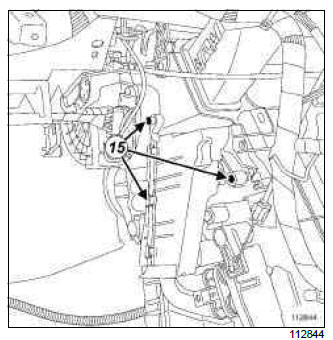
- Refit:
- the driver's side front footwell air distribution duct.
- the front footwell air distribution duct bolts (15) on the driver's side.
2 - Passenger side
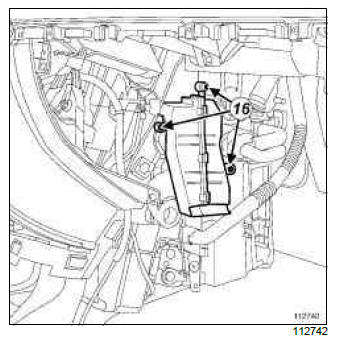
- Refit:
- the passenger side front footwell air distribution duct.
- the front footwell air distribution duct bolts (16) on the passenger side.
II - FINAL OPERATION.
1 - Driver's side
- Refit:
- the dashboard cross member stiffener,
- the dashboard reinforcement bolts.
- Torque tighten the dashboard cross member reinforcement bolts (21 Nm).
- Refit the floor carpet.
Note: Check that the floor carpet reaches under the accelerator pedal end-stop.
- Clip on:
- heater resistor relays,
- the fuse and relay box.
- Connect the dashboard lower trim connectors on the driver's side.
- Fit the dashboard lower trim on the driver's side.
- Refit:
- the dashboard lower trim bolts on the driver's side,
- the dashboard lower trim bolt on the driver's side.
- Fit the dashboard lower trim piece on the driver's side.
- Refit:
- the side panel,
- the door seal.
- Clip on the dashboard lower trim.
- Refit the centre console (see Centre console: Removal - Refitting) (MR 393, 57A, Interior equipment).
2 - Passenger side
- Refit the glovebox (see Glovebox: Removal - Refitting) (MR 393, 57A, Interior equipment).
RIGHT-HAND DRIVE
REMOVAL
I - REMOVAL PREPARATION OPERATION
1 - Driver's side
- Lock the airbag computer using the Diagnostic tool (see Fault finding - Replacement of components) ( MR 394, 88C, Airbags and pretensioners).
- Remove the centre console (see Centre console: Removal - Refitting) (MR 393, 57A, Interior equipment).
- Unclip the dashboard lower trim at (1) and (2).
- Partially remove the door seal. (3)

- Move the side panel to one side.
- Disconnect the inhibitor switch.
- Remove the side panel (4).
- Remove the dashboard lower trim bolt (5).
- Undo the dashboard lower trim piece (6) on the driver's side.
- Remove the bolts (7) from the dashboard lower trim on the driver's side.
- Remove the dashboard lower trim (8) on the driver's side.
- Disconnect the connectors (depending on equipment level).
- Lift the carpet to access the stiffener bolts.
- Unclip the fuse holder unit (9).
- Remove:
- the dashboard cross member reinforcement bolts (10),
- the dashboard cross member reinforcement.
2 - Passenger side
- Remove the glovebox (see Glovebox: Removal - Refitting) (MR 393, 57A, Interior equipment).
II - OPERATION FOR REMOVAL OF PART CONCERNED
1 - Driver's side
- Remove:
- the bolts (11) from the front footwell air distribution duct on the driver's side,
- the driver's side front footwell air distribution duct.
2 - Passenger side
- Remove:
- the bolts (12) from the front footwell air distribution duct on the passenger side,
- the passenger side front footwell air distribution duct.
REFITTING
I - REFITTING OPERATION FOR PART CONCERNED
1 - Driver's side
- Refit:
- the driver's side front footwell air distribution duct.
- the front footwell air distribution duct bolts (13) on the driver's side.
2 - Passenger side

- Refit:
- the passenger side front footwell air distribution duct.
- the front footwell air distribution duct bolts (14) on the passenger side.
II - FINAL OPERATION.
1 - Driver's side
- Refit:
- the dashboard cross member stiffener,
- the dashboard reinforcement bolts.
- Torque tighten the dashboard cross member reinforcement bolts (21 Nm).
- Clip the fuse and relay box into place.
- Refit the floor carpet.
Note: Check that the floor carpet reaches under the accelerator pedal end-stop.
- Connect the dashboard lower trim connectors on the driver's side.
- Fit the dashboard lower trim on the driver's side.
- Refit:
- the dashboard lower trim bolts on the driver's side,
- the dashboard lower trim bolt.
- Fit the dashboard lower trim piece on the driver's side.
- Connect the inhibitor switch.
- Refit:
- the side panel,
- the door seal.
- Clip on the dashboard lower trim.
- Refit the centre console (see Centre console: Removal - Refitting) (MR 393, 57A, Interior equipment).
- Unlock the airbag computer using the Diagnostic tool (see Fault finding - Replacement of components) ( MR 394, 88C, Airbags and pretensioners).
2 - Passenger side
- Refit the glovebox (see Glovebox: Removal - Refitting) (MR 393, 57A, Interior equipment).
READ NEXT:
 Recirculation motor: Removal - Refitting
LEFT-HAND DRIVE, and CLIMATE CONTROL
REMOVAL
I - REMOVAL PREPARATION OPERATION
Lock the airbag computer using the Diagnostic tool
(see Fault finding - Replacement of components) (
MR 394, 88C, Ai
Mixing motor: Removal - Refitting
LEFT-HAND DRIVE, and CLIMATE CONTROL
REMOVAL
I - REMOVAL PREPARATION OPERATION
Remove the centre console (see Centre console:
Removal - Refitting) (MR 393, 57A, Interior equipment).
Unclip the
Distribution motor: Removal - Refitting
LEFT-HAND DRIVE, and CLIMATE CONTROL
REMOVAL
I - REMOVAL PREPARATION OPERATION
Remove the centre console (see Centre console:
Removal - Refitting) (MR 393, 57A, Interior equipment).
Unclip the
SEE MORE:
Driver's front side door wiring: Removal - Refitting
IMPORTANT
Consult the safety and cleanliness advice and operation
recommendations before carrying out any
repair (see 88A, Wiring harness, Wiring: Precautions
for the repair, 88A-5).
REMOVAL
I - REMOVAL PREPARATION OPERATION
Raise the window fully.
Switch off the ignition.
Disconnect the battery
Passenger's front side door wiring: Removal -
Refitting
IMPORTANT
Consult the safety and cleanliness advice and operation
recommendations before carrying out any
repair (see 88A, Wiring harness, Wiring: Precautions
for the repair, 88A-5).
REMOVAL
I - REMOVAL PREPARATION OPERATION
Raise the window fully.
Switch off the ignition.
Disconnect the battery
