Renault Clio: Front side door lock: Removal - Refitting
REMOVAL
I - REMOVAL PREPARATION OPERATION
- Remove:
- the door trim (see Front side door trim: Removal - Refitting) (MR 393,72A, Side door trim),
- the door lock barrel (see 51A, Side opening element mechanisms, Front side door lock barrel: Removal - Refitting, 51A-4).
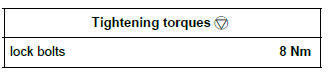
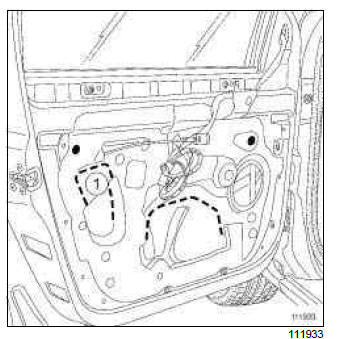
- Open the lock assembly access flap (1) following the marking on the sealing film (see Door sealing film: Removal - Refitting) (MR 393, 65A, Door sealing).
- Remove the exterior handle (see 51A, Side opening element mechanisms, Exterior door handle: Removal - Refitting, 51A-5).
- Drill out the rivet (2).
WARNING
Each time a panel is stripped in the workshop (e.g. when drilling), degrease and wipe the area and then use a fine paintbrush to apply out the following anti-corrosion protection materials:
- a pre-treatment primer,
- a two-part primer,
- paint in the vehicle body colour.
- Unclip the handle unit (3).
- Remove the door panel exterior handle module (4).
II - OPERATION FOR REMOVAL OF PART CONCERNED
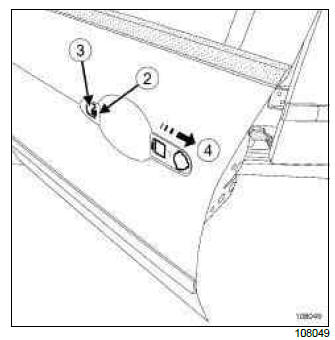
- Remove the bolts (5).
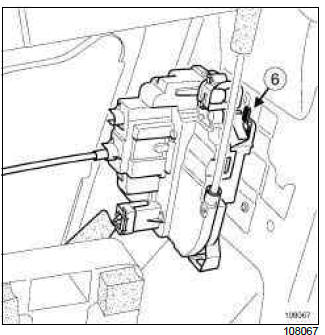
- Gently lift the lock to extract the retaining hook. (6)
- Remove the exterior handle lock module from the door box section.
- Disconnect the connectors.
- Unclip the exterior handle lock module cable.
REFITTING
I - REFITTING OPERATION FOR PART CONCERNED
- Clip the lock cable to the handle module.
- Fit the lock - module assembly into the door box section.
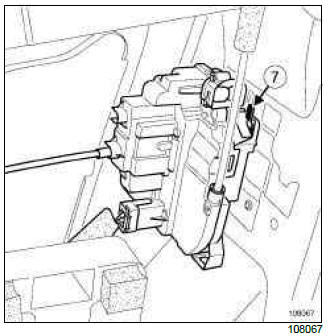
- Position the lock on the door box section retaining hook (7).
- Connect the connectors.
- Torque tighten the lock bolts (8 Nm).
II - FINAL OPERATION.
- Clip the module on the door panel.
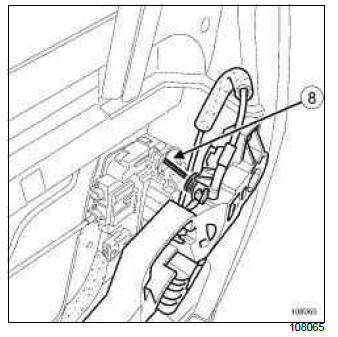
Note: When refitting the exterior handle module, check that the universal joint (8) is correctly positioned in the lock.
- Refit:
- the door lock barrel (see 51A, Side opening element mechanisms, Front side door lock barrel: Removal - Refitting, 51A-4),
- the rivet (2) (part no.: 77 03 072 051),
- the exterior handle (see 51A, Side opening element mechanisms, Exterior door handle: Removal - Refitting, 51A-5).
- Carry out a function test.
- Close the access flap (see Door sealing film: Removal - Refitting) (MR 393, 65A, Door sealing).
- Refit the door trim (see Front side door trim: Removal - Refitting) (MR 393, 72A, Side opening element trim).
Front side door lock barrel: Removal - Refitting
REMOVAL
I - REMOVAL PREPARATION OPERATION
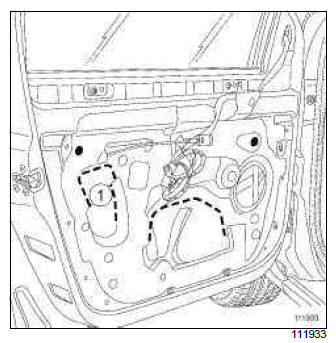
- Unclip the lock barrel unlocking blanking piece.
II - OPERATION FOR REMOVAL OF PART CONCERNED

- Unscrew the locking bolt completely (clockwise or anticlockwise) without removing it.
- Remove the lock barrel.
REFITTING
I - REFITTING OPERATION FOR PART CONCERNED
- Position the lock barrel.
- Torque tighten (clockwise or anticlockwise) the lock barrel bolt (2 Nm).
II - FINAL OPERATION.
- Clip in the blanking piece (replace it if necessary).
- Carry out an operational test on the lock barrel.
Exterior door handle: Removal - Refitting
REMOVAL
I - REMOVAL PREPARATION OPERATION
- Remove:
- the door trim (see Front side door trim: Removal - Refitting) (MR 393,72A, Side opening element trim),
- the door lock barrel (see 51A, Side opening element mechanisms, Front side door lock barrel: Removal - Refitting, 51A-4).
- Open the access flap (1) for the exterior handle module following the marking on the sealing film (see Door sealing film: Removal - Refitting) (MR 393, 65A, Door sealing).
II - OPERATION FOR REMOVAL OF PART CONCERNED
Exterior handle module (view from inside door box section).
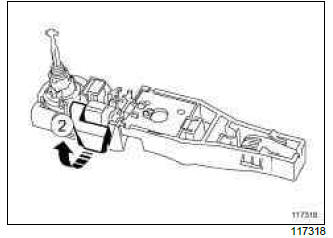
- Lift up the panel manually (2).

- Keep it in that position.
- Slide the lever (3) as far as possible.

- Remove the exterior handle (5) and (4).
- Disconnect the connector (depending on equipment level).
REFITTING
I - REFITTING PREPARATIONS OPERATION
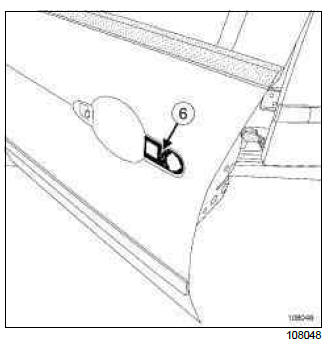
- Check the presence and condition of seal (6).
II - OPERATION FOR REFITTING PART CONCERNED
- Connect the connector (according to the equipment level)
- Insert the front section and rear section of the external door handle.
- Push the exterior handle towards the front of the vehicle.
- Refit the lock barrel (see 51A, Side opening element mechanisms, Front side door lock barrel: Removal - Refitting, 51A-4).
- Carry out a function test.
III - FINAL OPERATION.
- Close the access flap (see Door sealing film: Removal - Refitting) (MR 393, 65A, Door sealing).
- Refit the door trim (see Front side door trim: Removal - Refitting) (MR 393,72A, Side opening element trim).
READ NEXT:
 Front side door electric window mechanism: Removal - Refitting
REMOVAL
I - REMOVAL PREPARATION OPERATION
Remove the front side door trim (see Front side
door trim: Removal - Refitting) (72A, Side opening
elements trim).
Open the access flaps (1) and (2)
Rear side door lock: Removal - Refitting
B85 or K85
REMOVAL
I - REMOVAL PREPARATION OPERATION
Remove the door trim (see Rear side door trim:
Removal - Refitting) (MR 393, 72A, Side opening
element trim).
Unclip the access blanking cove
Non-side Opening Element Mechanisms
Bonnet release control: Removal - Refitting
REMOVAL
I - REMOVAL PREPARATION OPERATION
Remove:
the wheel arch liners (see 55A, Exterior protection,
Front wheel arch liner: Removal - Refitting, 5
SEE MORE:
Driving
The Renault Clio IV (2014-2019) offers a satisfying driving experience with its nimble handling and responsive performance. Its compact size and maneuverability make it well-suited for urban driving and tight parking spaces. The precise steering and suspension tuning provide a balanced and confident
Your comfort
The Renault Clio IV (2014-2019) is designed with your comfort in mind. It features a well-crafted interior with quality materials and thoughtful ergonomics. The seats offer excellent support and adjustability, providing a comfortable driving experience. The cabin is designed to minimize noise and vi
