Renault Clio: Oxygen sensors: Removal - Refitting
D4F, and 740
WARNING
Do not use any product designed to improve electrical contact in the injection computer connectors and oxygen sensors and on the oxygen sensor body. Failure to respect this advice prevents the oxygen sensor from operating correctly and results in failure to comply with the emission control standard.
WARNING
If the connections are corroded, repair the wiring (see Wiring: Precautions for the repair) (Technical Note 6015, 88A, Wiring).
REMOVAL
I - REMOVAL PREPARATION OPERATION
- Position the vehicle on a two-post lift (see Vehicle: Towing and lifting) (MR 392, 02A, Lifting equipment).
- Disconnect the battery (see ) (MR 392, 80A, Battery).
- Remove the air filter box (see 12A, Fuel mixture, Air filter unit: Removal - Refitting, 12A-17).
II - OPERATION FOR REMOVAL OF PART CONCERNED
1 - Upstream oxygen sensor
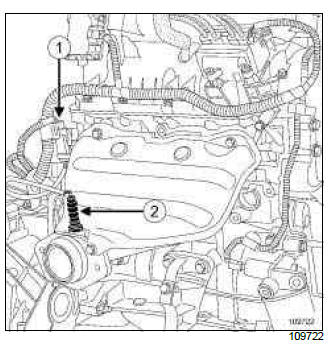
- Disconnect the upstream oxygen sensor connector (1).
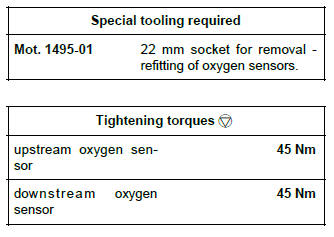
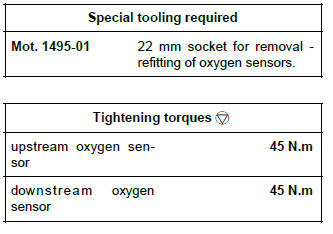
- Remove the upstream oxygen sensor (2) using the (Mot. 1495-01).
2 - Downstream oxygen sensor
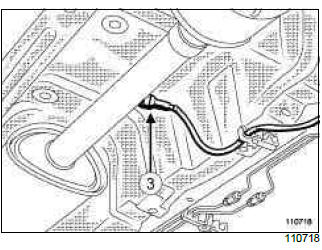
- Disconnect the downstream oxygen sensor connector.
- Remove the downstream oxygen sensor (3) using the (Mot. 1495-01).
REFITTING
I - REFITTING OPERATION FOR PART CONCERNED
1 - Upstream oxygen sensor
- Torque tighten the upstream oxygen sensor (45 Nm) using the (Mot. 1495-01).
- Connect the upstream oxygen sensor connector.
2 - Downstream oxygen sensor
- Torque tighten the downstream oxygen sensor (45 Nm) using the (Mot. 1495-01).
- Connect the downstream oxygen sensor connector.
II - FINAL OPERATION.
- Refit the air filter box (see 12A, Fuel mixture, Air filter unit: Removal - Refitting, 12A-17).
- Connect the battery (see ) (MR 392, 80A, Battery).
K4J - K4M, and 800 or 801 or 804
WARNING
Do not use any product designed to improve the electrical contact in the injection computer and oxygen sensor connectors or on the bodies of the oxygen sensors.
Failure to respect this advice causes the oxygen sensor to malfunction and results in failure to comply with the emission control standard.
WARNING
If the connections are corroded, repair the wiring (see Wiring: Precautions for repair) (88A, Wiring).
Note: This procedure is for removal - refitting of the upstream oxygen sensor and the downstream oxygen sensor.
REMOVAL
I - REMOVAL PREPARATION OPERATION
- Position the vehicle on a two-post lift (see Vehicle: Towing and lifting) (02A, Lifting equipment).
- Disconnect the battery (see ) (80A, Battery).
II - OPERATION FOR REMOVAL OF PART CONCERNED
1 - Upstream oxygen sensor
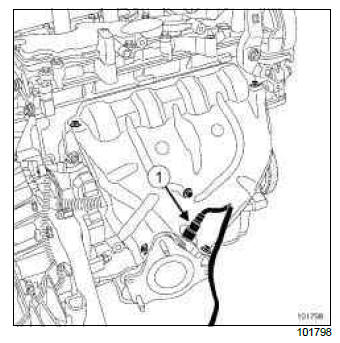
- Remove:
- the lifting eye on the timing end,
- the fuel vapour absorber solenoid valve connector,
- Unclip the oxygen sensor wiring.
- Disconnect the oxygen sensor connector.
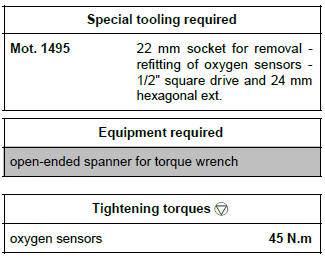
- Remove the upstream oxygen sensor (1) using the (Mot. 1495).
2 - Downstream oxygen sensor
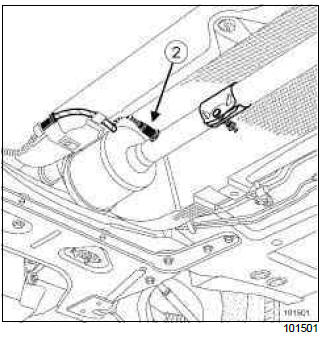
- Unclip the downstream oxygen sensor wiring.
- Disconnect the downstream oxygen sensor connector.
- Remove the downstream oxygen sensor (2).
REFITTING
I - REFITTING PREPARATION OPERATION
- Clean the threading of the upstream and downstream oxygen sensors using a WIRE BRUSH.
- Use SURFACE CLEANER (see ) (04B, Consumables
- Products) to clean and degrease:
- the thread hole of the oxygen sensor on the exhaust manifold,
- the threading of the oxygen sensor if it is to be reused.
II - REFITTING OPERATION FOR PART CONCERNED
1 - Upstream oxygen sensor
- Refit the upstream oxygen sensor.
- Connect the upstream oxygen sensor connector.
- Attach the upstream oxygen sensor wiring.
- Refit:
- the fuel vapour absorber solenoid valve connector,
- the front lifting eye at the timing end.
2 - Downstream oxygen sensor
- Refit the downstream oxygen sensor.
- Clip on the downstream oxygen sensor wiring.
- Connect the downstream oxygen sensor connector.
3 - Upstream and downstream oxygen sensors
- Torque tighten the oxygen sensors (45 N.m) using the (Mot. 1495) for the upstream oxygen sensor and using a 24 mm open-ended spanner for torque wrench for the downstream oxygen sensor.
III - FINAL OPERATION
- Connect the battery (see ) (80A, Battery).
M4R
WARNING
Do not use any product designed to improve the electrical contact in the injection computer and oxygen sensor connectors or on the bodies of the oxygen sensors.
Failure to respect this advice causes the oxygen sensor to malfunction and results in failure to comply with the emission control standard.
WARNING
If the connections are corroded, repair the wiring (see Wiring: Precautions for repair) (Technical Note 6015A, 88A, Wiring).
REMOVAL
I - REMOVAL PREPARATION OPERATION
- Position the vehicle on a lift (see Vehicle: Towing and lifting) (02A, Lifting equipment).
II - REMOVING THE UPSTREAM OXYGEN SENSOR
- Remove the engine cover.
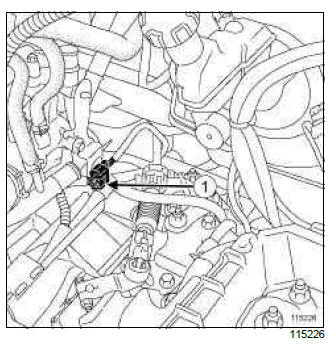
- Unclip the upstream oxygen sensor connector at (1).
- Disconnect the upstream oxygen sensor connector.
- Remove the engine undertray.
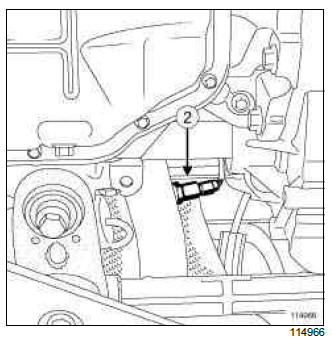
- Remove the upstream oxygen sensor (2).
III - REMOVAL OF THE DOWNSTREAM OXYGEN SENSOR
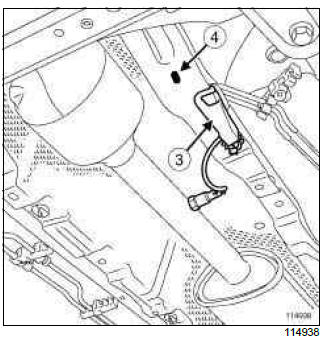
- Remove the plastic cover (3).
- Detach the downstream oxygen sensor connector at (4).
- Disconnect the downstream oxygen sensor connector.
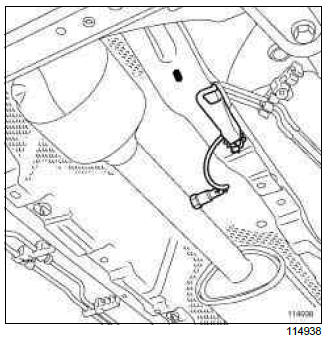
- Remove the downstream oxygen sensor.
REFITTING
I - REFITTING THE UPSTREAM OXYGEN SENSOR
- Refit the upstream oxygen sensor.
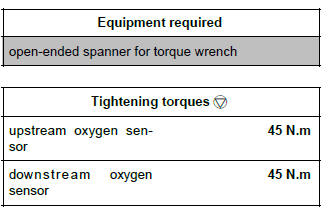
- Torque tighten the upstream oxygen sensor (45 N.m) using a open-ended spanner for torque wrench.
- Refit the engine undertray.
- Connect the upstream oxygen sensor connector.
- Clip the oxygen sensor connector.
- Refit the engine cover.
II - REFITTING THE DOWNSTREAM OXYGEN SENSOR
- Refit the downstream oxygen sensor.
- Torque tighten the downstream oxygen sensor (45 N.m) using a open-ended spanner for torque wrench.
- Connect the downstream oxygen sensor connector.
- Clip the downstream oxygen sensor connector.
- Refit the plastic cover.
F4R
WARNING
Do not use any product designed to improve the electrical contact in the injection computer and oxygen sensor connectors or on the bodies of the oxygen sensors.
Failure to respect this advice causes the oxygen sensor to malfunction and results in failure to comply with the emission control standard.
WARNING
If the connections are corroded, repair the wiring (see Wiring: Precautions for repair) (Technical Note 6015A, 88A, Wiring).
REMOVAL
I - REMOVAL PREPARATION OPERATION
- Position the vehicle on a two-post lift (see Vehicle: Towing and lifting) (02A, Lifting equipment).
II - REMOVAL OPERATION FOR THE OXYGEN SENSOR
1 - Removing the upstream oxygen sensor
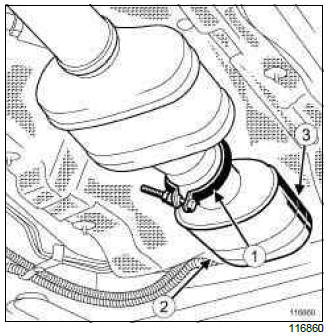
- Remove the connecting clip (1) between the " manifold - catalytic converter " assembly and the expansion chamber.
- Lower the catalytic converter slightly.
- Disconnect the upstream oxygen sensor connector (2).
- Remove the upstream oxygen sensor (3).
2 - Removal of the downstream oxygen sensor
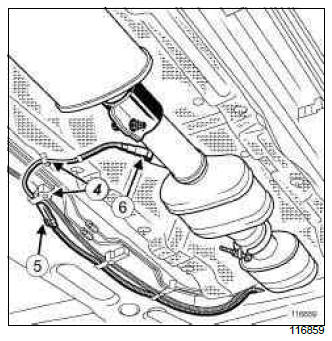
- Unclip the downstream oxygen sensor harness at (4).
- Disconnect the downstream oxygen sensor connector (5).
- Remove the downstream oxygen sensor (6).
REFITTING
REFITTING OPERATION FOR THE OXYGEN SENSOR
1 - Refitting the upstream oxygen sensor
- Refit the upstream oxygen sensor.
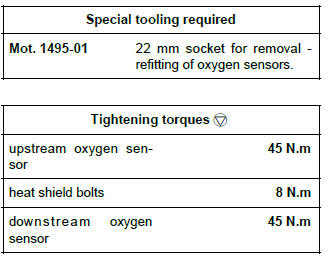
- Torque tighten the upstream oxygen sensor (45 N.m) using the (Mot. 1495-01).
- Align the exhaust pipe.
- Refit the connecting clip between the " manifold - catalytic converter " assembly and the expansion chamber.
- Connect the upstream oxygen sensor connector.
2 - Refitting the downstream oxygen sensor
- Refit the downstream oxygen sensor.
- Torque tighten the downstream oxygen sensor (45 N.m) using the tool (Mot. 1495-01).
- Connect the downstream oxygen sensor connector.
- Clip on the heat shield downstream oxygen sensor connector.
D4F, and 784 or 786
WARNING
Do not use any product designed to improve the electrical contact in the injection computer and oxygen sensor connectors or on the bodies of the oxygen sensors.
Failure to respect this advice causes the oxygen sensor to malfunction and results in failure to comply with the emission control standard.
WARNING
If the connections are corroded, repair the wiring (see Wiring: Precautions for repair) (Technical Note 6015A, 88A, Wiring).
REMOVAL
I - REMOVING THE UPSTREAM OXYGEN SENSOR
- Remove the engine cover.
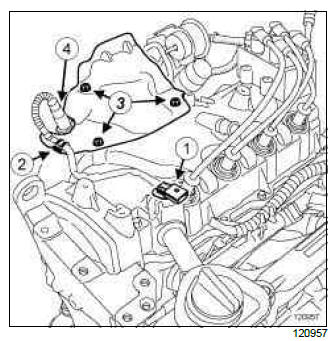
- Disconnect the upstream oxygen sensor connector (1).
- Unclip the upstream oxygen sensor connector.
- Detach the upstream oxygen sensor wiring harness at (2).
- Remove:
- the bolts (3) from the heat shield,
- the heat shield,
- the upstream oxygen sensor (4) using the (Mot.1495-01).
II - REMOVING THE DOWNSTREAM OXYGEN SENSOR
- Position the vehicle on a two-post lift (see Vehicle: Towing and lifting) (02A, Lifting equipment).
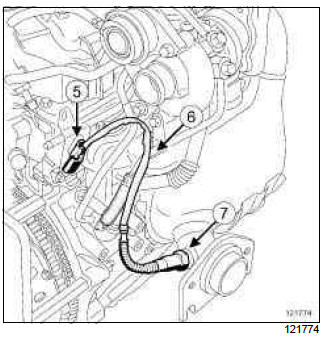
- Disconnect the downstream oxygen sensor connector (5).
- Unclip the downstream oxygen sensor connector from the catalytic converter.
- Detach the downstream oxygen sensor wiring harness from the catalytic converter at (6).
- Remove:
- the catalytic converter (see 19B, Exhaust, Catalytic converter: Removal - Refitting, 19B- 29),
- the downstream oxygen sensor from the catalytic converter (7) using the (Mot. 1495-01).
REFITTING
I - REFITTING THE UPSTREAM OXYGEN SENSOR
- Refit the upstream oxygen sensor.
- Torque tighten the upstream oxygen sensor (45 N.m) using the (Mot. 1495-01).
- Refit:
- the heat shield,
- the heat shield bolts.
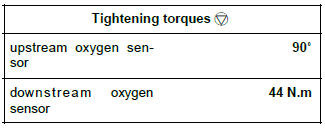
- Torque tighten the heat shield bolts (8 N.m).
- Attach the upstream oxygen sensor wiring harness.
- Fit the upstream oxygen sensor connector.
- Connect the upstream oxygen sensor connector.
- Refit the engine cover.
II - REFITTING THE DOWNSTREAM OXYGEN SENSOR
- Refit the downstream oxygen sensor.
- Torque tighten the downstream oxygen sensor (45 N.m) using the tool (Mot. 1495-01).
- Refit the catalytic converter (see 19B, Exhaust, Catalytic converter: Removal - Refitting, 19B-29).
- Attach the downstream oxygen sensor wiring harness.
- Fit the downstream oxygen sensor connector.
- Connect the downstream oxygen sensor connector.
- Refit the engine undertray.
K4M, and 862
WARNING
Do not use any product designed to improve the electrical contact in the injection computer and oxygen sensor connectors or on the bodies of the oxygen sensors.
Failure to respect this advice causes the oxygen sensor to malfunction and results in failure to comply with the emission control standard.
WARNING
If the connections are corroded, repair the wiring (see Wiring: Precautions for repair) (Technical Note 6015A, 88A, Wiring).
Note: This procedure is for removing and refitting the upstream oxygen sensor and the downstream oxygen sensor.
REMOVAL
I - REMOVAL PREPARATION OPERATION
- Position the vehicle on a two-post lift (see Vehicle: Towing and lifting) (02A, Lifting equipment).
1 - Upstream oxygen sensor
- Remove:
- the front right-hand wheel (see Wheel: Removal - Refitting) (35A, Wheels and tyres),
- the front right-hand wheel arch liner (see Front wheel arch liner: Removal - Refitting) (55A, Exterior protection).
2 - Downstream oxygen sensor
- Remove:
- the engine undertray bolts,
- the engine undertray,
- the windscreen wiper arms (see Windscreen wiper arm: Removal - Refitting) (85A, Wiping - Washing),
- the scuttle panel grille (see Scuttle panel grille: Removal - Refitting) (56A, Exterior equipment),
- the scoop under the scuttle panel grille (see Scoop under the scuttle panel grille: Removal - Refitting) (56A, Exterior equipment).
II - OPERATION FOR REMOVAL OF PART CONCERNED
1 - Upstream oxygen sensor
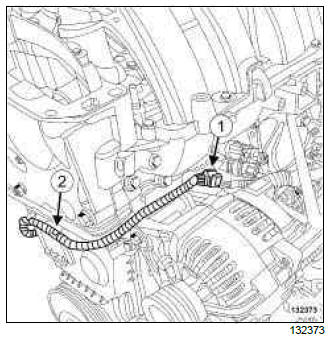
- Disconnect the upstream oxygen sensor connector (1).
- Unclip the wiring from the upstream oxygen sensor at (2).
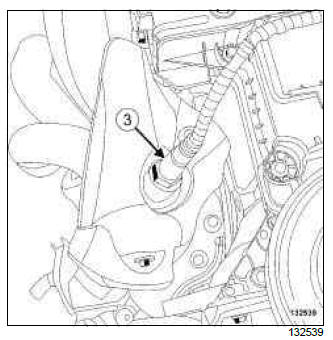
- Remove the upstream oxygen sensor (3).
2 - Downstream oxygen sensor
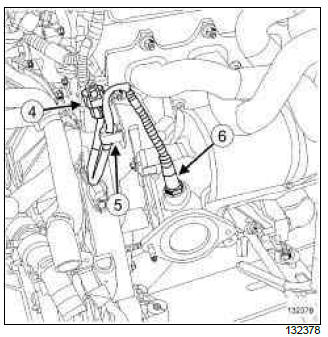
- Disconnect the downstream oxygen sensor connector (4).
- Unclip the wiring from the downstream oxygen sensor at (5).
- Remove the downstream oxygen sensor (6).
REFITTING
I - REMOVAL PREPARATION OPERATION
- Clean the threading of the upstream and downstream oxygen sensors using a WIRE BRUSH.
- Use SURFACE CLEANER (see ) (04B, Consumables
- Products) to clean and degrease:
- the thread hole of the oxygen sensor on the exhaust manifold,
- the threading of the oxygen sensor if it is to be reused.
II - REFITTING OPERATION FOR PART CONCERNED
1 - Upstream oxygen sensor
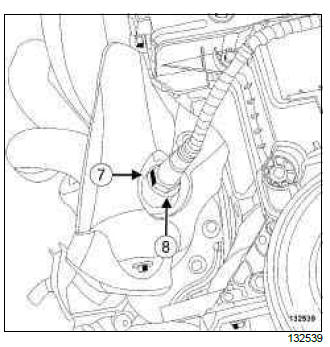
- Refit the upstream oxygen sensor.
- Angle tighten the upstream oxygen sensor (90

