Renault Clio: Rear stub axle carrier: Removal - Refitting
Renault Clio III (2005-2013) Service Manual / Chassis / Rear Axle Components / Rear stub axle carrier: Removal - Refitting
DISC BRAKE
REMOVAL
I - REMOVAL PREPARATION OPERATION
- Position the vehicle on a two-post lift (see Vehicle: Towing and lifting) (MR 392, 02A, Lifting equipment).
- Remove:
- the rear wheel in question (see 35A, Wheels and tyres, Wheel: Removal - Refitting, 35A-1),
- the rear brake pads (see 33A, Rear axle components, Rear brake pads: Removal - Refitting, 33A-3),
- the calliper mounting (see 33A, Rear axle components, Rear brake calliper mounting: Removal - Refitting, 33A-10),
- the rear brake disc (see 33A, Rear axle components, Rear brake disc: Removal - Refitting, 33A-12).
II - OPERATION FOR REMOVAL OF PART CONCERNED
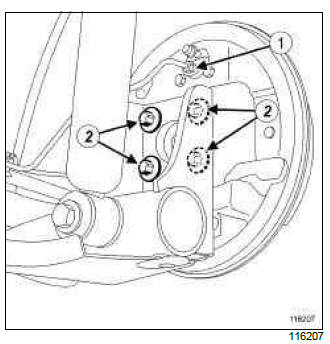
- Remove:
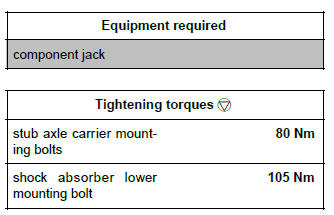
- the rivets (1) from the disc protector,
- the brake disc protector,
- the sensor holder (2) from the ABS sensor,
Note: Mark the of the position of the inscription on the stub axle carrier for the purpose of refitting
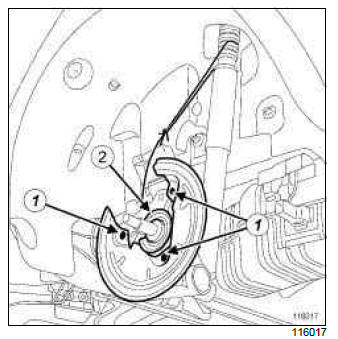
- Fit a component jack with a shim under the rear axle level with the shock absorber.
- Remove:
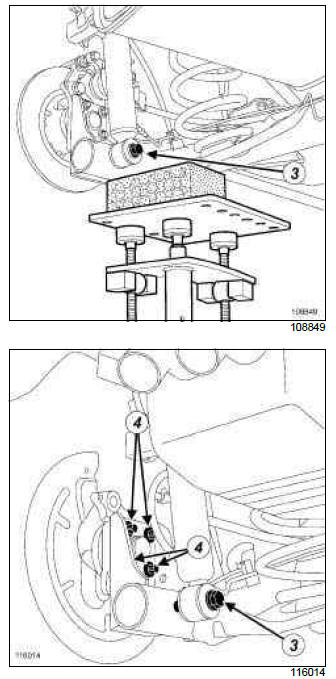
- the shock absorber lower mounting bolt (3),
- the mounting bolts (4) from the stub axle carrier,
- the stub axle carrier.
REFITTING
I - REFITTING PREPARATIONS OPERATION
- Clean the stub axle carrier.
II - REFITTING OPERATION FOR PART CONCERNED
- Refit:
- the stub axle carrier,
- the stub axle carrier mounting bolts.
- Torque tighten the stub axle carrier mounting bolts (80 Nm).
- Refit:
- the ABS sensor holder,
- the brake disc protector,
- the disc protector rivets.
III - FINAL OPERATION.
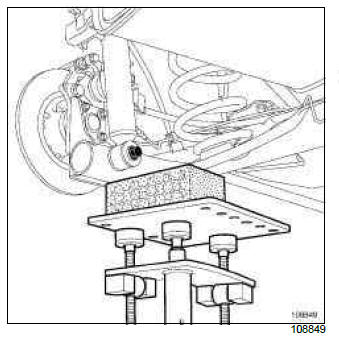
- Refit and torque tighten the shock absorber lower mounting bolt (105 Nm) with the component jack fitted, with a shim, under the rear axle and level with the shock absorber.
- Remove the component jack.
- Refit:
- the rear brake disc (see 33A, Rear axle components, Rear brake disc: Removal - Refitting, 33A-12),
- the calliper mounting (see 33A, Rear axle components, Rear brake calliper mounting: Removal - Refitting, 33A-10),
- the rear brake pads (see 33A, Rear axle components, Rear brake pads: Removal - Refitting, 33A-3),
- the rear wheel (see 35A, Wheels and tyres, Wheel: Removal - Refitting, 35A-1).
DRUM BRAKE
REMOVAL
I - REMOVAL PREPARATION OPERATION
- Position the vehicle on a two-post lift (see 02A, Lifting equipment, Vehicle: Towing and lifting).
- Remove:
- the rear wheel in question (see 35A, Wheels and tyres, Wheel: Removal - Refitting, 35A-1),
- the brake drum (see 33A, Rear axle components, Rear brake drum: Removal - Refitting, 33A-19).
II - OPERATION FOR REMOVAL OF PART CONCERNED
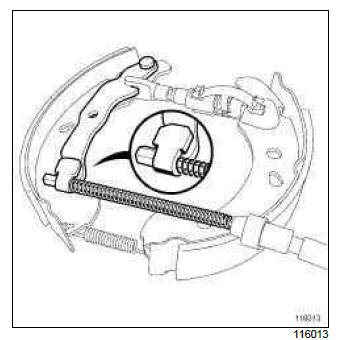
Note: Mark the of the position of the inscription on the stub axle carrier for the purpose of refitting
- Remove:
- the rigid pipe union (1) on the brake cylinder,
- the mounting bolts (2) from the stub axle carrier,
- the stub axle carrier,
- the brake cylinder-flange-pad assembly.
REFITTING
I - REFITTING PREPARATION OPERATION
- Clean the stub axle carrier.
II - REFITTING OPERATION FOR PART CONCERNED
- Refit:
- the brake cylinder-flange-pad assembly,
- the stub axle carrier,
- the stub axle carrier mounting bolts,
- the rigid pipe union on the brake cylinder,
- Tighten to torque:
- the stub axle carrier mounting bolts (80 Nm),
- the rigid pipe union on the brake cylinder (14 Nm).
- Check that the parking brake cable is correctly positioned on the parking brake lever.
III - FINAL OPERATION
- Refit:
- the brake drum (see 33A, Rear axle components, Rear brake drum: Removal - Refitting, 33A-19),
- the rear wheel (see 35A, Wheels and tyres, Wheel: Removal - Refitting, 35A-1).
- Bleed the brake circuit (see 30A, General information, Braking circuit: Bleed, 30A-4).
READ NEXT:
 Complete rear axle system: Removal - Refitting
EQUIPMENT LEVEL E3 LEISURE or EQUIPMENT LEVEL EA1 or EQUIPMENT LEVEL EA2
or EQUIPMENT
LEVEL EA3 or EQUIPMENT LEVEL EA4 or EQUIPMENT LEVEL EA5 or EQUIPMENT LEVEL EAG
WARNING
Never use the rear axle a
Wheel: Removal - Refitting
EQUIPMENT LEVEL E3 LEISURE or EQUIPMENT LEVEL EA1 or EQUIPMENT LEVEL EA2
or EQUIPMENT
LEVEL EA3 or EQUIPMENT LEVEL EA4 or EQUIPMENT LEVEL EA5 or EQUIPMENT LEVEL EAG
The removal - refitting procedure
SEE MORE:
Driving
The Renault Clio IV (2014-2019) offers a satisfying driving experience with its nimble handling and responsive performance. Its compact size and maneuverability make it well-suited for urban driving and tight parking spaces. The precise steering and suspension tuning provide a balanced and confident
Your comfort
The Renault Clio IV (2014-2019) is designed with your comfort in mind. It features a well-crafted interior with quality materials and thoughtful ergonomics. The seats offer excellent support and adjustability, providing a comfortable driving experience. The cabin is designed to minimize noise and vi
© 2016-2026 Copyright Renault Clio Owners Club - 0.0035
