Renault Clio: Valves: Adjustment
Renault Clio III (2005-2013) Service Manual / Engine And Peripherals / Engine And Cylinder Block Assembly / Valves: Adjustment
D4F
I - VALVE CLEARANCE ADJUSTMENT PREPARATION OPERATION
- Fit the vehicle on a two-post lift (see Vehicle: Towing and lifting).
- Remove:
- the front right-hand wheel (see Wheel: Removal - Refitting),
- the front right-hand wheel arch liner (see MR 393 Bodywork, 55A, Exterior protection, Front wheel arch liners: Removal - Refitting).
- the air filter unit (see 12A, Fuel mixture, Air filter unit: Removal - Refitting, 12A-17),
- the plenum chamber (see 12A, Fuel mixture, Inlet distributor: Removal - Refitting, 12A-45),
- the rocker cover (see 11A, Top and front of engine, Rocker cover: Removal - Refitting, 11A-183).
Adjusting the timing
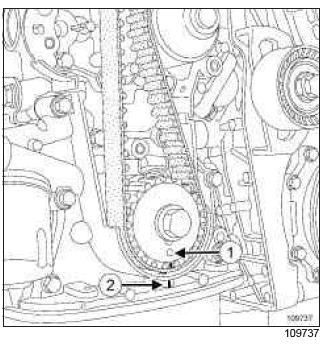
- Turn the crankshaft clockwise (timing end), half a tooth before the alignment of the crankshaft pulley mark (1) with the fixed mark (2).
- Insert (Mot. 1054).
- Turn the crankshaft clockwise to the timing point.
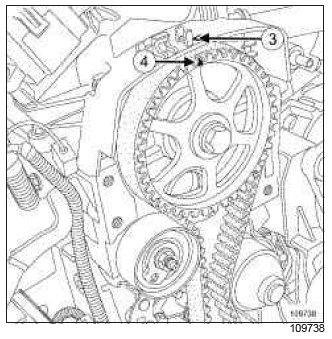
- Check that the camshaft pulley mark (4) and the crankshaft pulley mark (1) are aligned with the fixed marks (3).
II - ADJUSTING THE VALVE CLEARANCES
- To adjust the valves (see Technical Note 6004A, Petrol engine - 4 cylinders - D4, 10A, Engine and peripherals, Timing - cylinder head: Refit).
III - FINAL OPERATION
- Refit:
- the rocker cover (see 11A, Top and front of engine, Rocker cover: Removal - Refitting, 11A-183),
- the plenum chamber (see 12A, Fuel mixture, Inlet distributor: Removal - Refitting, 12A-45),
- the air filter unit (see 12A, Fuel mixture, Air filter unit: Removal - Refitting, 12A-17),
- the front right-hand wheel arch liner (see MR 393 Bodywork, 55A, Exterior protection, Front wheel arch liners: Removal - Refitting).
- the front right-hand wheel (see Wheel: Removal - Refitting).
K9K
- To adjust the valves (see ) (Technical Note 6006A, 10A, Engine and peripherals).
M4R
- The engine and gearbox assembly must be removed to adjust the valves (see 10A, Engine and cylinder block assembly, Engine - gearbox assembly: Removal - Refitting, 10A-112).
- For the valve adjustment procedure (see ) (Technical Note 6020A, 10A, Engine and peripherals).
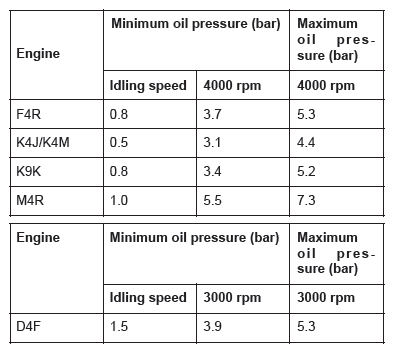
Oil pressure: Check
D4F or F4R or K4J or K4M or K9K or M4R
Oil pressure tables:
End pieces to be used:

REMOVAL
WARNING
Always check the oil level using the dipstick.
Do not exceed the maximum level on the dipstick (could destroy the engine).
Correct the engine oil level if necessary before delivering the vehicle to the customer.
Note: When topping up the engine oil, always leave at least 10 minutes before checking the level with a dipstick.
CHECK
- Remove the oil pressure sensor (see 10A, Engine and cylinder block assembly, Oil pressure sensor: Removal - Refitting, 10A-39).
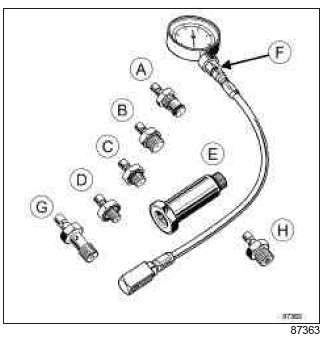
- In place of the oil pressure sensor, fit the (Mot. 836- 05) with suitable adapters using the (Mot. 1495-01) or a 22 mm long socket.
- Start the vehicle.
- Monitor the engine oil pressure as the engine oil
temperature rises (approximately 80
READ NEXT:
D4F or F4R or K4J or K4M or K9K REMOVAL I - REMOVAL PREPARATION OPERATION Position the vehicle on a two-post lift (see Vehicle: Towing and lifting) (02A, Lifting equipment). Disconnect the batter Flywheel: Removal - Refitting
K4M, and DP0 REMOVAL I - REMOVAL PREPARATION OPERATION Remove the gearbox (see Automatic gearbox: Removal - Refitting). II - OPERATION FOR REMOVAL OF PART CONCERNED Set up the (Mot. 582-01) (2) Drive plate: Removal -
Refitting
SEE MORE:
K4M, and DP0 REMOVAL I - REMOVAL PREPARATION OPERATION Remove: the scuttle panel grille (see Scuttle panel grille: Removal - Refitting) (MR 393, 56A, Exterior equipment), the scoop under the scuttle panel grille (see Scoop under the scuttle panel grille: Removal - Refitting) (MR 393,
Left-hand suspended engine mounting: Removal - Refitting
The Renault Clio IV (2014-2019) offers a range of transmission options to suit different driving preferences. Manual transmissions are available with five or six speeds, providing precise and engaging control over gear changes. They allow drivers to optimize engine performance and fuel efficiency.
Transmission
© 2016-2026 Copyright Renault Clio Owners Club - 0.0036
