Renault Clio: Front right-hand driveshaft gaiter, gearbox side: Removal - Refitting
Renault Clio III (2005-2013) Service Manual / Transmission / Driveshafts / Front right-hand driveshaft gaiter, gearbox side: Removal - Refitting
DP0 or JH3 or JR5 or TL4
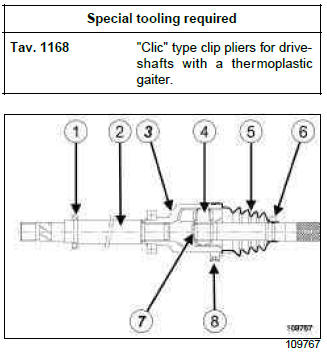
- Deflector
- Propeller shaft
- Driveshaft yoke sleeve
- Spider
- RC gaiter
- Tightening clip
- Lock ring
- Tightening ring
REMOVAL
I - REMOVAL PREPARATION OPERATION
- Position the vehicle on a two-post lift (see Vehicle: Towing and lifting) (MR 392, 02A, Lifting equipment).
- Disconnect the battery (see Battery: Removal - Refitting) (MR 392, 80A, Battery).
- Remove the front right-hand driveshaft (see 29A, Driveshafts, Front right-hand driveshaft: Removal - Refitting, 29A-9).
II - OPERATION FOR REMOVAL OF PART CONCERNED
- Cut the ring (8) and the tightening clip (6) using cutting pliers or a metal saw, taking care not to damage the yoke sleeve.
- Push back the gaiter (5) to release the driveshaft yoke sleeve.
- Remove as much grease as possible.
WARNING
Never use thinners to clean the components.
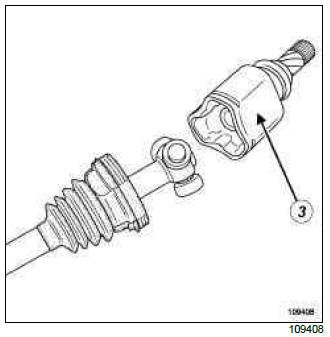
- Remove the driveshaft yoke sleeve (3).
Note:
- Since the driveshaft yoke sleeve does not have a stop tab, it can be removed without being forced.
- Do not remove the rollers from their respective bushings as the rollers and needles are matched and should never be interchanged.
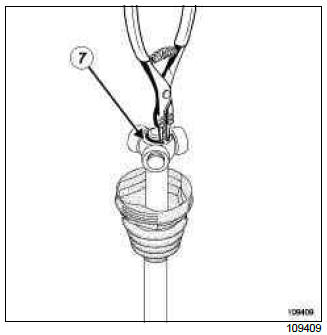
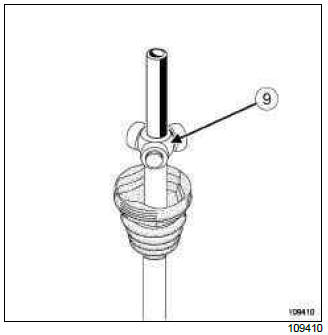
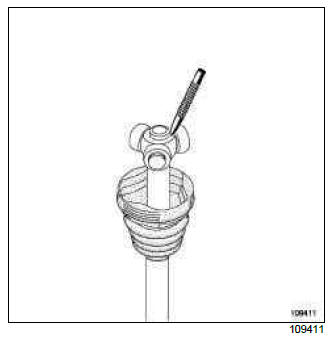
- Remove the lock ring (7) using the tool.
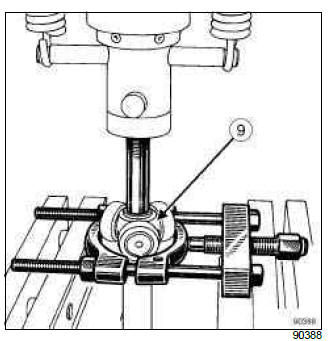
- Extract the spider (9), using a press and a releasing type extractor.
Note: Mark the position of the spider before extracting it.
- Remove the propeller shaft gaiter.
REFITTING
I - REFITTING OPERATION FOR PART CONCERNED
- Fit the small tightening clip (6) to the propeller shaft.
- Slightly lubricate the propeller shaft to facilitate fitting the gaiter.
- Refit the propeller shaft gaiter.
- Refit the spider (9) in the position marked during removal.
- Refit the retaining lock ring (7) or crimp at three
points at 120
READ NEXT:
DP0 or JH3 or JR5 or TL4 Tightening clip Tightening ring Cup Driveshaft yoke sleeve Deflector Propeller shaft RC gaiter Spider Lock ring Spring REMOVAL I - REMOVAL PREPARATION OPERATION Front left-hand driveshaft gaiter, gearbox side: Removal - Refitting
The Renault Clio IV (2014-2019) features a well-engineered chassis that contributes to its handling, stability, and overall driving dynamics. The chassis is designed to provide a balanced and controll Chassis
SEE MORE:
The Renault Clio IV (2014-2019) offers a satisfying driving experience with its nimble handling and responsive performance. Its compact size and maneuverability make it well-suited for urban driving and tight parking spaces. The precise steering and suspension tuning provide a balanced and confident
Driving
The Renault Clio IV (2014-2019) is designed with your comfort in mind. It features a well-crafted interior with quality materials and thoughtful ergonomics. The seats offer excellent support and adjustability, providing a comfortable driving experience. The cabin is designed to minimize noise and vi
Your comfort
© 2016-2026 Copyright Renault Clio Owners Club - 0.0033
