Renault Clio: Headlight: Removal - Refitting
DISCHARGE LAMPS, and DOCUMENTATION PHASE 1
IMPORTANT
To prevent eye injuries:
- do not look at a xenon bulb when lit (voltage when lit 20000 V),
- do not light a bulb which has not been fitted into its headlight.
IMPORTANT
To prevent burns, wait until the " computers - power unit " assemblies are cold before removal.
REMOVAL
I - REMOVAL PREPARATION OPERATION
- Position the vehicle on a two-post lift (see Vehicle: Towing and lifting) (02A, Lifting equipment).
DISCHARGE LAMPS, and DOCUMENTATION PHASE 1
- Disconnect the battery (see 80A, Battery, Battery: Removal - Refitting, 80A-1).
- Remove:
- the front wheels (see Wheel: Removal - Refitting) (35A, Wheels and tyres),
- the front section of the front wheel arch liners (see Front wheel arch liner: Removal - Refitting) (55A, Exterior protection),
- the front bumper (see Front bumper: Removal - Refitting) (55A, Exterior protection).
II - OPERATION FOR REMOVAL OF PART CONCERNED
DOCUMENTATION PHASE 1

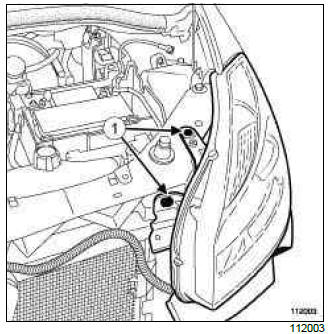
- Remove the upper bolts (1) from the headlight.

- Remove:
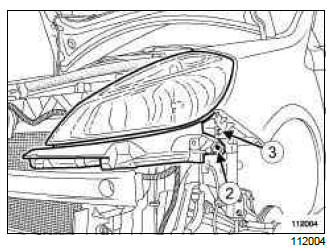
- the headlight lower bolt (2),
- the plastic rivet (3).
DOCUMENTATION PHASE 2

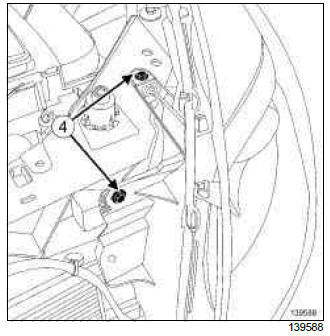
- Remove the upper bolts (4) from the headlight.

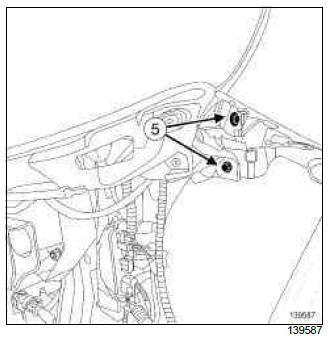
- Remove the lower bolts (5) from the headlight.
- Remove the headlight.
- Disconnect the headlight connectors.
- Remove the headlight.
REFITTING
I - REFITTING OPERATION FOR PART CONCERNED
- Connect the headlight connectors
- Refit the headlight.
II - FINAL OPERATION
DISCHARGE LAMPS, and DOCUMENTATION PHASE 1
- Connect the battery (see 80A, Battery, Battery: Removal - Refitting, 80A-1).
- Adjust the headlights (see 80B, Headlights, Headlight: Adjustment, 80B-9).
- Refit:
- the front bumper (see Front bumper: Removal - Refitting) (55A, Exterior protection),
- the front section of the front wheel arch liners (see Front wheel arch liner: Removal - Refitting) (55A, Exterior protection),
- the front wheels (see Wheel: Removal - Refitting) (35A, Wheels and tyres).
READ NEXT:
 Headlight: Adjustment
DOCUMENTATION PHASE 1
ADJUSTMENT
I - PREPARATION OPERATION FOR CHECK
Place the vehicle in a working area equipped with a
two-post lift.
Note:
Check that the lift is on flat, horizontal ground.
 Headlight bulb: Removal - Refitting
DOCUMENTATION PHASE 1
REMOVAL
DISCHARGE LAMPS
IMPORTANT
To prevent eye injuries:
do not look at a xenon bulb when lit (voltage
when lit 20000 V),
do not light a bulb which has not been fitted into
 Remote headlight beam adjustment actuator: Removal - Refitting
DOCUMENTATION PHASE 1
DISCHARGE LAMPS
IMPORTANT
To prevent burns, wait until the " computers -
power unit " assemblies are cold before removal.
IMPORTANT
To prevent eye injuries:
do not look at a xe
SEE MORE:
 Panelwork
The Renault Clio IV features stylish and aerodynamic panelwork that not only enhances its visual appeal but also contributes to its overall performance. The exterior panels are designed to reduce drag and improve fuel efficiency, while maintaining a modern and attractive look. The body panels are ma
 Front seat height adjustment: Removal - Refitting
FRONT SEAT TYPE 02 or FRONT SEAT TYPE 03 or FRONT SEAT TYPE 05, and
WITHOUT SPORT SEATS, and
DOCUMENTATION PHASE 2
IMPORTANT
Before beginning work on any component of the
safety system, it is essential to lock the airbag computer
using the Diagnostic tool (see Airbag and
pretensioners: Precautions
© 2016-2026 Copyright Renault Clio Owners Club

