Renault Clio: Manual gearbox: Removal - Refitting
JH3 or JR5
REMOVAL
I - REMOVAL PREPARATION OPERATION
- Position the vehicle on a two-post lift (see Vehicle: Towing and lifting).
IMPORTANT
During this operation, secure the vehicle to the lift with a strap, to avoid any imbalance.
- For strapping the vehicle (see 02A, Lifting equipment, Vehicle: Towing and lifting).
- Remove:
- the battery (see Battery: Removal - Refitting),
- the battery tray,
- the air inlet duct,
- the air filter unit (see Air filter unit: Removal - Refitting),
- the front wheels (see Wheel: Removal - Refitting),
- the front wheel arch liners (see MR 393 Bodywork, 55A, Exterior protection, Front wheel arch liners: Removal - Refitting).
- the engine undertray.
- Drain the gearbox (see 21A, Manual gearbox, Manual gearbox oils: Draining - Filling, 21A-3).
- Remove:
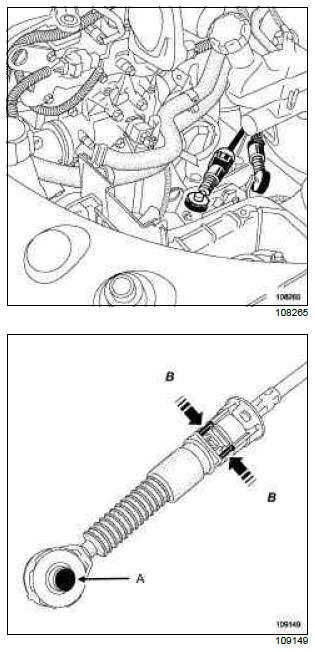
- the gear control cables from the gearbox by pressing at (A),
- the gearbox control cable sleeve stops by pressing at (B).
- Disconnect the anti-lock braking system sensor connectors.
- Remove:
- the left-hand driveshaft (see 29A, Driveshafts, Front left-hand driveshaft: Removal - Refitting, 29A-2),
- the right-hand driveshaft (see 29A, Driveshafts, Front right-hand driveshaft: Removal - Refitting, 29A-9).
- Attach the radiator assembly to the upper cross member.
- Remove the radiator support cross member (see MR 393 Bodywork, 41A, Front lower structure, Radiator support cross member: Removal - Refitting).
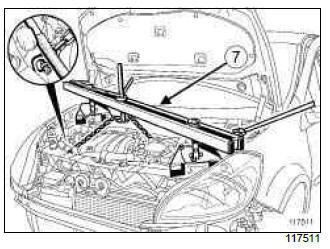
- Remove the engine tie-bar with its reinforcement (see Lower engine tie-bar: Removal - Refitting).
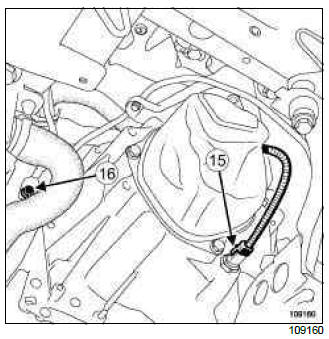
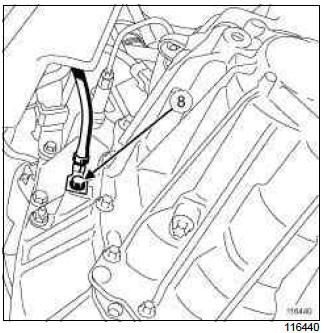
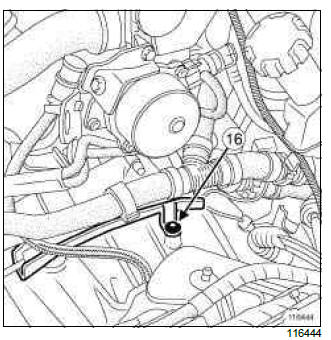
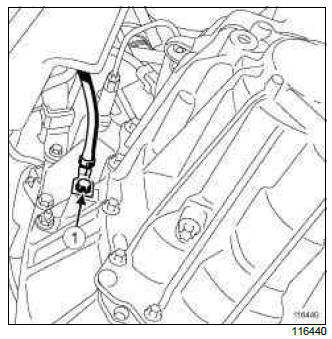
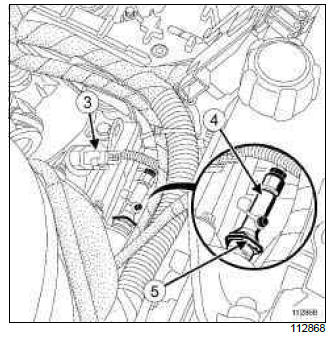
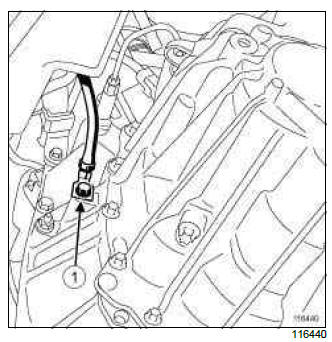
- Remove:
- the reverse gear connector (15) on the gearbox,
- the earth strap (16) from the gearbox.
- Remove:
- the starter (see Starter: Removal - Refitting),
- the TDC sensor,
- the cover of the Protection and Switching Unit,
- the injection computer (see Petrol injection computer: Removal - Refitting),
- the computer bracket mounting bolts bolts,
- the computer bracket.
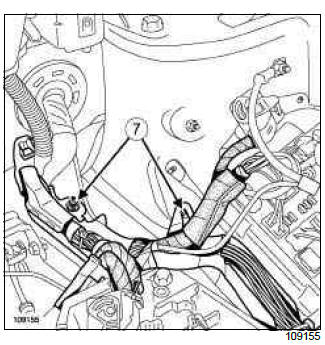
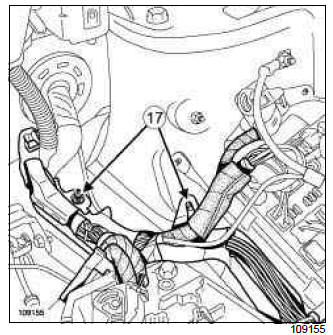
- Remove the mounting bolts (7) for the wiring duct on the body.
- Remove the wiring duct.
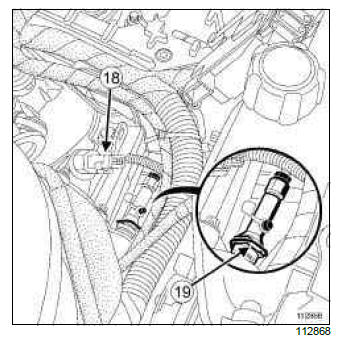
- Fit a hose clamp between the brake fluid reservoir and the clutch master cylinder.
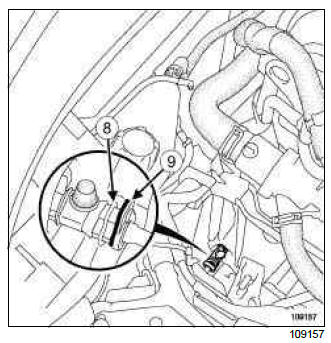
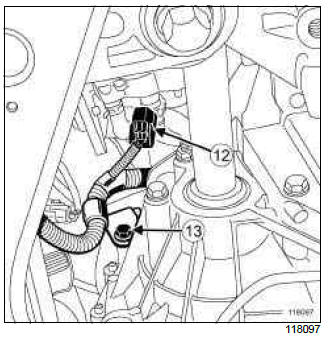
- Disconnect the clutch slave cylinder by pulling on the clips (8), (9).
- Collect the fluid in a container.
- It is essential to place protective plugs in the ends of the hoses.
- Remove:
- the scuttle panel grille (see MR 393 Bodywork, 56A, Exterior protection, Scuttle panel grille: Removal - Refitting).
- the scoop under the scuttle panel grille (see 393 56A, Exterior equipment, Scoop under scuttle panel grille: Removal - Refitting).
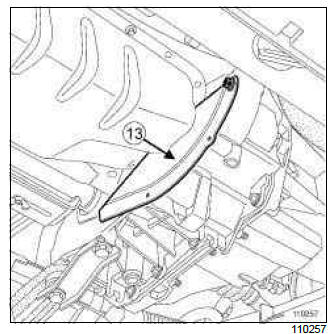
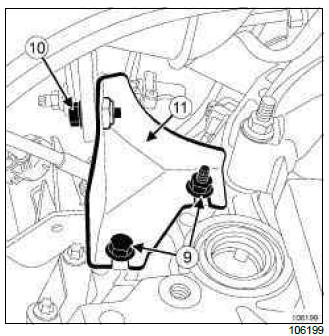
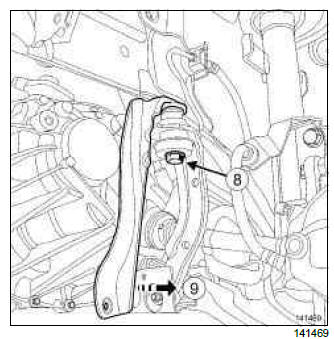
- the left-hand suspended engine mounting (see Left-hand suspended engine mounting: Removal - Refitting).

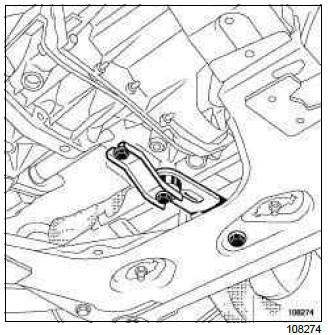
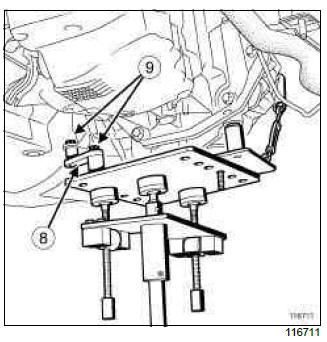
- Remove:
- the bolts (12) securing the gearbox support.
- the gearbox support.
II - OPERATION FOR REMOVAL OF PART CONCERNED
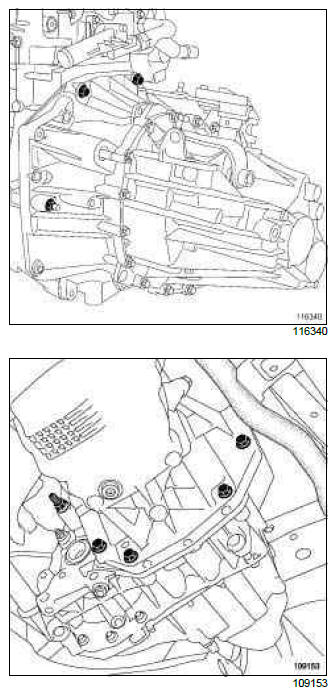
- Remove the upper gearbox bell housing bolts.
- Position the component jack under the gearbox.
- Remove:
- the flywheel cover (13),
- the lower gearbox bell housing bolts,
- the gearbox mounting studs,
- the gearbox.
REFITTING
I - REFITTING PREPARATION OPERATION
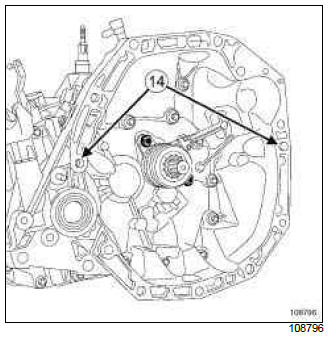
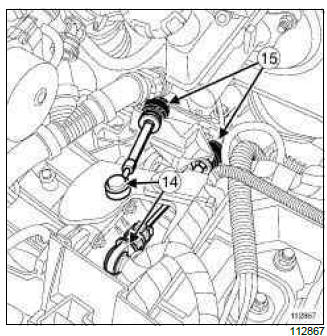
- Check that the engine / gearbox centering rings (14) are present and correctly positioned.
WARNING
Do not grease:
- the transmission output shaft, so as not to damage the clutch slave cylinder,
- the clutch shaft splines.
Note:
- To avoid leaks, the clutch slave cylinder must always be replaced after the clutch pressure plate is replaced;
- Always replace the right-hand driveshaft circlip with a new one whenever it is removed.
- It is essential to replace the differential seals with new ones every time the driveshafts are removed.
II - REFITTING OPERATION FOR PART CONCERNED
- Refit:
- the gearbox,
- the gearbox mounting studs,
- the lower gearbox bell housing bolts,
- the flywheel cover.
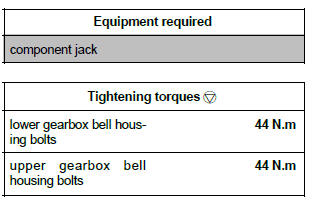
- Tighten to torque the lower gearbox bell housing bolts (44 N.m).
- Remove the component jack from underneath the gearbox.
- Refit the upper gearbox bell housing bolts.
- Tighten to torque the upper gearbox bell housing bolts (44 N.m).
III - FINAL OPERATION
- Refit:
- the left-hand suspended engine mounting (see Left-hand suspended engine mounting: Removal - Refitting),
- the scoop under the scuttle panel grille (see 393 56A, Exterior equipment, Scoop under scuttle panel grille: Removal - Refitting).
- the scuttle panel grille (see MR 393 Bodywork, 56A, Exterior protection, Scuttle panel grille: Removal - Refitting).
- It is essential to remove the protective plugs from the ends of the hoses.
- Connect the clutch slave cylinder.
- Remove the hose clamp between the brake fluid reservoir and the clutch master cylinder.
- Refit:
- the wiring channel on the body,
- the mounting bolts for the wiring duct on the body.
- the earth strap on the gearbox,
- the computer mounting,
- the computer bracket mounting bolts bolts,
- the injection computer (see Petrol injection computer: Removal - Refitting),
- the reverse gear connector on the gearbox,
- the cover of the Protection and Switching Unit,
- the TDC sensor,
- the starter (see Starter: Removal - Refitting),
- the engine tie-bar with its reinforcement (see Lower engine tie-bar: Removal - Refitting),
- the radiator support cross member (see MR 393 Bodywork, 41A, Lower front structure, Radiator support cross member: Removal - Refitting).
- Detach the radiator assembly from the upper cross member.
- Refit:
- the left-hand driveshaft (see 29A, Driveshafts, Front left-hand driveshaft: Removal - Refitting, 29A-2),
- the right-hand driveshaft (see 29A, Driveshafts, Front right-hand driveshaft: Removal - Refitting, 29A-9).
- Connect the ABS sensor connectors.
- Connect:
- the gearbox control cable sleeve stops on the gearbox,
- the gear control cables to the gearbox.
- Fill the gearbox (see 21A, Manual gearbox, Manual gearbox oils: Draining - Filling, 21A-3).
- Refit:
- the engine undertray,
- the front wheel arch liners (see MR 393 Bodywork, 55A, Exterior protection, Front wheel arch liners: Removal - Refitting).
- the front wheels (see Wheel: Removal - Refitting),
- the air filter unit (see Air filter unit: Removal - Refitting),
- the air inlet duct,
- the battery tray,
- the battery (see Battery: Removal - Refitting).
K9K, and TL4
REMOVAL
I - REMOVAL PREPARATION OPERATION
- Position the vehicle on a two-post lift (see Vehicle: Towing and lifting) (MR 392, 02A, Lifting equipment).
- Remove:
- the scoop under the scuttle panel grille (see Scoop under the scuttle panel grille: Removal - Refitting) (MR 393, 56A, Exterior equipment),
- the battery (see Battery: Removal - Refitting) (MR 392, 80A, Battery),
- the battery tray (see Battery tray: Removal - Refitting) (MR 392, 80A, Battery),
- the air filter unit (see Air filter unit: Removal - Refitting) (MR 392, 12A, Fuel mixture).
- the front wheels (see Wheel: Removal - Refitting) (MR 392, 35A, Wheels and tyres),
- the front section of the front wheel arch liners (see Front wheel arch liner: Removal - Refitting) (MR 393, 55A, Exterior protection).
- the engine undertray,
- the front bumper (see Front bumper: Removal - Refitting) (MR 393, 55A, Exterior protection),
- Drain the gearbox (see 21A, Manual gearbox, Manual gearbox oils: Draining - Filling, 21A-3).
- Remove:
- the front left-hand driveshaft (see 29A, Driveshafts, Front left-hand driveshaft: Removal - Refitting, 29A-2),
- the front right-hand driveshaft (see 29A, Driveshafts, Front right-hand driveshaft: Removal - Refitting, 29A-9).
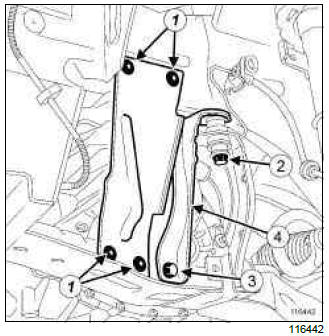
- Remove:
- the side stiffener bolts (1),
- the front axle sub-frame front left-hand bolt (2),
- the tie-rod bolt (3),
- the tie rod (4).
K9K, and 772
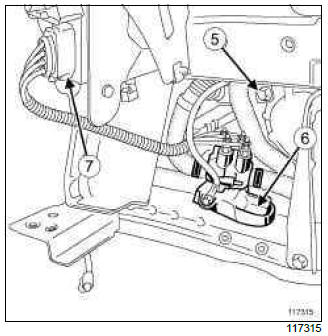
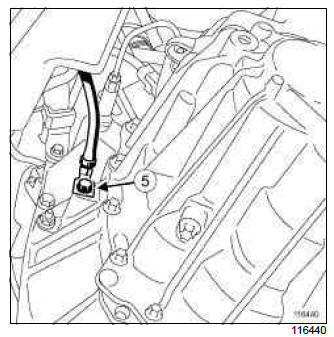
- Remove:
- the earth wiring bolt (5),
- the bolt (6) from the heating element and coolant pump support on the radiator mounting cross member.
- Disconnect the connector (7) from the heating element unit.
- Move the heating element and coolant pump support on the radiator mounting cross member to one side.
- Undo the radiator mounting cross member bolts (see Radiator mounting cross member: General description) (MR 393, 41A, Lower structure).
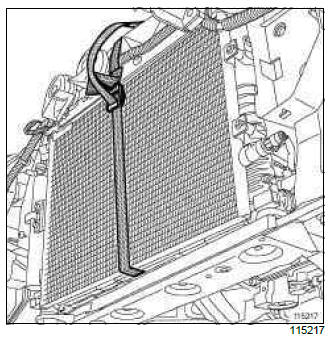
- Attach the " cooling radiator - fan unit " assembly to the upper cross member using a safety strap(s).
- Remove the radiator mounting cross member (see Radiator mounting cross member: Removal - Refitting) (MR 393, 41A, Front lower structure).
- Remove the rear suspended engine mounting (see Lower engine tie-bar: Removal - Refitting) (MR 392, 19D, Engine mounting).
IMPORTANT
Having already removed the driveshafts, remove the front axle subframe without removing the lower ball joint nuts.
- Remove the front axle sub-frame (see Front axle subframe: Removal - Refitting) (MR 392, 31A, Front axle components).
- Remove the earth wiring bolt (8).
Note: Before removing the earth terminal, mark its position using an indelible marker by drawing a line on the earth terminal and on the gearbox casing.
When reassembling, improper positioning of the earth terminal on the gearbox casing could result in damage to the earth terminal or earth wiring.
- Remove:
- the bolt and the nut (9) on the gearbox,
- the bolt (10) on the catalytic converter,
- the exhaust strut (11).
K9K, and 772
- Disconnect the connector (12) from the diesel injector.
- Remove the bolt (13) from the diesel injector wiring harness strut.
- Move the diesel injector wiring harness strut to one side.
- Unclip:
- the gear control cables (14) from the gearbox using an open ended wrench,
- the gear control cable sleeve stops (15) from the gearbox,
- the expansion bottle (see Expansion bottle: Removal - Refitting) (MR 392, 19A, Cooling).
- Remove the bolt (16) from the wiring harness channel on the gearbox.
- Remove the wiring harness channel.
- Remove:
- the starter (see Starter: Removal - Refitting) (MR 392, 16A, Starting - Charging),
- the engine speed and position sensor (see Crankshaft position sensor: Removal - Refitting) (MR 392, 13B, Diesel injection).
- Disconnect the coolant temperature sensor.
- Remove the injection computer (see Diesel injection computer: Removal - Refitting) (MR 392, 13B, Diesel injection).
- Remove the wiring channel bolts (17) on the body.
- Remove:
- the computer supporting bracket,
- the wiring channel.
- Fit a hose clamp between the brake fluid reservoir and clutch master cylinder.
- Disconnect the connector (18) from the reversing sensor.
WARNING
Do not pull on the clip, any incorrect handling of the clip will mean that the clutch control pipes will have to be replaced.
- Disconnect the clutch slave cylinder by pressing on the clip (19).
- It is essential to place protective plugs in the ends of the hoses.
- Unclip the breather pipe from the gearbox on the engine.
- Fit:
- the (Mot. 1453),
- the safety strap(s).
- Remove the left-hand suspended engine mounting (see Left-hand suspended engine mounting: Removal - Refitting) (MR 392, 19D, Engine mounting).
II - OPERATION FOR REMOVAL OF PART CONCERNED

- Remove:
- the gearbox nuts (23),
- the gearbox bolts (24),
- the gearbox studs (25).
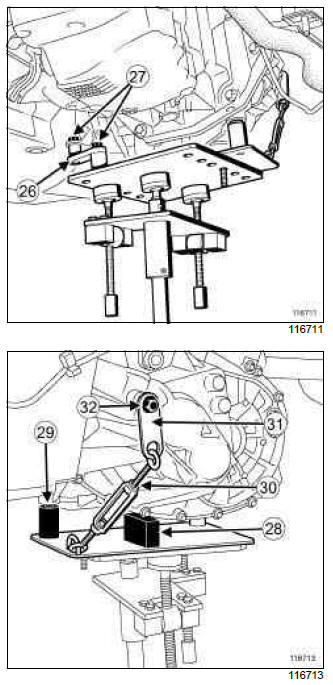
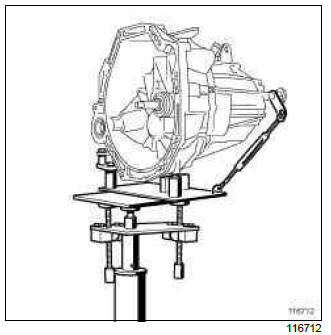
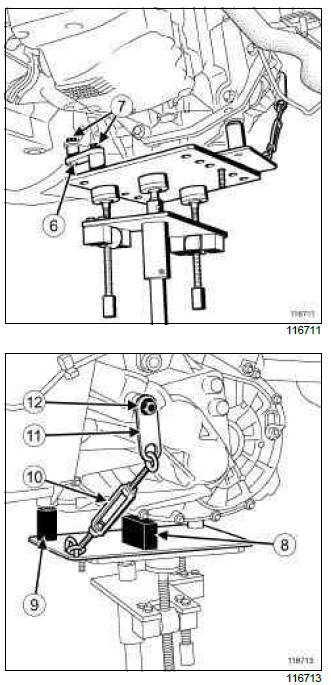
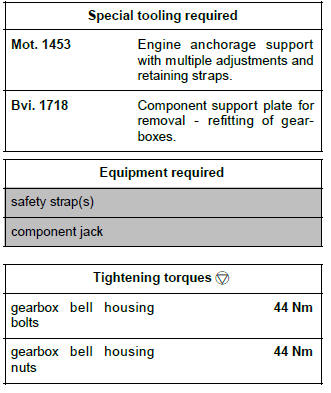
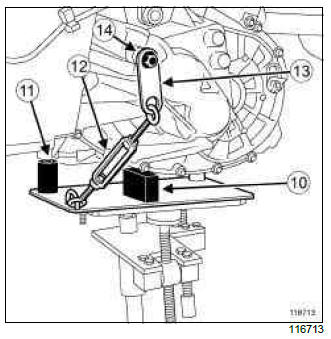
- Fit the (Bvi. 1718) on a component jack.
- Fit:
- the (Bvi. 1718) and the component jack under the gearbox,
- the bracket (26) using the nuts (27),
- the support (28),
- the pin (29),
- the rod (30) using the bracket (31) and the bolt (32).
- Tighten the rod (30) anti-clockwise in order to avoid tilting the gearbox.
- Remove the gearbox using the (Bvi. 1718).
REFITTING
I - REFITTING PREPARATION OPERATION
WARNING
To avoid damaging the clutch slave cylinder, do not coat the gearbox output shaft with grease.
WARNING
Do not grease the clutch shaft splines.
WARNING
To prevent leaks, replace the slave cylinder after replacing the clutch pressure plate.
WARNING
It is essential to replace the differential output lip seal each time the driveshafts are removed.

- Remove:
- the clutch hydraulic slave cylinder bolts (33),
- the clutch hydraulic slave cylinder (34).
- Check that the engine-gearbox centering ringsare in place and correctly positioned.
- Pre-fill the hydraulic slave cylinder using a syringe.
- Position the new clutch hydraulic slave cylinder.
- Refit the bolts for the clutch hydraulic slave cylinder.
- Replace the left and right-hand differential seals (see 21A, Manual gearbox, Differential output seal: Removal - Refitting, 21A-46).
Replacing the gearbox
Note: To fit the tool on the new gearbox, follow the same steps as for the removal operation.
- Fit the new gearbox on the (Bvi. 1718).
II - REFITTING OPERATION FOR PART CONCERNED
- Refit the gearbox using the (Bvi. 1718).
- Refit the gearbox studs.
- Fit without tightening:
- the gearbox bolts,
- the nuts on the studs.
- Remove the (Bvi. 1718).
- Tighten to torque:
- the nuts on the studs (44 Nm),
- the gearbox bolts (44 Nm).
III - FINAL OPERATION.
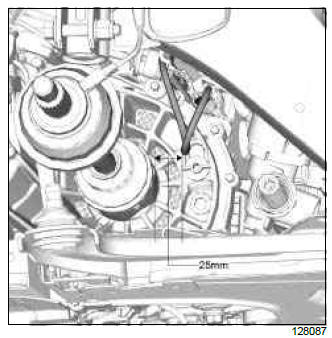
Note: If equipped with the 5thinjector.
After carrying out the operation, check that the dimension between the driveshaft and the hose for the 5thinjector is at least 25mm.
To avoid damaging the hose.
- Connect:
- the hydraulic slave cylinder,
- the reverse gear connector.
- Remove the hose clamp.
- Bleed the hydraulic clutch control (see Clutch circuit: Bleed) (MR 392, 37A, Mechanical component controls).
- Refit:
- the left-hand suspended engine mounting (see Left-hand suspended engine mounting: Removal - Refitting) (MR 392, 19D, Engine mounting),
- the (Mot. 1453),
- the safety strap(s).
- Clip the breather pipe from the gearbox on the engine.
- Fit:
- the computer supporting bracket,
- the wiring harness channel on the body.
- Refit:
- the wiring channel bolts on the body,
- the diesel injection computer (see Diesel injection computer: Removal - Refitting) (MR 392, 13B, Diesel injection),
- Connect the coolant temperature sensor.
- Refit:
- the engine speed and position sensor (see Crankshaft position sensor: Removal - Refitting) (MR 392, 13B, Diesel injection).
- the starter (see Starter: Removal - Refitting) (MR 392, 16A, Starting - Charging),
- the wiring harness channel mounting on the gearbox.
- Clip:
- the expansion bottle (see Expansion bottle: Removal - Refitting) (MR 392, 19A, Cooling).
- the gearbox control cable sleeve stops on the gearbox,
- the control cables onto the gearbox.
K9K, and 772
- Fit the diesel injector wiring harness strut.
- the diesel injector wiring harness strut bolt.
- Connect the diesel injector connector.
- Fit the exhaust strut.
- Fit without tightening the exhaust strut bolts and nut.
- Tighten to torque:
- the exhaust strut bolt on the gearbox (21 Nm),
- the exhaust strut nut on the gearbox (21 Nm),
- the exhaust strut bolt on the catalytic converter (21 Nm).
- Refit:
- the tie rod,
- the front axle subframe front left-hand bolt,
- the tie-rod bolt,
- the side stiffener,
- the side stiffener bolts,
- Tighten to torque:
- the front axle subframe front left-hand bolt (105 Nm),
- the tie-rod bolt (21 Nm),
- the side stiffener bolts (21 Nm).
Note: Refit the earth terminal, aligning the indelible marks on the gearbox casing.
When reassembling, improper positioning of the earth terminal on the gearbox casing could result in damage to the earth terminal or earth wiring.
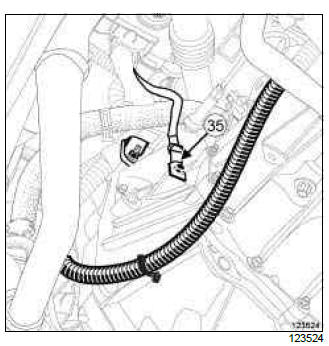
- The earth wiring must be refit as shown in the illustration.
- Refit the earth wiring bolt (35) to the manual gearbox.
- Tighten the earth wiring bolt (35) on the manual gearbox.
- Refit:
- the front axle subframe (see Front axle subframe: Removal - Refitting) (MR 392, 31A, Front axle components).
- the rear suspended engine mounting (see Lower engine tie-bar: Removal - Refitting) (MR 392, 19D, Engine mounting).,
- the radiator mounting cross member (see Radiator mounting cross member: Removal - Refitting) (MR 393, 41A, Front lower structure).
- Detach the " cooling radiator - fan unit " assembly from the upper cross member.
K9K, and 772
- Position the heating element and electric coolant pump mounting on the radiator mounting cross member.
- Refit:
- the bolt from the heating element and coolant pump support on the radiator mounting cross member.
- the earth wiring bolt,
- Connect the connector to the heating element unit.
- Refit:
- the front right-hand driveshaft (see 29A, Driveshafts, Front right-hand driveshaft: Removal - Refitting, 29A-9),
- the front left-hand driveshaft (see 29A, Driveshafts, Front left-hand driveshaft: Removal - Refitting, 29A-2).
- Top up the gearbox (see 21A, Manual gearbox, Manual gearbox oils: Draining - Filling, 21A-3).
- Refit:
- the front bumper (see Front bumper: Removal - Refitting) (MR 393, 55A, Exterior protection),
- the engine undertray,
- the front section of the front wheel arch liners (see Front wheel arch liner: Removal - Refitting) (MR 393, 55A, Exterior protection).
- the front wheels (see Wheel: Removal - Refitting) (MR 392, 35A, Wheels and tyres),
- the air filter unit (see Air filter unit: Removal - Refitting) (MR 392, 12A, Fuel mixture).
- the battery tray (see Battery tray: Removal - Refitting) (MR 392, 80A, Battery),
- the battery (see Battery: Removal - Refitting) (MR 392, 80A, Battery),
- the scoop under the scuttle panel grille (see Scoop under the scuttle panel grille: Removal - Refitting) (MR 393, 56A, Exterior equipment).
F4R, and 830, and TL4
REMOVAL
I - REMOVAL PREPARATION OPERATION
- Position the vehicle on a two-post lift (see Vehicle: Towing and lifting) (MR 392, 02A, Lifting equipment).
- Use the lifting eye on the gearbox side and its mounting bolts (see Lifting eyes: Removal - Refitting) (MR 392, 11A, Top and front of engine).
- Disconnect the battery (see Battery: Removal - Refitting) (MR 392, 80A, Battery).
- Unclip the breather pipe from the gearbox.
- Remove:
- the air filter unit (see Air filter unit: Removal - Refitting) (MR 392, 12A, Fuel mixture).
- the battery tray bracket (see Battery tray: Removal - Refitting) (MR 392, 80A, Battery),
- the front wheels (see Wheel: Removal - Refitting) (MR 392, 35A, Wheels and tyres),
- the front bumper (see Front bumper: Removal - Refitting) (MR 393, 55A, Exterior protection),
- Drain the gearbox.
- Remove the left-hand and right-hand driveshafts (see 29A, Driveshafts, Front right-hand driveshaft: Removal - Refitting, 29A-9).
- Strap the cooling unit in place.
- Remove:
- the radiator mounting cross member (see Radiator mounting cross member: Removal - Refitting) (MR 393, 41A, Front lower structure).
- the front axle sub-frame (see Front axle subframe: Removal - Refitting) (MR 392, 31A, Front axle components).
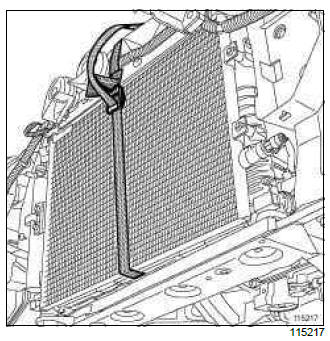
- Remove the earth strap mounting bolt (1).
- Unclip the gearbox controls (2).
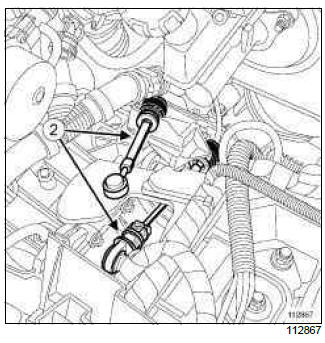
- Disconnect:
- the connector (3) from the reverse gear switch,
- the pipe (4) from the clutch slave cylinder by pushing on the clip (5).
- Fit the lifting eye on the gearbox side (see Lifting eyes: Removal - Refitting) (MR 392, 11A, Top and front of engine).
- Remove the scuttle panel grille (see Scuttle panel grille: Removal - Refitting) (MR 393, 56A, Exterior equipment).
- Fit the (Mot. 1453).
II - OPERATION FOR REMOVAL OF PART CONCERNED
- Remove the left-hand suspended engine mounting (see Left-hand suspended engine mounting: Removal - Refitting) (MR 392, 19D, Engine mounting).

- Remove:
- the starter mounting bolts,
- the gearbox bell housing mounting nuts,
- the gearbox bell housing mounting bolts, leaving one mounting bolt in place,
- the gearbox mounting studs.
- Fit the (Bvi. 1718) on a component jack.
- Fit:
- the (Bvi. 1718) and the component jack under the gearbox,
- the bracket (6) using mounting nuts (7),
- the support (8),
- the pin (9),
- the rod (10) using the bracket (11) and the mounting bolt (12).
- Tighten the rod (10) in an anti-clockwise direction to prevent the gearbox from tilting.
- Remove:
- the remaining gearbox bell housing mounting bolt,
- the gearbox using the (Bvi. 1718).
REFITTING
I - REFITTING PREPARATIONS OPERATION
WARNING
Do not grease the clutch shaft splines.
WARNING
To prevent leaks, replace the slave cylinder after replacing the clutch pressure plate.
WARNING
It is essential to replace the differential output lip seal each time the driveshafts are removed.
- Replace the left-hand and right-hand differential output seals (see 21A, Manual gearbox, Differential output seal: Removal - Refitting, 21A-46).
- Refit the gearbox mounting studs.
- Check the condition of the centring devices on the gearbox.
II - REFITTING OPERATION FOR PART CONCERNED
- Position the gearbox using the (Bvi. 1718).
- Refit one gearbox bell housing mounting bolt.
- Remove the (Bvi. 1718) from the gearbox.
- Refit:
- the gearbox bell housing mounting bolts,
- the gearbox bell housing mounting nuts,
- the starter mounting bolts.
- Torque tighten:
- the gearbox bell housing mounting bolts (44 Nm),
- the gearbox bell housing mounting nuts (44 Nm),
- the starter mounting bolts (40 Nm).
- Refit the left-hand suspended engine mounting (see Left-hand suspended engine mounting: Removal - Refitting) (MR 392, 19D, Engine mounting).
- Remove:
- the (Mot. 1453),
- the lifting eye on the gearbox side (see Lifting eyes: Removal - Refitting) (MR 392, 11A, Top and front of engine).
- Connect the clutch slave cylinder pipe.
- Refit the scuttle panel grille (see Scuttle panel grille: Removal - Refitting) (MR 393, 56A, Exterior equipment).
- Bleed the hydraulic clutch system (see Clutch circuit: Bleed) (MR 392, 37A, Mechanical component controls).
- Connect the reverse gear switch connector.
- Clip the gear controls into place.
- Refit the earth strap and its mounting bolt.
III - FINAL OPERATION.
- Refit:
- the front axle sub-frame (see Front axle subframe: Removal - Refitting) (MR 392, 31A, Front axle components).
- the radiator mounting cross member (see Radiator mounting cross member: Removal - Refitting) (MR 393, 41A, Front lower structure).
- Remove the retaining belt from the cooling unit.
- Refit:
- the front bumper (see Front bumper: Removal - Refitting) (MR 393, 55A, Exterior protection),
- the left-hand and right-hand driveshafts (see 29A, Driveshafts, Front right-hand driveshaft: Removal - Refitting, 29A-9),
- the front wheels (see Wheel: Removal - Refitting) (MR 392, 35A, Wheels and tyres),
- the battery tray bracket (see Battery tray: Removal - Refitting) (MR 392, 80A, Battery),
- the air filter unit (see Air filter unit: Removal - Refitting) (MR 392, 12A, Fuel mixture).
- Clip the breather pipe onto the gearbox.
- Fill the gearbox.
- Connect the battery (see Battery: Removal - Refitting) (MR 392, 80A, Battery).
M4R, and TL4
REMOVAL
I - REMOVAL PREPARATION OPERATION
- Position the vehicle on a two-post lift (see Vehicle: Towing and lifting) (MR 392, 02A, Lifting equipment).
- Remove the battery (see Battery: Removal - Refitting) (MR 392, 80A, Battery).
- Remove:
- the battery tray bracket (see Battery tray: Removal - Refitting) (MR 392, 80A, Battery),
- the air filter unit (see Air filter unit: Removal - Refitting) (MR 392, 12A, Fuel mixture).
- the front wheels (see Wheel: Removal - Refitting) (MR 392, 35A, Wheels and tyres),
- the front section of the front wheel arch liners (see Front wheel arch liner: Removal - Refitting) (MR 393, 55A, Exterior protection).
- the front bumper (see Front bumper: Removal - Refitting) (MR 393, 55A, Exterior protection),
- Drain the gearbox.
- Remove the left-hand and right-hand driveshafts (see 29A, Driveshafts, Front right-hand driveshaft: Removal - Refitting, 29A-9) and (see 29A, Driveshafts, Front left-hand driveshaft: Removal - Refitting, 29A-2).
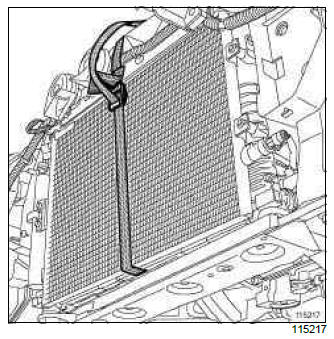
- Attach the cooling assembly using a safety strap(s).
- Remove:
- the radiator mounting cross member (see Radiator mounting cross member: Removal - Refitting) (MR 393, 41A, Front lower structure).
- the front axle sub-frame (see Front axle subframe: Removal - Refitting) (MR 392, 31A, Front axle components).
- Remove the earth wiring bolt (1).
- Unclip the gearbox controls (2).
- Remove the wiring harness channel bolts.
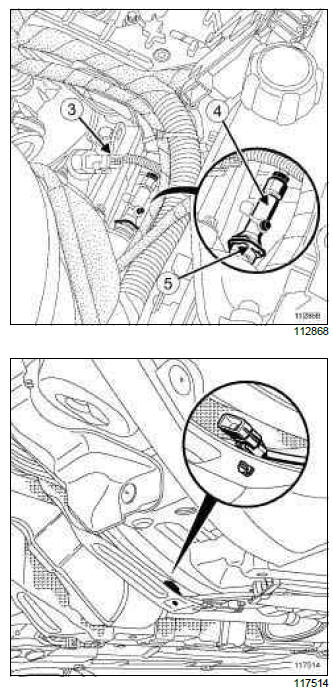
- Disconnect:
- the connector (3) from the reverse gear switch,
- the downstream oxygen sensor connector,
- the clutch control pipes (4) by pushing on the clip (5).
- Remove:
- the scuttle panel grille (see Scuttle panel grille: Removal - Refitting) (MR 393, 56A, Exterior equipment).
- the scoop under the scuttle panel grille (see Scoop under the scuttle panel grille: Removal - Refitting) (MR 393, 56A, Exterior equipment).
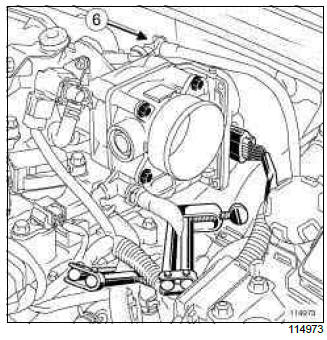
- Disconnect the union (6) from the brake servo pipe on the vacuum pump.
- Position the (Mot. 1453) (7).
WARNING
Do not deform the air conditioning pipes.
II - OPERATION FOR REMOVAL OF PART CONCERNED
- Remove the left-hand suspended engine mounting (see Left-hand suspended engine mounting: Removal - Refitting) (MR 392, 19D, Engine mounting).
- Remove:
- the starter bolts (see Starter: Removal - Refitting) (MR 392, 16A, Starting - Charging),
- the gearbox nuts,
- the gearbox bolts, leaving one bolt in place,
- the gearbox studs.
- Unclip the breather pipe from the gearbox.
- Fit the (Bvi. 1718) on a component jack.
- Fit:
- the (Bvi. 1718) and the component jack under the gearbox,
- the bracket (8) using the nuts (9),
- Tap the hole (14) using a self-tapping bolt (Part no.: 77 03 002 244) to attach the gearbox to the support using the rod (12).
- Fit:
- the shim (10),
- the shim (11),
- the rod (12) using the bracket (13) and the bolt (14).
- Tighten the rod (12) in an anti-clockwise direction to prevent the gearbox from tilting.
Note: Check that the pulleys on the accessories side are not pressing against the side member on the right-hand side of the vehicle when the engine and transmission assembly is being lowered.
- Remove:
- the gearbox bolt,
- the gearbox using the (Bvi. 1718).
REFITTING
I - REFITTING PREPARATIONS OPERATION
WARNING
Do not grease the clutch shaft splines.
WARNING
To prevent leaks, replace the slave cylinder after replacing the clutch pressure plate.
WARNING
It is essential to replace the differential output lip seal each time the driveshafts are removed.
- Replace the left-hand and right-hand differential output seals (see 21A, Manual gearbox, Differential output seal: Removal - Refitting, 21A-46).
- Refit the gearbox studs.
- Check the condition of the centring devices on the gearbox.
II - REFITTING OPERATION FOR PART CONCERNED
- Position the gearbox using the (Bvi. 1718).
- Refit a gearbox bell housing bolt,
- Remove the (Bvi. 1718) from the gearbox.
- Refit:
- the gearbox bell housing bolts,
- the gearbox bell housing nuts,
- the starter bolts (see Starter: Removal - Refitting) (MR 392, 16A, Starting - Charging),
- Torque tighten:
- the gearbox bell housing bolts (44 Nm),
- the gearbox bell housing nuts (44 Nm),
- Refit the left-hand suspended engine mounting (see Left-hand suspended engine mounting: Removal - Refitting) (MR 392, 19D, Engine mounting).
- Remove the (Mot. 1453).
- Refit the hose connected to the brake servo.
- Connect the clutch slave cylinder pipe.
- Refit:
- the scoop under the scuttle panel grille (see Scoop under the scuttle panel grille: Removal - Refitting) (MR 393, 56A, Exterior equipment).
- the scuttle panel grille (see Scuttle panel grille: Removal - Refitting) (MR 393, 56A, Exterior equipment).
- Bleed the hydraulic clutch system (see Clutch circuit: Bleed) (MR 392, 37A, Mechanical component controls).
- Connect the reverse gear switch connector.
- Clip the gear controls into place.
- Refit:
- the wiring harness channel bolt,
- the earth wiring fitted with its bolt.
- Reposition the downstream oxygen sensor connector.
III - FINAL OPERATION.
- Refit:
- the subframe (see 31A, Front axle component, Front axle subframe: Removal-Refitting),
- the radiator mounting cross member (see MR 393 Bodywork, 41A, Lower structure, Radiator mounting cross member: Removal - Refitting).
- Remove the safety strap(s) from the cooling unit.
- Refit:
- the front bumper (see Front bumper: Removal - Refitting) (MR 393, 55A, Exterior protection),
- the left-hand and right-hand driveshafts (see 29A, Driveshafts, Front right-hand driveshaft: Removal - Refitting, 29A-9),
- the front wheels (see Wheel: Removal - Refitting) (MR 392, 35A, Wheels and tyres),
- the air filter unit (see Air filter unit: Removal - Refitting) (MR 392, 12A, Fuel mixture).
- the battery tray bracket (see Battery tray: Removal - Refitting) (MR 392, 80A, Battery),
- Clip the breather pipe onto the gearbox.
- Top up the gearbox.
- Refit the battery (see Battery: Removal - Refitting) (MR 392, 80A, Battery).
K4M, and TL4
I - REMOVAL PREPARATION OPERATION
- Position the vehicle on a two-post lift (see Vehicle: Towing and lifting) (02A, Lifting equipment).
- Remove:
- the engine undertray bolts,
- the engine undertray,
- the front wheels (see Wheel: Removal - Refitting) (35A, Wheels and tyres),
- the front wheel arch liners (see Front wheel arch liner: Removal - Refitting) (55A, Exterior protection),
- the front bumper (see Front bumper: Removal - Refitting) (55A, Exterior protection),
- the windscreen wiper arms (see Windscreen wiper arm: Removal - Refitting) (85A, Wiping - Washing),
- the scuttle panel grille (see Scuttle panel grille: Removal - Refitting) (56A, Exterior equipment),
- the scoop under the scuttle panel grille (see Scoop under the scuttle panel grille: Removal - Refitting) (56A, Exterior equipment).
- Drain the gearbox (see 21A, Manual gearbox, Manual gearbox oils: Draining - Filling, 21A-3).
- Remove:
- the front right-hand driveshaft (see 29A, Driveshafts, Front right-hand driveshaft: Removal - Refitting, 29A-9),
- the front left-hand driveshaft (see 29A, Driveshafts, Front left-hand driveshaft: Removal - Refitting, 29A-2),
- the differential output seals (see 21A, Manual gearbox, Differential output seal: Removal - Refitting, 21A-46),
- the air resonator (see Air resonator: Removal - Refitting) (12A, Fuel mixture),
- the battery (see ) (80A, Battery),
- the battery tray (see Battery tray: Removal - Refitting) (80A, Battery),
- the air filter unit (see Air filter unit: Removal - Refitting) (12A, Fuel mixture),
- the radiator mounting cross member (see Radiator mounting cross member: Removal - Refitting) (41A, Front lower structure),
- the starter (see Starter: Removal - Refitting) (16A, Starting - Charging),
- the lower engine tie-bar (see Lower engine tie-bar: Removal - Refitting) (19D, Engine mounting),
- the left-hand suspended engine mounting (see Left-hand suspended engine mounting: Removal - Refitting) (19D, Engine mounting).

- Unclip:
- the gear control cables (1) from the selector ball joints using an open-jawed spanner,
- the gear control cables (2) from their support.
- Fit the tool (Ms. 583) between the brake fluid reservoir and the clutch master cylinder.
WARNING
Do not pull the clip. If it is incorrectly handled in any way, the pipe will need to be replaced.

- Disconnect:
- the hydraulic clutch control pipe by pressing on the clip (3),
- the connector (4) from the reverse gear switch,
- Insert the blanking plugs.
Note: Before removing the earth terminal, mark its position using a indelible pencil by drawing a line on the earth terminal and on the gearbox casing.
When reassembling, improper positioning of the earth terminal on the gearbox casing could result in damage to the earth terminal or earth wiring.
- Remove the earth wiring bolt (5).
- Remove the bolt (6) from the wiring harness channel on the gearbox.
- Disconnect the breather pipe (7) from the gearbox.
- Remove the crankshaft position sensor (see Crankshaft position sensor: Removal - Refitting).
- Loosen the front left-hand bolt (8) on the front axle subframe.
- Pivot the tie rod at (9).
II - OPERATION FOR REMOVAL OF PART CONCERNED
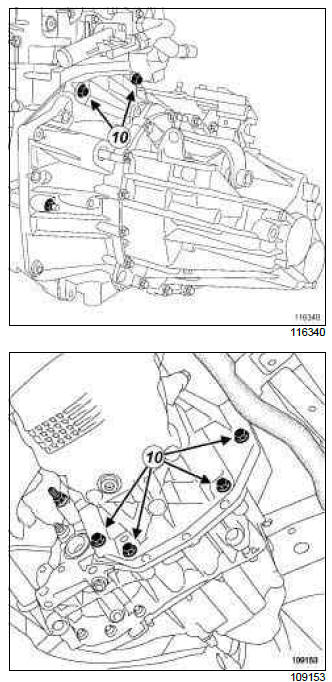
- Remove the bolts (10) from the gearbox.
- Fit the (Bvi. 1718) on a component jack.
- Position the tool (Bvi. 1718) and the component jack under the gearbox.
- Tighten the rod (11) anti-clockwise in order to avoid tilting the gearbox.
- Remove:
- the gearbox nuts,
- the gearbox using the tool (Bvi. 1718),
- the clutch thrust bearing (see 20A, Clutch, Clutch thrust bearing: Removal - Refitting, 20A- 11).
REFITTING
I - REFITTING PREPARATION OPERATION
- parts always to be replaced: Clutch thrust bearing.
WARNING
To avoid damaging the slave cylinder, do not coat the gearbox output shaft with grease.
WARNING
Do not grease the clutch shaft splines.
- Check that the centring dowelsare in place.
II - REFITTING OPERATION FOR PART CONCERNED
- Refit:
- a new clutch thrust bearing (see 20A, Clutch, Clutch thrust bearing: Removal - Refitting, 20A-11),
- the gearbox using the (Bvi. 1718).
- Remove the tool (Bvi. 1718).
- Tighten to torque:
- the gearbox nuts (44 N.m),
- the gearbox bolts (44 N.m).
III - FINAL OPERATION
- Fit the tie-rod.
- Refit the front left-hand bolt on the front axle subframe.
- Torque tighten the front left-hand bolt of the front axle sub-frame (105 N.m).
- Refit the crankshaft position sensor (see Crankshaft position sensor: Removal - Refitting).
- Connect the gearbox breather pipe.
- Refit the wiring channel bolt on the gearbox.
- Refit the earth cable respecting the marks made during removal.
- Refit the earth wiring bolt on the gearbox.
- Torque tighten the earth wiring bolt on the gearbox (24 N.m).
- Connect the reverse gear switch connector.
- Remove the blanking plugs.
- Connect the clutch slave cylinder.
- Remove the tool (Ms. 583).
- Clip:
- the gear control cables onto their support,
- the gear control cables onto the gear selector ball joints.
- Refit:
- the left-hand suspended engine mounting (see Left-hand suspended engine mounting: Removal - Refitting) (19D, Engine mounting),
- the lower engine tie-bar (see Lower engine tie-bar: Removal - Refitting) (19D, Engine mounting),
- the starter (see Starter: Removal - Refitting) (16A, Starting - Charging),
- the radiator mounting cross member (see Radiator mounting cross member: Removal - Refitting) (41A, Front lower structure),
- the air filter unit (see Air filter unit: Removal - Refitting) (12A, Fuel mixture),
- the battery tray (see Battery tray: Removal - Refitting) (80A, Battery),
- the battery (see ) (80A, Battery),
- the air resonator (see Air resonator: Removal - Refitting) (12A, Fuel mixture),
- the differential output seals (see 21A, Manual gearbox, Differential output seal: Removal - Refitting, 21A-46),
- the front left-hand driveshaft (see 29A, Driveshafts, Front left-hand driveshaft: Removal - Refitting, 29A-2),
- the front right-hand driveshaft (see 29A, Driveshafts, Front right-hand driveshaft: Removal - Refitting, 29A-9),
- the scoop under the scuttle panel grille (see Scoop under the scuttle panel grille: Removal - Refitting) (56A, Exterior equipment),
- the scuttle panel grille (see Scuttle panel grille: Removal - Refitting) (56A, Exterior equipment),
- the windscreen wiper arms (see Windscreen wiper arm: Removal - Refitting) (85A, Wiping - Washing),
- the front bumper (see Front bumper: Removal - Refitting) (55A, Exterior protection),
- the front wheel arch liners (see Front wheel arch liner: Removal - Refitting) (55A, Exterior protection),
- the front wheels (see Wheel: Removal - Refitting) (35A, Wheels and tyres).
- Perform the following operations:
- fill the gearbox (see 21A, Manual gearbox, Manual gearbox oils: Draining - Filling, 21A-3),
- bleed the clutch hydraulic clutch (see Clutch circuit: Bleed) (37A, Mechanical component controls).
- Refit the engine undertray.
READ NEXT:
 Input shaft lip seal: Removal - Refitting
JH3 or JR5
Replace the lip seal after opening the gearbox (see
Technical Note 3661A, gearbox JH - JR).
TL4
REMOVAL
I - REMOVAL PREPARATION OPERATION
Remove:
the gearbox (see 21A, Manual gearb
Differential output seal: Removal - Refitting
JH3 or JR5
REMOVAL
I - REMOVAL PREPARATION OPERATION
Position the vehicle on a two-post lift (see Vehicle:
Towing and lifting) (MR 392, 02A, Lifting equipment).
Disconnect the battery (see Batter
Reverse gear switch: Removal - Refitting
TL4
REMOVAL
I - REMOVAL PREPARATION OPERATION
Remove:
the battery (see Battery: Removal - Refitting)
(80A, Battery),
the battery tray (see Battery tray: Removal - Refitting)
(80A, Battery).
SEE MORE:
Driving
The Renault Clio IV (2014-2019) offers a satisfying driving experience with its nimble handling and responsive performance. Its compact size and maneuverability make it well-suited for urban driving and tight parking spaces. The precise steering and suspension tuning provide a balanced and confident
Your comfort
The Renault Clio IV (2014-2019) is designed with your comfort in mind. It features a well-crafted interior with quality materials and thoughtful ergonomics. The seats offer excellent support and adjustability, providing a comfortable driving experience. The cabin is designed to minimize noise and vi
