Renault Clio: Reverse gear switch: Removal - Refitting
Renault Clio III (2005-2013) Service Manual / Transmission / Manual Gearbox / Reverse gear switch: Removal - Refitting
TL4
REMOVAL
I - REMOVAL PREPARATION OPERATION
- Remove:
- the battery (see Battery: Removal - Refitting) (80A, Battery),
- the battery tray (see Battery tray: Removal - Refitting) (80A, Battery).
II - OPERATION FOR REMOVAL OF PART CONCERNED

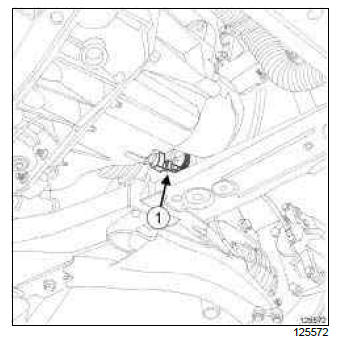
- Disconnect the connector (1) from the reverse gear switch.
- Remove the reverse gear switch using the socket for removing/refitting the reverse gear switch (Bvi.1934) (2).
REFITTING
I - REFITTING OPERATION FOR PART CONCERNED
- Refit the reverse gear switch.
- Tighten the reverse gear switch using the socket for removing/refitting the reverse gear switch (Bvi.1934).
- Connect the reverse gear switch connector.
II - FINAL OPERATION
- Refit:
- the battery tray (see Battery tray: Removal - Refitting) (80A, Battery),
- the battery (see Battery: Removal - Refitting) (80A, Battery).
JH3 or JR5
REMOVAL
I - REMOVAL PREPARATION OPERATION
- Position the vehicle on a two-post lift (see Vehicle: Towing and lifting) (02A, Lifting equipment).
- Remove the engine undertray.
II - OPERATION FOR REMOVAL OF PART CONCERNED
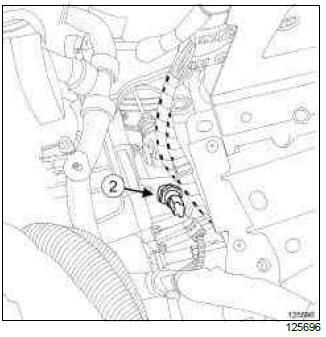
- Disconnect the connector (1) from the reverse gear switch.
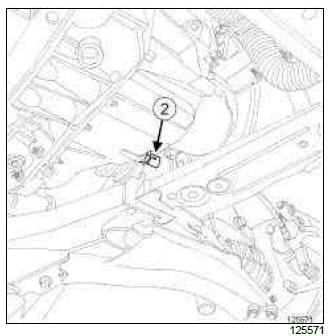
- Remove the reverse gear switch (2) using the (Bvi.1934).
Note: Seal the housing of the reverse gear switch while replacing the part.
REFITTING
I - REFITTING OPERATION FOR PART CONCERNED
- Apply some SILICONE ADHESIVE SEALANT (see Vehicle: Parts and consumables for the repair) (04B, Consumables - Products) to the threading of the reverse gear switch.
- Refit the reverse gear switch using the (Bvi. 1934).
- Torque tighten the reverse gear switch (23 N.m).
- Connect the reverse gear switch connector.
II - FINAL OPERATION
- Fill the gearbox (see 21A, Manual gearbox, Manual gearbox oils: Draining - Filling, 21A-3).
- Refit the engine undertray.
READ NEXT:
 Sequential gearbox: Precautions for the repair
D4F or K9K, and JA3 or JA5
I - SEQUENTIAL GEARBOX
WARNING
If any operation is carried out on the electro-hydraulic
unit, it is essential to clean the unit using a cleaning
product and compressed air.
Pump assembly reservoir: Removal - Refitting
K9K, and JA5
REMOVAL
I - REMOVAL PREPARATION OPERATION
IMPORTANT
Before any operation on the sequential system,
discharge the accumulator using the Diagnostic
tool.
To discharge the accumulator, ru
SEE MORE:
Driving
The Renault Clio IV (2014-2019) offers a satisfying driving experience with its nimble handling and responsive performance. Its compact size and maneuverability make it well-suited for urban driving and tight parking spaces. The precise steering and suspension tuning provide a balanced and confident
Your comfort
The Renault Clio IV (2014-2019) is designed with your comfort in mind. It features a well-crafted interior with quality materials and thoughtful ergonomics. The seats offer excellent support and adjustability, providing a comfortable driving experience. The cabin is designed to minimize noise and vi
© 2016-2026 Copyright Renault Clio Owners Club - 0.0036
