Renault Clio: Rear right-hand side door wiring: Removal - Refitting
B85 or K85
IMPORTANT
Consult the safety and cleanliness advice and operation recommendations before carrying out any repair (see 88A, Wiring harness, Wiring: Precautions for the repair, 88A-5).
REMOVAL
I - REMOVAL PREPARATION OPERATION
- Raise the window fully.
- Switch off the ignition.
- Disconnect the battery (see 80A, Battery, Battery: Removal - Refitting, 80A-1).
WARNING
To prevent damaging the connectors, consult the disconnection procedure (see Connector: Disconnection and reconnection) (Technical Note 6015A, 88A, Wiring).
- Remove:
- the rear side door trim (see Rear side door trim: Removal - Refitting) (MR 393, 72A, Side opening element trim),
- the rear speaker (see 86A, Radio, Rear speakers: Removal - Refitting, 86A-15).
- the door sealing film (see Door sealing film: Removal - Refitting) (MR 393, 65A, Opening element sealing),
- the rear side door lock (see Rear side door lock: Removal - Refitting) (MR 393, 51A, Side opening element mechanisms).
II - OPERATION FOR REMOVAL OF PART CONCERNED
WARNING
To prevent any risk of noise, premature wear, short circuits, etc. after the refitting operation, mark the wiring routing and how to connect the connectors.
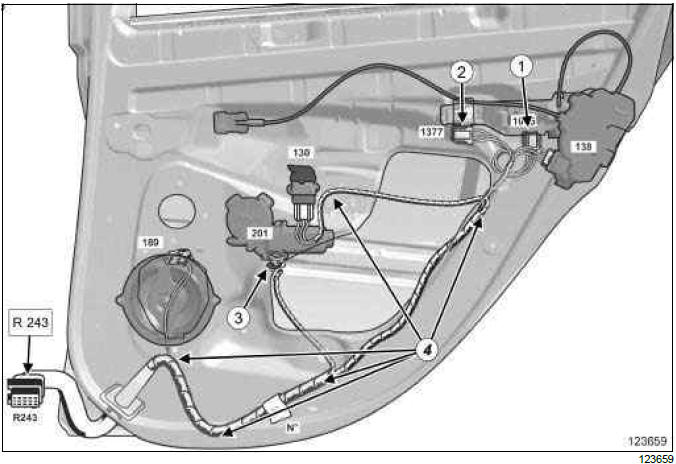
- Disconnect R 243 connector which connects the rear left-hand wiring/right-hand rear door.
VEHICLE WITH CARD
- Disconnect:
- the presence detector connector (1),
- the opening aerial connector (2).
ELECTRIC REAR WINDOW
- Disconnect the (3) rear side door electric window winder mechanism connector.
- Unclip the rear side door wiring at (4).
- Remove the rear side door wiring.
WARNING
To prevent any damage during the removal operation, check that the wiring is free from its mountings (retaining clip, plastic clip, adhesive tape, connector, etc.).
REFITTING
I - REFITTING PREPARATION OPERATION
- If replacing with more wiring, lock the unused connectors (see Connector: Sealing and immobilisation) (Technical Note 6015A, 88A, Wiring).
II - REFITTING OPERATION FOR PART CONCERNED
- Refit the rear side door wiring.
- Clip the rear side door wiring into place (4).
ELECTRIC REAR WINDOW
- Connect the rear side door electric window mechanism connector.
VEHICLE WITH CARD
- Connect:
- the opening aerial connector,
- the presence detector connector.
- Connect the R 243 connector to connect the rear left-hand wiring / right-hand rear door wiring.
III - FINAL OPERATION.
- Refit:
- the rear side door lock (see Rear side door lock: Removal - Refitting) (MR 393, 51A, Side opening element mechanisms),
- the door sealing film (see Door sealing film: Removal - Refitting) (MR 393, 65A, Opening element sealing),
- the rear speaker (see 86A, Radio, Rear speakers: Removal - Refitting, 86A-15).
- the rear side door trim (see Rear side door trim: Removal - Refitting) (MR 393, 72A, Side opening element trim).
- Connect the battery (see 80A, Battery, Battery: Removal - Refitting, 80A-1).
READ NEXT:
 Rear left-hand side door wiring: Removal - Refitting
B85 or K85
IMPORTANT
Consult the safety and cleanliness advice and operation
recommendations before carrying out any
repair (see 88A, Wiring harness, Wiring: Precautions
for the repair, 88A-5).
REMOVA
Rear wiring: Connector access
I - LOCATION OF CONNECTORS
R 374 connectors (left-hand rear wiring/front wiring
connection).
B85 or K85
R 2 connector (left-hand rear wiring/dashboard wiring
connection).
R 13 connector (lef
Rear wiring: Removal - Refitting
B85 or K85
IMPORTANT
Consult the safety and cleanliness advice and operation
recommendations before carrying out any
repair (see 88A, Wiring harness, Wiring: Precautions
for the repair, 88A-5).
IMPOR
SEE MORE:
Intercooler: Removal - Refitting
K9K - D4F, and 784 or 786
Note:
Vehicles equipped with the K9K*768 engine may or
may not be equipped with an intercooler.
REMOVAL
I - REMOVAL PREPARATION OPERATION
Position the vehicle on a two-post lift (see Vehicle:
Towing and lifting) (02A, Lifting equipment).
Remove:
the front wheel arch
Fuel circuit: Operating diagram
D4F or F4R or K4J or K4M
Operating diagram of the petrol supply circuit ( " pump - sender - fuel
filter " assembly).
The fuel system does not have a return.
The fuel pressure does not vary with engine load.
The circuit comprises:
a rail (1) without a return pipe union and without a
supply pre
