Renault Clio: Sequential gearbox: Precautions for the repair
D4F or K9K, and JA3 or JA5

I - SEQUENTIAL GEARBOX
WARNING
If any operation is carried out on the electro-hydraulic unit, it is essential to clean the unit using a cleaning product and compressed air.
Never leave the circuit open and never use a high pressure cleaner.
II - SEQUENTIAL GEARBOX COMPUTER
To disconnect the computer, switch off the ignition and wait for 1 minute.
III - ELECTRO-HYDRAULIC UNIT
Discharge the pressure accumulator using the Diagnostic tool before any operation on the electro-hydraulic unit.
Pressure accumulator: Removal - Refitting
K9K, and JA5
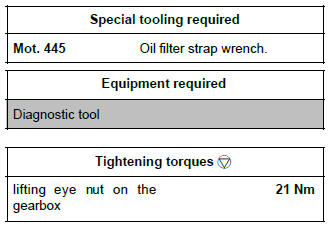
REMOVAL
I - REMOVAL PREPARATION OPERATION
IMPORTANT
Before any operation on the sequential system, discharge the accumulator using the Diagnostic tool.
- To discharge the accumulator, run command
" Discharge pressure accumulator " AC081.
To confirm the pressure drop, read the " Hydraulic pressure " parameter for the resulting value.
If there is still pressure in the accumulator, re-run the " Discharge pressure accumulator " command until the pressure is negligible and will not pose a risk when the high pressure pipes are removed.
The pressure reading must be close to zero.
- Remove:
- the battery (see Battery: Removal - Refitting) (MR 392, 80A, Battery),
- the battery tray (see Battery tray: Removal - Refitting) (MR 392, 80A, Battery),
- the air filter unit (see Air filter unit: Removal - Refitting) (MR 392, 12A, Fuel mixture).
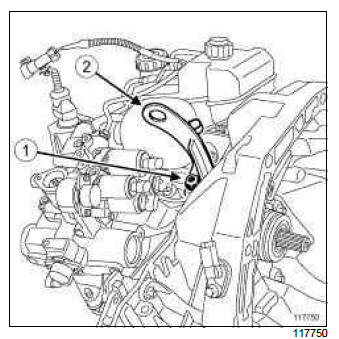
- Remove:
- the lifting eye nut on the gearbox (1),
- the lifting eye on the gearbox (2).
II - OPERATION FOR REMOVAL OF PART CONCERNED
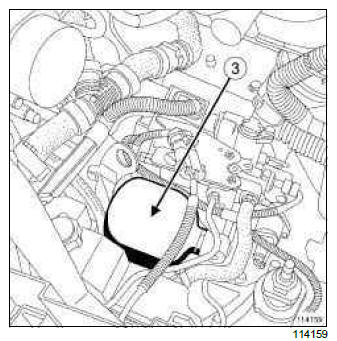
- Remove the pressure accumulator (3) using the (Mot. 445).
REFITTING
I - REFITTING OPERATION FOR PART CONCERNED
- Fit the pressure accumulator.
- Tighten the pressure accumulator using the (Mot.445).
- Affix the safety label to the pressure accumulator.
- Refit:
- the lifting eye on the gearbox,
- the lifting eye nut on the gearbox.
- Tighten to torque the lifting eye nut on the gearbox (21 Nm).
- Refit:
- the air filter unit (see Air filter unit: Removal - Refitting) (MR 392, 12A, Fuel mixture).
- the battery tray (see Battery tray: Removal - Refitting) (MR 392, 80A, Battery),
- the battery (see Battery: Removal - Refitting) (MR 392, 80A, Battery),
II - FINAL OPERATION.
- Carry out the necessary programming (see Fault finding - Replacement of components) (MR 394, 21B, Sequential gearbox).
WARNING
After the accumulator has been fully filled (15 seconds after the ignition has been switched on): the oil is at the MIN mark.
D4F, and JA3
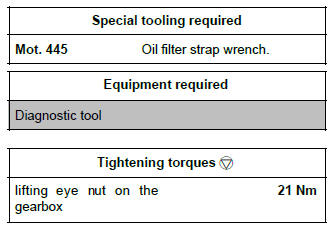
REMOVAL
I - REMOVAL PREPARATION OPERATION
IMPORTANT
Before any operation on the sequential system, discharge the accumulator using the Diagnostic tool.
- To discharge the accumulator, run command
" Discharge pressure accumulator " AC081.
To confirm the pressure drop, read the " Hydraulic pressure " parameter for the resulting value.
If there is still pressure in the accumulator, re-run the " Discharge pressure accumulator " command until the pressure is negligible and will not pose a risk when the high pressure pipes are removed.
The pressure reading must be close to zero.
- Remove:
- the battery (see Battery: Removal - Refitting) (MR 392, 80A, Battery),
- the battery tray (see Battery tray: Removal - Refitting) (MR 392, 80A, Battery),
- the air filter unit (see Air filter unit: Removal - Refitting) (MR 392, 12A, Fuel mixture).
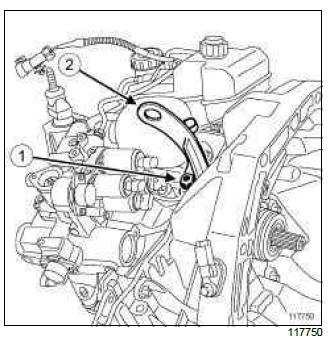
- Remove:
- the lifting eye nut on the gearbox (1),
- the lifting eye on the gearbox (2).
II - OPERATION FOR REMOVAL OF PART CONCERNED
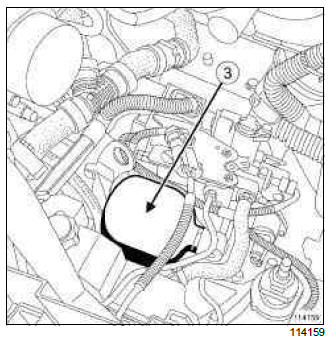
- Remove the pressure accumulator (3) using the (Mot. 445).
REFITTING
I - REFITTING OPERATION FOR PART CONCERNED
- Fit the pressure accumulator.
- Tighten the pressure accumulator using the (Mot.445).
- Affix the safety label to the pressure accumulator.
- Refit:
- the lifting eye on the gearbox,
- the lifting eye nut on the gearbox.
- Tighten to torque the lifting eye nut on the gearbox (21 Nm).
- Refit:
- the air filter unit (see Air filter unit: Removal - Refitting) (MR 392, 12A, Fuel mixture),
- the battery tray (see Battery tray: Removal - Refitting) (MR 392, 80A, Battery),
- the battery (see Battery: Removal - Refitting) (MR 392, 80A, Battery).
II - FINAL OPERATION.
- Carry out the necessary programming (see Fault finding - Replacement of components) (MR 394, 21B, Sequential gearbox).
WARNING
After the accumulator has been fully filled (15 seconds after the ignition has been switched on): the oil is at the MIN mark.

