Renault Clio: Solenoid valve assembly pressure sensor: Removal - Refitting
K9K, and JA5

REMOVAL
REMOVAL PREPARATION OPERATION
IMPORTANT
Before any operation on the sequential system, discharge the accumulator using the Diagnostic tool.
- To discharge the accumulator, run command
" Discharge pressure accumulator " AC081.
To confirm the pressure drop, read the " Hydraulic pressure " parameter for the resulting value.
If there is still pressure in the accumulator, re-run the " Discharge pressure accumulator " command until the pressure is negligible and will not pose a risk when the high pressure pipes are removed.
The pressure reading must be close to zero.
- Position the vehicle on a two-post lift (see Vehicle: Towing and lifting) (MR 392, 02A, Lifting equipment).
- Remove:
- the battery (see Battery: Removal - Refitting) (MR 392, 80A, Battery),
- the battery tray (see Battery tray: Removal - Refitting) (MR 392, 80A, Battery),
- the air filter unit (see Air filter unit: Removal - Refitting) (MR 392, 12A, Fuel mixture).
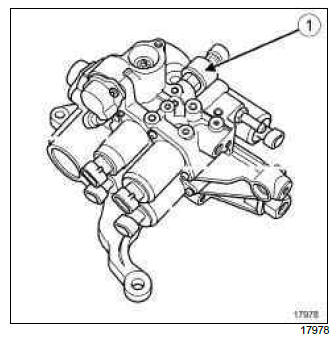
- Disconnect the solenoid valve unit pressure sensor connector (1).
- Remove the pressure sensor from the solenoid valve unit (1) using a long socket.
REFITTING
I - REFITTING OPERATION FOR PART CONCERNED
- Fit the solenoid valve unit pressure sensor.
- Finger tighten the solenoid valve unit pressure sensor.
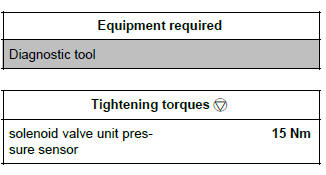
- Torque tighten the solenoid valve unit pressure sensor (15 Nm)
- Connect the solenoid valve unit pressure sensor connector.
II - FINAL OPERATION.
- Refit:
- the air filter unit (see Air filter unit: Removal - Refitting) (MR 392, 12A, Fuel mixture),
- the battery tray (see Battery tray: Removal - Refitting) (MR 392, 80A, Battery),
- the battery (see Battery: Removal - Refitting) (MR 392, 80A, Battery).
- Carry out the necessary programming (see Fault finding - Replacement of components (MR 394, 21B, Sequential gearbox).
WARNING
After the accumulator has been fully filled (15 seconds after the ignition has been switched on): the oil is at the MIN mark.
D4F, and JA3
REMOVAL
REMOVAL PREPARATION OPERATION
IMPORTANT
Before any operation on the sequential system, discharge the accumulator using the Diagnostic tool.
- To discharge the accumulator, run command
" Discharge pressure accumulator " AC081.
To confirm the pressure drop, read the " Hydraulic pressure " parameter for the resulting value.
If there is still pressure in the accumulator, re-run the " Discharge pressure accumulator " command until the pressure is negligible and will not pose a risk when the high pressure pipes are removed.
The pressure reading must be close to zero.
- Position the vehicle on a two-post lift (see Vehicle: Towing and lifting) (MR 392, 02A, Lifting equipment).
- Remove:
- the battery (see Battery: Removal - Refitting) (MR 392, 80A, Battery),
- the battery tray (see Battery tray: Removal - Refitting) (MR 392, 80A, Battery).

- Disconnect the solenoid valve unit pressure sensor connector (1).
- Remove the pressure sensor from the solenoid valve unit (1) using a long socket.
REFITTING
I - REFITTING OPERATION FOR PART CONCERNED
- Fit the solenoid valve unit pressure sensor.
- Finger tighten the solenoid valve unit pressure sensor.
- Torque tighten the solenoid valve unit pressure sensor (15 Nm)
- Connect the solenoid valve unit pressure sensor connector.
II - FINAL OPERATION.
- Refit:
- the battery tray (see Battery tray: Removal - Refitting) (MR 392, 80A, Battery),
- the battery (see Battery: Removal - Refitting) (MR 392, 80A, Battery).
- Carry out the necessary programming (see Fault finding - Replacement of components (MR 394, 21B, Sequential gearbox).
WARNING
After the accumulator has been fully filled (15 seconds after the ignition has been switched on): the oil is at the MIN mark.
READ NEXT:
 Sequential gearbox engine speed sensor: Removal - Refitting
D4F, and JA3
REMOVAL
I - REMOVAL PREPARATION OPERATION
IMPORTANT
Before any operation on the sequential system,
discharge the accumulator using the Diagnostic
tool.
To discharge the accumulator, ru
Sequential gearbox: Removal - Refitting
K9K, and JA5
REMOVAL
I - REMOVAL PREPARATION OPERATION
IMPORTANT
Before any operation on the sequential system,
discharge the accumulator using the Diagnostic
tool.
To discharge the accumulator, ru
Sequential gearbox converter: Removal - Refitting
K9K, and JA5
REMOVAL
I - REMOVAL PREPARATION OPERATION
Position the vehicle on a two-post lift (see Vehicle:
Towing and lifting) (MR 392, 02A, Lifting equipment).
Disconnect the battery (see Batte
SEE MORE:
Driving
The Renault Clio IV (2014-2019) offers a satisfying driving experience with its nimble handling and responsive performance. Its compact size and maneuverability make it well-suited for urban driving and tight parking spaces. The precise steering and suspension tuning provide a balanced and confident
Your comfort
The Renault Clio IV (2014-2019) is designed with your comfort in mind. It features a well-crafted interior with quality materials and thoughtful ergonomics. The seats offer excellent support and adjustability, providing a comfortable driving experience. The cabin is designed to minimize noise and vi
