Renault Clio: Solenoid valves: Removal - Refitting
K9K, and JA5
REMOVAL
I - REMOVAL PREPARATION OPERATION
Note: Before removing the solenoid valves, always mark their respective connectors in order not to mix them up.
IMPORTANT
Before any operation on the sequential system, discharge the accumulator using the Diagnostic tool.
- To discharge the accumulator, run command
" Discharge pressure accumulator " AC081.
To confirm the pressure drop, read the " Hydraulic pressure " parameter for the resulting value.
If there is still pressure in the accumulator, re-run the " Discharge pressure accumulator " command until the pressure is negligible and will not pose a risk when the high pressure pipes are removed.
The pressure reading must be close to zero.
- Position the vehicle on a two-post lift (see Vehicle: Towing and lifting) (MR 392, 02A, Lifting equipment).
- Remove the actuator module (see 21B, Sequential gearbox, Actuator module: Removal - Refitting, 21B-34).
II - OPERATION FOR REMOVAL OF PART CONCERNED
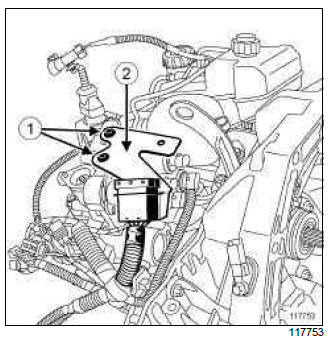
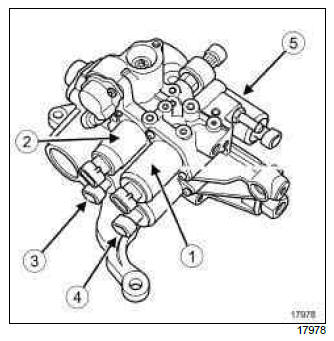
- Remove:
- the bracket bolts on the actuator module (1),
- the actuator module bracket (2).
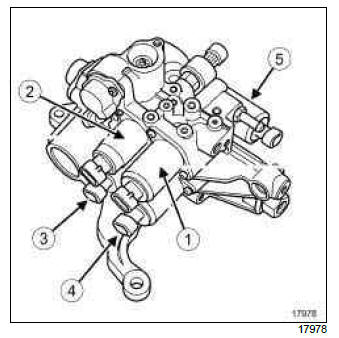
- Remove the solenoid valve affected, following the
correct removal order for the solenoid valves:
- Clutch solenoid valve
- Selection solenoid valve 4
- Selection solenoid valve 3
- Engagement solenoid valve 1
Note: Remove engagement solenoid valve 2 (5) independently of the other solenoid valves.
REFITTING
I - REFITTING PREPARATION OPERATION
- Refit the actuator module (see 21B, Sequential gearbox, Actuator module: Removal - Refitting, 21B-34).
II - REFITTING OPERATION FOR PART CONCERNED
- Refit:
- the solenoid valve affected,
- the bolts from the solenoid valve,
- the actuator module bracket.
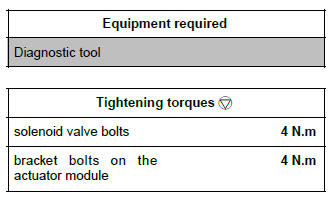
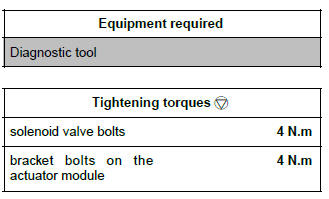
- Tighten to torque:
- the solenoid valve bolts (4 N.m),
- the bracket bolts on the actuator module (4 N.m).
III - FINAL OPERATION
- Perform the following operations:
- bleed the clutch circuit (see 21B, Sequential gearbox, Sequential gearbox: Bleeding, 21B- 84)
- the necessary programming (see Fault finding - Replacement of components (MR 394, 21B, Sequential gearbox).
WARNING
After the accumulator has been fully filled (15 seconds after the ignition has been switched on): the oil is at the MIN mark.
D4F, and JA3
REMOVAL
I - REMOVAL PREPARATION OPERATION
Note: Before removing the solenoid valves, always mark their respective connectors in order not to mix them up.
IMPORTANT Before any operation on the sequential system, discharge the accumulator using the Diagnostic tool.
- To discharge the accumulator, run command
" Discharge pressure accumulator " AC081.
To confirm the pressure drop, read the " Hydraulic pressure " parameter for the resulting value.
If there is still pressure in the accumulator, re-run the " Discharge pressure accumulator " command until the pressure is negligible and will not pose a risk when the high pressure pipes are removed.
The pressure reading must be close to zero.
- Position the vehicle on a two-post lift (see Vehicle: Towing and lifting) (MR 392, 02A, Lifting equipment).
- Remove the actuator module (see 21B, Sequential gearbox, Actuator module: Removal - Refitting, 21B-34).
II - OPERATION FOR REMOVAL OF PART CONCERNED

- Remove:
- the bracket bolts on the actuator module (1),
- the actuator module bracket (2).
- Remove the solenoid valve affected, following the
correct removal order for the solenoid valves:
- Clutch solenoid valve
- Selection solenoid valve 4
- Selection solenoid valve 3
- Engagement solenoid valve 1
Note: Remove engagement solenoid valve 2 (5) independently of the other solenoid valves.
REFITTING
I - REFITTING PREPARATION OPERATION
- Refit the actuator module (see 21B, Sequential gearbox, Actuator module: Removal - Refitting, 21B-34).
II - REFITTING OPERATION FOR PART CONCERNED
- Refit:
- the solenoid valve affected,
- the bolts from the solenoid valve,
- the actuator module bracket.
- Tighten to torque:
- the solenoid valve bolts (4 N.m),
- the bracket bolts on the actuator module (4 N.m).
III - FINAL OPERATION
- Perform the following operations:
- bleed the clutch circuit (see 21B, Sequential gearbox, Sequential gearbox: Bleeding, 21B- 84)
- the necessary programming (see Fault finding - Replacement of components (MR 394, 21B, Sequential gearbox).
WARNING
After the accumulator has been fully filled (15 seconds after the ignition has been switched on): the oil is at the MIN mark.
READ NEXT:
 Engagement sensor: Removal - Refitting
K9K, and JA5
REMOVAL
I - REMOVAL PREPARATION OPERATION
Position the vehicle on a two-post lift (see Vehicle:
Towing and lifting) (MR 392, 02A, Lifting equipment).
Disconnect the battery (see Batt
Actuator module: Removal - Refitting
K9K, and JA5
(1) Clutch solenoid valve
(2) Gear engagement solenoid
valve
(18) Gear engagement solenoid
valve
(4) Selection solenoid valve
(5) Engagement sensor
(20) Gear selection sensor
(7) Solen
Gear selection sensor: Removal - Refitting
K9K, and JA5
REMOVAL
I - REMOVAL PREPARATION OPERATION
WARNING
To remove the gear selection sensor it is essential
that you shift to first gear before removal.
Remove:
the battery (see Battery: R
SEE MORE:
Driving
The Renault Clio IV (2014-2019) offers a satisfying driving experience with its nimble handling and responsive performance. Its compact size and maneuverability make it well-suited for urban driving and tight parking spaces. The precise steering and suspension tuning provide a balanced and confident
Your comfort
The Renault Clio IV (2014-2019) is designed with your comfort in mind. It features a well-crafted interior with quality materials and thoughtful ergonomics. The seats offer excellent support and adjustability, providing a comfortable driving experience. The cabin is designed to minimize noise and vi
